
ON THIS PAGE:
What Is Concrete Formwork?
Concrete formwork is the temporary mold that contains wet concrete until it hardens and gains enough strength to support itself. For a slab, the form is the perimeter board that defines the edge — it holds the concrete in place while the surface is floated, finished, and cured. For a wall, the form is a two-sided panel system that shapes both faces of the concrete and resists the lateral pressure of the wet material pushing against it. In both cases, the form is removed once the concrete has cured.
Formwork is one of the most labor-intensive parts of concrete work — often costing more in time and materials than the concrete itself. A well-built form produces a slab with clean, straight edges and a wall with a smooth, plumb surface. A poorly built form produces bulges, honeycombing, edge failure, and in the worst case, a blowout that destroys the pour and wastes the concrete. The difference between the two outcomes is preparation, correct materials, and attention to bracing.
What Formwork Does
Concrete in its plastic state behaves like a very heavy fluid. It exerts lateral pressure against anything that contains it — a slab edge form, a wall panel, a column mold. The form must be strong enough to resist that pressure without deflecting, strong enough to carry its own weight plus the weight of the wet concrete, and accurate enough to produce the dimensions and surface quality the project requires. Beyond containment, formwork also defines the finished geometry of the concrete: the edge location, the wall thickness, the floor-to-floor height, and the surface texture of every face that touches the form.
What Goes Wrong When Formwork Fails
The consequences of formwork failure range from cosmetic to structural. A bulged wall form produces a concrete surface that is no longer plumb — the wall bows outward, and correcting it may require grinding, patching, or in severe cases, demolition. A slab edge form that moves during the pour produces a wavy, uneven edge that cannot be fixed after the concrete hardens. The most serious failure is a blowout — where the form breaks open entirely and wet concrete spills out. A blowout wastes the entire pour in that area, creates a cleanup and re-pour cost that often exceeds the original concrete order, and can damage surrounding work, tools, and safety. Understanding the forces involved and building forms that can handle them is the single most important skill in concrete flatwork and wall construction.
Formwork Materials Compared
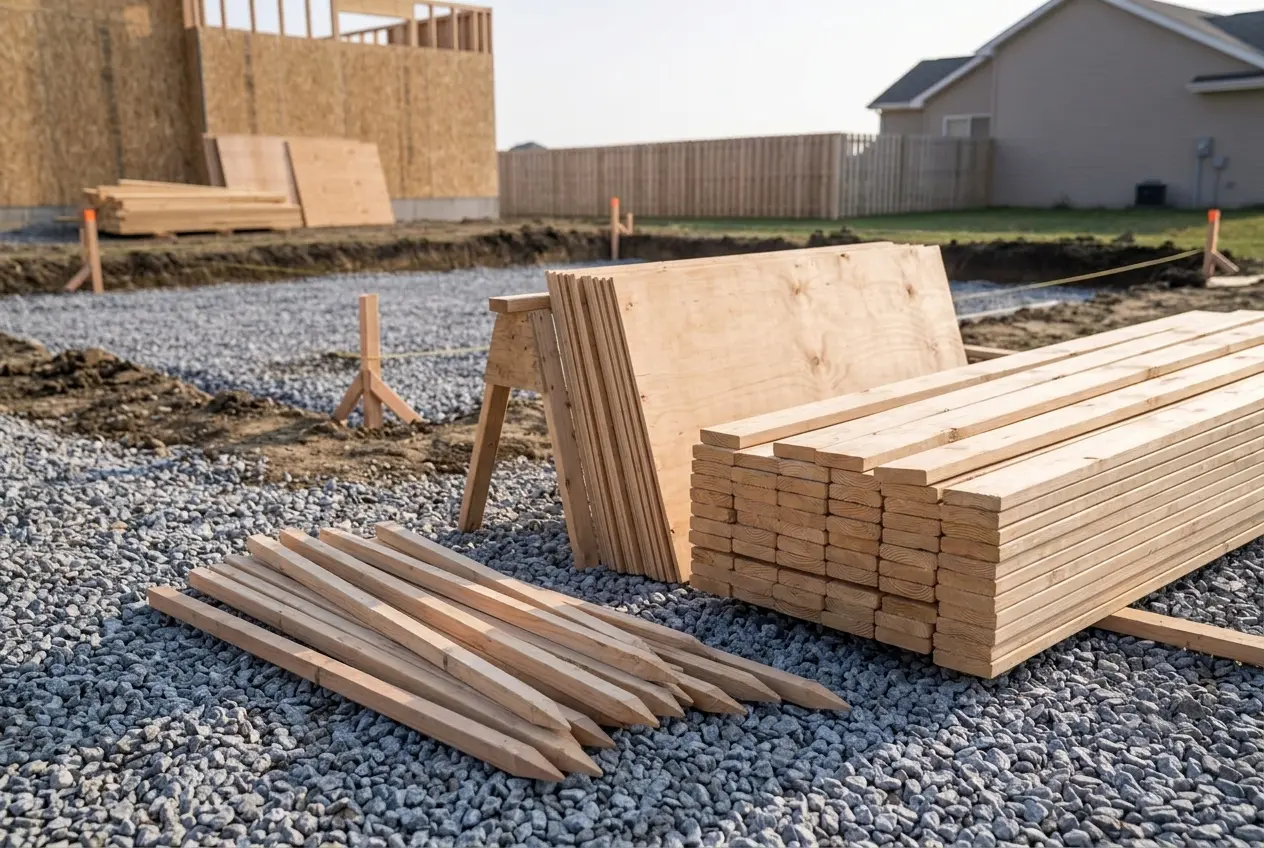
Formwork can be built from dimensional lumber, plywood panels, or purpose-made modular form systems. Each material has a different cost profile, reuse life, and set of situations where it performs best. The table below compares the three most common formwork materials for residential and light commercial concrete work.
Material Comparison Table
| Material | Cost per SF | Reuse Cycles | Best For | Limitations |
|---|---|---|---|---|
| Dimensional lumber (2×4, 2×6, 2×8) | $0.10–$0.30 | 5–10 pours | Slab edge forms, small wall forms, bracing | Warping, moisture absorption, limited span capacity |
| Plywood (3/4" BC or B-C exterior) | $0.50–$1.20 | 3–5 pours | Wall forms, large slab edges, column forms | Face veneer degrades, edges swell when wet |
| Modular aluminum/steel forms | Rental: $2–$5/day | 50+ pours | Large wall pours, repeated projects, commercial work | High upfront cost, requires experienced crew |
| Insulated Concrete Forms (ICF) | $15–$25/sf | Permanent (stays in place) | Foundation walls, residential construction | Not suitable for slabs or temporary forms |
When to Use Each Material
Dimensional lumber is the default for residential slab work. A 2×6 or 2×8 board staked along the perimeter of a patio, driveway, or garage slab is the standard form — it is inexpensive, easy to cut and install, and reusable for multiple pours. Lumber also serves as the bracing and waling for plywood wall forms. The main weakness is dimensional accuracy: lumber warps when wet and bows under sustained pressure, so it must be braced and re-checked before each pour.
Plywood is the standard for wall forms and for any form that needs a smooth, flat concrete surface. A 3/4-inch plywood panel supported on 2×4 studs at 16 inches on center forms a wall face that is far more stable than individual boards. BC and B-C exterior-grade plywood are rated for concrete formwork — the B face is the concrete-contact surface, smooth and free of major defects. CDX plywood, while cheaper, has a rougher C face that transfers its texture to the concrete and is more prone to moisture damage at the edges.
Modular form systems — aluminum panels, steel frames, or proprietary systems like those from Dayton Superior, Leviat, or Atlas — are designed for repeated use on commercial and large residential projects. They erect faster than lumber and plywood, produce a consistently smooth concrete surface, and can be configured for a wide range of wall heights and thicknesses. The tradeoff is cost: a small crew doing one or two residential pours per year cannot justify the purchase price, though rental options exist for larger projects.
Choosing Lumber by Slab Thickness
The thickness of the slab or wall being formed determines the height of the form — and that height determines what lumber is adequate. The table below matches common residential slab and wall thicknesses to the recommended form lumber, stud spacing, and maximum safe pour rate.
Lumber Selection Reference
| Slab / Wall Thickness | Form Lumber | Stud Spacing | Max Pour Rate | Notes |
|---|---|---|---|---|
| 2"–4" (sidewalk, patio, shed pad) | 2×4 or 2×6 | 24" o.c. | Unrestricted (flat pour) | Single board edge form; stakes at 4–6 ft |
| 4"–6" (residential driveway, garage slab) | 2×6 or 2×8 | 24" o.c. | Unrestricted (flat pour) | Doubled 2×6 for heights above 6"; brace every stake |
| 6"–8" (heavy driveway, workshop slab) | 2×8 or 2×10 | 24" o.c. | Unrestricted (flat pour) | Double 2×8 or 2×10; cross-brace on outside face |
| 8"–12" (thickened slab, equipment pad) | Doubled 2×10 or 2×12 | 16" o.c. | Unrestricted (flat pour) | Diagonal braces to ground stakes; check for deflection |
| Wall forms, 4 ft tall (single story foundation) | 3/4" plywood on 2×4 studs | 16" o.c. | 4"/hr max | Form ties at 24" o.c. horizontally; walers on both faces |
| Wall forms, 6–8 ft tall (basement, retaining wall) | 3/4" or 1" plywood on 2×4 studs | 12" o.c. | 2–3"/hr max | Form ties rated for pressure; strongback verticals; kickers to ground |
Why Plywood Is Standard for Wall Forms
A wall form is under far more stress than a slab edge form. Slab edges resist only the shallow height of the slab — 4 to 8 inches of concrete pushing outward. Wall forms resist the full height of the pour — 4 to 8 feet of concrete producing lateral pressure that increases with depth. Plywood panels span between studs as a continuous surface, distributing that pressure evenly. Individual boards cannot do this: they flex individually, allowing concrete to push between them and produce a ribbed, uneven wall face. For any wall form taller than about 2 feet, plywood on studs is the minimum standard for a professional-quality result.
Formwork for Concrete Slabs
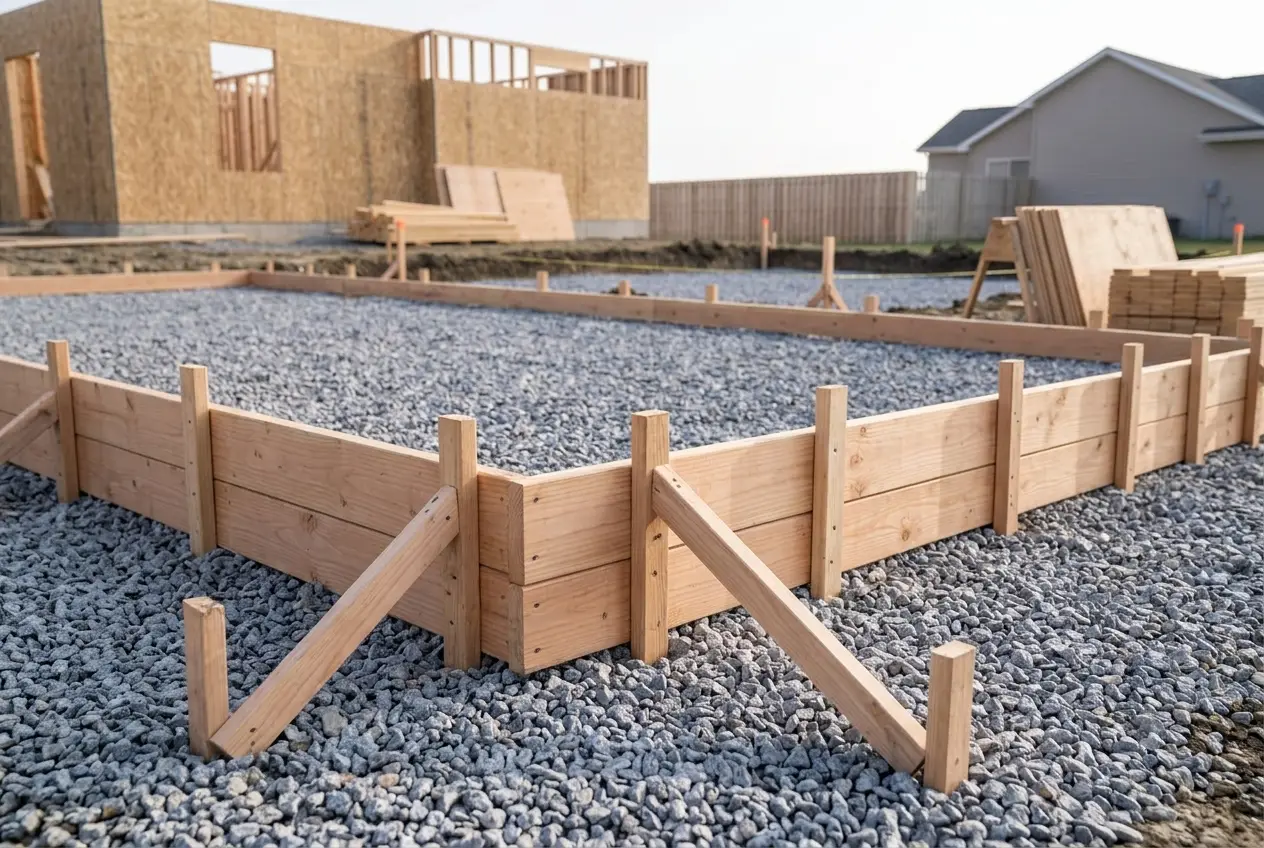
Slab formwork is the simplest form system in concrete construction — and the most commonly built by homeowners and small contractors. The form is a perimeter board that defines the slab edge, holds the concrete in place during the pour, and is removed once the concrete has hardened. The form height equals the slab thickness: a 4-inch slab gets a 4-inch form face, typically a 2×4 laid flat or a 2×6 set on edge.
Step-by-Step: Building a Slab Edge Form
- Set corner stakes first. Drive a stake at every corner of the slab. Use 2×2 or 2×3 stakes — thin stakes will bend under concrete pressure. Set each stake so its inner face is flush with the outside face of the form board.
- Install the first form board. Lay the board against the corner stakes, with the top edge at the finished slab elevation. Nail or screw the board to each stake. For a 2×4 slab form, two nails per stake is sufficient; for 2×6 and thicker, use three.
- Check the grade. Use a level or laser to confirm the top of the form board is at the correct finished elevation. Adjust by raising or lowering the board on the stakes before securing the next section.
- Install intermediate stakes. Space stakes 4 to 6 feet apart along the form board, depending on soil firmness. Each stake must contact the form board on its inside face — a gap between the stake and the board means the stake is doing nothing.
- Brace the corners. Corner stakes alone are not enough. Add a diagonal brace from each corner stake to a secondary stake driven 3 to 4 feet outside the form, angled at roughly 45 degrees. Corners are the highest-pressure points in a slab form and the most common location for blowouts.
- Check square with the 3-4-5 method. Measure 3 feet from one corner along one form and 4 feet along the perpendicular form. The distance between those points must be 5 feet. Adjust the form until the corner is square before proceeding to the remaining sides.
- Install the remaining sides. Continue the same process around the perimeter — board, stakes, grade check, bracing. Connect form boards at corners with a butt joint secured to the corner stake, or with a splice joint if the form continues past the corner.
- Verify the entire form. Check the top elevation of every form board with a level or string line. Check both diagonals of the slab — they should be equal within 1/2 inch. Walk the outside of the form and push against it at mid-span between stakes — any significant flex means a stake is missing or the board is undersized.
- Apply release agent. Spray or roll a thin, even coat of form release agent on the inside face of every form board — the face that will contact concrete. Apply just before pouring, not the night before.
Form Height: Setting the Finished Elevation
The top of the form board is the finished surface of the concrete. Getting the form height right means getting the slab grade right — and grade determines drainage, which determines whether water runs off the slab or ponds on it. For a driveway or patio, set the form top so the finished slab slopes away from structures at 1 to 2 percent (approximately 1/8 to 1/4 inch per foot). For an interior slab, set the form top at the design floor elevation. Use a rotary laser or a string line between corner stakes to check the elevation at every intermediate stake — a form that is correct at the corners but high or low in the middle produces a slab that is high or low in the middle, and the error cannot be corrected after the concrete hardens.
Formwork for Concrete Walls
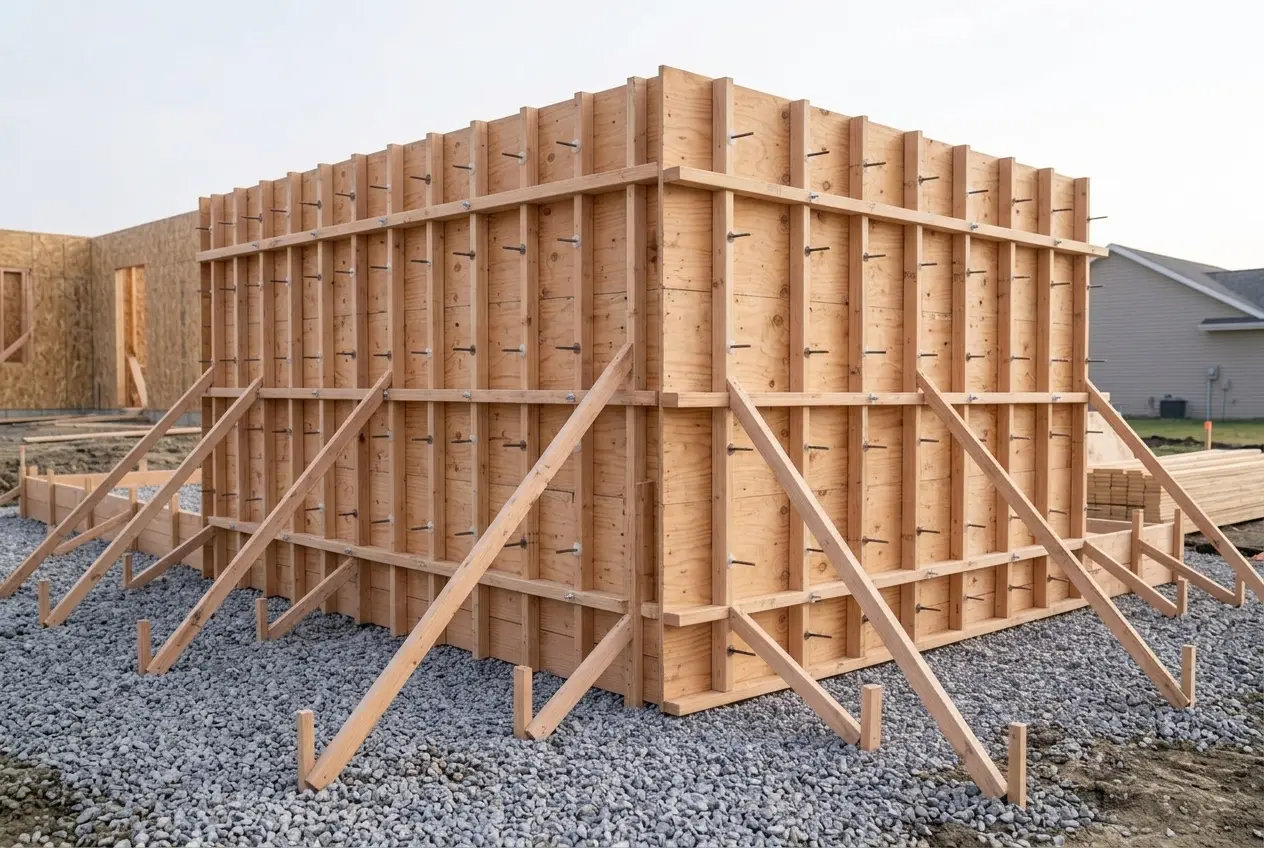
Wall formwork is more complex than slab formwork because the form resists pressure on both faces simultaneously. A two-sided form — inner panel, outer panel, and the space between them filled with concrete — must maintain a consistent wall thickness from top to bottom while resisting the lateral pressure of wet concrete that increases with depth. The components of a wall form system are: the plywood face, the vertical studs, the horizontal walers, the form ties, and the bracing.
Wall Form Components
| Component | Function | Typical Material | Spacing |
|---|---|---|---|
| Plywood face | Directly contacts concrete; defines wall surface | 3/4" or 1" BC/B-C exterior plywood | N/A (panels) |
| Studs (verticals) | Support plywood face between walers | 2×4 or 2×6 lumber | 12"–16" o.c. vertically |
| Walers (horizontals) | Tie studs together; distribute tie loads | Double 2×4 or 2×6 | Every 24"–36" vertically |
| Form ties | Hold inner and outer forms at constant wall thickness; resist concrete pressure | Steel snap ties, spreader bolts, or coil ties | 24"–36" o.c. horizontally and vertically |
| Bracing / kickers | Hold form plumb; resist wind and pour pressure | 2×4 or 2×6 diagonal braces to ground stakes | Every 4–6 ft along wall |
Form Ties: The Critical Component
Form ties are the single most important component in a wall form system. They connect the inner and outer form panels across the wall thickness, preventing the panels from spreading apart under concrete pressure. Without ties — or with ties spaced too far apart — the wall thickens in the middle (the "pillow" effect) and the form faces bow outward. Ties are available in several types: snap ties (cut off after the concrete cures, leaving a recess that is patched), spreader bolts (reusable, threaded rods with removable sleeves), and coil ties (threaded ties with cones that create a clean recess). The spacing of ties depends on wall height, pour rate, and plywood thickness. For a 4-foot wall poured at 4 inches per hour with 3/4-inch plywood on 12-inch stud spacing, ties at 24 inches on center horizontally and vertically are adequate. Taller walls or faster pours require closer spacing — consult the tie manufacturer's pressure tables.
Bracing and Plumb Alignment
Wall forms must be held plumb — perfectly vertical — before and during the pour. Bracing is what does this. A kicker is a diagonal brace, typically a 2×4 or 2×6, that runs from the mid-height of the form down to a ground stake at a 45-degree angle. Kicker stakes must be driven deep enough to resist the form pushing against them — 18 to 24 inches into firm soil. For tall walls, multiple kickers per form panel are needed: one at mid-height minimum, two or more for walls above 6 feet. Before the pour, check plumb with a level on every form panel. During the pour, have a crew member monitor the forms for movement — concrete placed on one side of a form before the other creates asymmetric pressure that can push the form out of plumb in seconds.
Stake Spacing & Bracing Reference
Stake spacing determines how well a form resists concrete pressure between stake contact points. Too few stakes and the form board flexes between them, producing a bowed concrete edge. Too many stakes waste time and material. The right spacing depends on the form height, the board thickness, and the firmness of the soil the stakes are driven into.
Stake Spacing Reference Table
| Form Height | Board Thickness | Firm Soil (gravel, sand) | Average Soil (silt, silty clay) | Soft Soil (clay, saturated) |
|---|---|---|---|---|
| 4" (sidewalk, patio edge) | 2×4 | 6 ft | 5 ft | 4 ft |
| 6" (driveway, garage slab edge) | 2×6 | 6 ft | 5 ft | 4 ft |
| 8"–12" (thick slab, equipment pad) | 2×8 or 2×10 | 5 ft | 4 ft | 3 ft |
| Wall forms, 4 ft tall | 3/4" plywood on studs | Studs at 16" o.c. | Studs at 12" o.c. | Studs at 12" o.c. + extra walers |
| Wall forms, 6–8 ft tall | 3/4" or 1" plywood on studs | Studs at 12" o.c. | Studs at 12" o.c. | Engineer-reviewed bracing required |
Stake Installation Details
Stakes must be driven deep enough to resist the lateral force of concrete pushing against the form board. For slab edge forms, drive stakes a minimum of 12 inches into the ground — deeper on soft soil. For wall forms, kicker stakes need 18 to 24 inches of embedment. Use a post driver or a heavy hammer — a stake that is barely above ground will rock and loosen under load. The stake must contact the form board on its inside face — if there is a gap between the stake and the board, the stake provides no support. Nail or screw the board to the stake at the point of contact. For wall forms, drive the kicker stake at the point where the diagonal brace meets the ground — not behind the form, but out to the side at a 45-degree angle.
Corner Bracing
Corners are the highest-pressure points in any form system. Concrete pushes outward in two directions simultaneously at a corner, and the form board has no continuous support around the bend. Every corner needs a diagonal brace — a 2×4 or 2×6 running from the corner form board out to a stake driven 3 to 4 feet away, at roughly 45 degrees. On wall forms, corner braces run from the corner stud down to a ground stake on both sides of the corner. Do not rely on the corner stake alone to resist concrete pressure — it will bend, and the corner will open during the pour.
The 3-4-5 Square Method
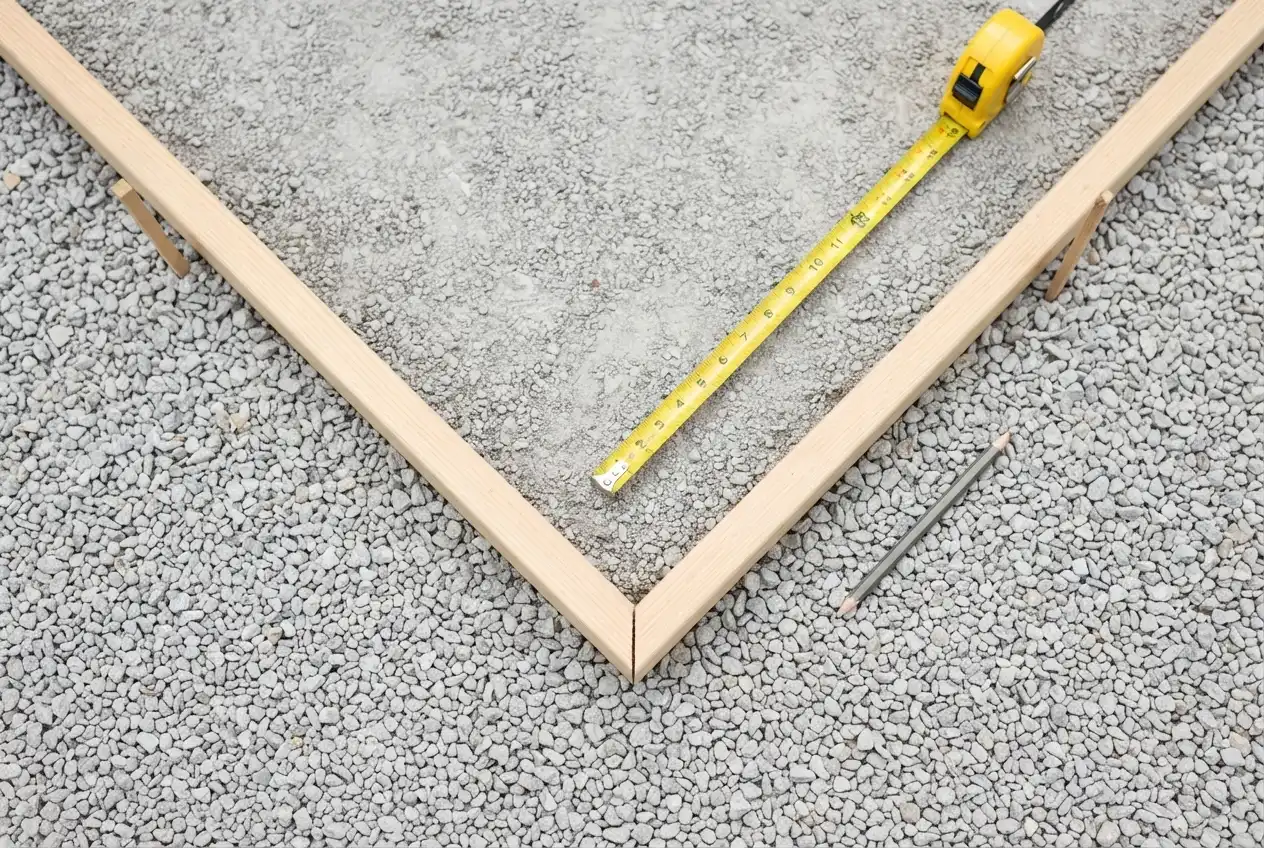
A form that is not square produces a concrete slab with unequal diagonals — one corner is too open, the opposite corner is too closed. The slab still works structurally, but every subsequent measurement, finish, and joint layout is thrown off. The 3-4-5 method is the simplest way to check a corner for square without specialized tools. It relies on the Pythagorean theorem: in a right triangle, the square of the hypotenuse equals the sum of the squares of the other two sides (a² + b² = c²). A triangle with sides of 3, 4, and 5 feet is a right triangle — the 3-foot and 4-foot sides form a perfect 90-degree angle at the corner.
How to Check a Corner
- From the corner of the form, measure 3 feet along one form board and make a mark.
- From the same corner, measure 4 feet along the perpendicular form board and make a mark.
- Measure the distance between the two marks. It must be exactly 5 feet.
- If the distance is greater than 5 feet, the corner is open (too wide) — push the form boards toward each other at the corner.
- If the distance is less than 5 feet, the corner is closed (too acute) — pull the form boards apart at the corner.
- Re-check after adjusting. The corner must measure 5 feet between the marks before moving on.
Multiples for Larger Slabs
For larger slabs, use multiples of the 3-4-5 triangle to check the corner from a greater distance — this is more accurate than measuring close to the corner, where small errors in mark placement have a larger proportional effect.
| Multiply By | Side A | Side B | Hypotenuse | Use When |
|---|---|---|---|---|
| 1× | 3 ft | 4 ft | 5 ft | Small slabs, sheds, patios under 10 ft |
| 2× | 6 ft | 8 ft | 10 ft | Garages, medium patios |
| 3× | 9 ft | 12 ft | 15 ft | Driveways, large slabs |
| 4× | 12 ft | 16 ft | 20 ft | Full-building slabs, workshops |
Checking the Full Slab Diagonal
After all four corners are set, measure both diagonals of the slab — corner to opposite corner, both ways. The two diagonal measurements should be equal within 1/2 inch for a properly squared form. If they differ by more than 1/2 inch, one or more corners is out of square, even if each corner passed the 3-4-5 check individually. The diagonal check catches cumulative error that individual corner checks miss. Correct the form by adjusting the corner that is most out of square — usually the one where the diagonal is shorter means that corner is too closed, and the longer diagonal means that corner is too open.
Concrete Pressure on Forms
Wet concrete exerts lateral pressure against formwork in the same way water does — but denser. Concrete weighs about 150 pounds per cubic foot (pcf) compared to water at 62.4 pcf, so for the same depth, concrete produces roughly 2.4 times the hydrostatic pressure of water. However, concrete does not behave exactly like water as it begins to set. The rate at which concrete is placed determines how much of the full hydrostatic pressure the forms actually experience — pour slowly enough and the concrete begins to stiffen before full pressure develops at the bottom of the form.
Concrete Pressure Reference
The table below shows approximate lateral pressure at the base of a wall form for common pour rates and concrete temperatures. These values assume normal-weight concrete (150 pcf) and represent the pressure the forms must be designed to resist.
| Wall Height | Pour Rate (in/hr) | Concrete Temp | Approx. Pressure at Base (psf) | Form Requirement |
|---|---|---|---|---|
| 4 ft | 2 in/hr | 70°F | 300–400 | 3/4" plywood, 2×4 studs at 16" o.c. |
| 4 ft | 4 in/hr | 70°F | 450–600 | 3/4" plywood, 2×4 studs at 16" o.c., ties at 24" o.c. |
| 4 ft | 6 in/hr | 70°F | 550–750 | 1" plywood or double 3/4", studs at 12" o.c. |
| 8 ft | 2 in/hr | 70°F | 500–700 | 3/4" plywood, studs at 12" o.c., ties at 24" o.c. |
| 8 ft | 4 in/hr | 70°F | 800–1,100 | 1" plywood, studs at 12" o.c., ties rated for 1,200 psf |
| 8 ft | 6 in/hr | 70°F | 1,000–1,400 | Engineer-reviewed form design; closely spaced ties and walers |
| Any height | Any rate | 50°F or below | Higher (slower setting) | Reduce pour rate or increase form strength; cold concrete sets slower |
These values are approximate — actual pressure depends on concrete mix design, slump, admixtures, and placement method. For any wall form taller than 6 feet or any pour faster than 4 inches per hour, consult the form tie manufacturer's pressure tables or have the form design reviewed by an engineer. The reference values above are drawn from ACI 347R and common contractor practice for residential and light commercial work.
Release Agents & Surface Finishes
A form release agent (also called a form oil or bond breaker) is a substance applied to the inside face of formwork to prevent wet concrete from bonding to the form material. Without release agent, concrete sticks to plywood and lumber — pulling the form face away during stripping tears the concrete surface, leaving voids, aggregate exposure, and unsightly patches. With release agent, the form peels away cleanly, leaving a smooth surface that matches the form face texture.
Types of Release Agents
| Type | How It Works | Pros | Cons |
|---|---|---|---|
| Water-based | Forms a film between concrete and form; evaporates with water | Easy cleanup, low odor, environmentally friendlier | Can wash off in rain; may not release as cleanly as chemical types |
| Chemical-based | Reacts with concrete surface to create a bond-breaking layer | High release performance, consistent results | Higher cost; some types stain concrete if over-applied |
| Oil-based (mineral oil) | Forms a hydrophobic barrier between concrete and form | Excellent release, widely available | Stains concrete, messy, environmentally regulated in many jurisdictions |
Application Best Practices
- Apply thin and even. The goal is a uniform film, not a puddle. Too much release agent will drip down the form face, pool at the bottom, and stain the concrete surface — or prevent bonding if a second pour is placed against the first.
- Apply just before pouring. Applying release agent the night before allows dust, debris, and rain to compromise the film. Apply within a few hours of the pour.
- Cover all concrete-contact surfaces. Every surface that will touch concrete — form faces, stakes, braces, ties — should receive release agent. A brace without release agent will bond to the concrete and cannot be removed without damage.
- Do not use motor oil, cooking spray, or paint thinner. These are not form release agents. Motor oil stains and degrades plywood. Cooking spray is not designed for concrete contact and will not provide reliable release. Paint thinner dissolves plywood glue and is a fire hazard.
Surface Finish and Form Quality
The concrete surface that results from a pour is only as good as the form face that produced it. Smooth plywood produces a smooth, wood-grain-textured concrete surface — the plywood face grain transfers to the concrete. Rough or damaged plywood produces a rough, pitted surface. Lumber forms produce a board-textured surface with visible board joints. This is not necessarily a problem — board-textured concrete is a common and accepted finish for sidewalks, driveways, and foundation walls. But if a smooth, uniform surface is required — for a wall that will be finished, painted, or tiled — the form face must be smooth plywood (BC or better), free of patches, gouges, and swelling at the edges. The surface finish of the concrete is determined before the concrete is ever poured — it is determined by the condition of the formwork.
Concrete Form Removal Times
Form removal — also called form stripping — must be timed based on concrete strength, not on the calendar. Remove forms too early and the concrete has not gained enough strength to support its own weight or resist the loads that will be applied to it. The result is sagging, cracking, or edge failure that cannot be repaired. Remove forms too late and you waste time, tie up materials, and delay the next phase of work. The table below provides general removal timeframes for common residential formwork situations, based on concrete reaching approximately 500 to 1,000 PSI — the typical minimum for non-structural form stripping.
Form Removal Time Reference
| Form Type | Typical Removal Time | Concrete Strength Target | Conditions |
|---|---|---|---|
| Slab edge forms (patio, sidewalk) | 24–48 hours | ~500 PSI | Normal temps (60–80°F); concrete has stiffened and no longer sags |
| Slab edge forms (driveway, garage) | 24–48 hours | ~500 PSI | Same as above; heavier slabs may need longer before traffic loads |
| Wall forms, light residential (≤4 ft) | 24–48 hours | ~500 PSI | Forms can be stripped and repositioned; concrete supports itself |
| Wall forms, structural (6–8 ft) | 48–72 hours | ~750–1,000 PSI | Do not strip if concrete shows cracking, sagging, or discoloration |
| Column forms | 24–48 hours | ~500 PSI | Stripping too early causes edge spalling at the form corners |
| Cold weather (below 50°F) | Add 50–100% | Same targets | Concrete gains strength much slower in cold; insulated forms or heaters may be needed |
| Hot weather (above 90°F) | Reduce by 25% | Same targets | Concrete sets faster; watch for plastic shrinkage cracking before stripping |
How to Check Concrete Strength Before Stripping
The most reliable method is a field cylinder break test — cast standard 6×12-inch cylinders during the pour, cure them under the same conditions as the slab, and break one at the lab at the planned removal time. The concrete must reach the specified strength before forms are stripped. For residential work where cylinder testing is not practical, the pencil test is a common field check: push a number 2 pencil into the concrete surface at the bottom of the form. If the pencil point dents the concrete by more than a shallow impression, the concrete is not yet strong enough to strip. A second field check: if the concrete surface appears damp, cool to the touch, or shows visible water sheen, it is still curing and should not be stripped.
Common Formwork Failures
Most formwork failures are preventable. They occur when the form material is undersized for the pressure, when bracing is insufficient, or when the pour rate exceeds what the forms were designed to handle. The table below lists the most common failures, their causes, and how to prevent them.
Failure Modes and Prevention
| Failure | What It Looks Like | Primary Cause | Prevention |
|---|---|---|---|
| Form bulge | Form board bows outward between stakes; concrete edge is curved | Stakes too far apart, board too thin, soil too soft for stake spacing | Follow stake spacing table; use thicker board; brace at mid-span |
| Blowout | Form breaks open; concrete spills out during the pour | Form tie failure, missing bracing, pour rate too fast, wet lumber | Rate ties for actual pressure; brace every panel; control pour rate |
| Edge honeycombing | Rough, porous concrete edge with exposed aggregate | Form face not sealed, release agent missing, board joints open | Seal plywood edges; apply release agent; close board joints |
| Wall thickness variation | Wall is thicker in the middle than at the top and bottom | Form ties too far apart or missing; concrete pressure pushes panels apart | Use ties rated for the pressure; space per manufacturer tables |
| Out-of-plumb wall | Wall leans in one direction; not vertical | Bracing insufficient; asymmetric concrete placement; kickers too short | Check plumb before and during pour; brace both sides; drive kickers deep |
| Surface staining | Dark patches or streaks on concrete surface | Excess release agent; motor oil or foreign substance on form face | Use proper release agent; apply thin; avoid foreign substances |
The Most Expensive Mistake: Pouring Too Fast
Concrete placed faster than the forms can resist produces higher lateral pressure than the form design assumed. The pressure builds from the bottom up — the first few inches of a pour produce minimal pressure, but as the form fills, the cumulative weight of the concrete above generates force that the lower form sections must resist. A crew that fills a wall form in one continuous pour, rather than in controlled lifts, can generate pressures 50 to 100 percent higher than the same wall poured slowly. The form ties, the plywood, the stakes — everything is designed for the slow pour rate, and exceeding that rate is the most common cause of blowouts on residential and commercial formwork. Control the pour rate. For wall forms, limit placement to 4 inches per hour unless the form design has been reviewed for a faster rate.
Worked Example: 20×20 Slab Formwork
This example walks through a complete formwork material takeoff for a 20-foot by 20-foot residential concrete slab at 4-inch thickness — a typical patio or small workshop floor. The form is a perimeter edge form using 2×6 lumber staked at 5-foot intervals on average soil.
Project Parameters
| Parameter | Value | Source |
|---|---|---|
| Slab dimensions | 20 ft × 20 ft (400 sq ft) | Project design |
| Slab thickness | 4 inches | Project design |
| Form lumber | 2×6 (nominal) edge forms | Lumber selection table — 4"–6" slab |
| Stake spacing | 5 feet | Stake spacing table — average soil |
| Corner bracing | Diagonal 2×4 at all 4 corners | Corner bracing guidance |
| Release agent | Water-based, thin coat | Release agent selection |
Step 1: Perimeter Length
- Perimeter = 2 × (20 + 20) = 80 linear feet of form board
- 2×6 lumber comes in 8-foot and 10-foot lengths; 10-foot boards reduce joint count
- Boards needed at 10 ft each: 80 ÷ 10 = 8 boards (order 9 for waste and trimming)
Step 2: Stake Count
- Stakes per side at 5-foot spacing: 20 ÷ 5 = 4 intermediate stakes + 2 corner stakes per side
- Corners are shared between sides: 4 corners total
- Intermediate stakes: 4 sides × 4 = 16
- Total stakes: 16 intermediate + 4 corner = 20 stakes
- Order 22 stakes for waste and replacement of any bent stakes
Step 3: Corner Braces
- One diagonal brace per corner: 4 corners × 1 brace = 4 braces
- Each brace: 2×4 × 6 ft (cut to length from standard 8-foot stock)
- Each brace needs a ground stake: 4 brace stakes
Step 4: Release Agent
- Form contact area = perimeter × form face height = 80 ft × (4 ÷ 12 ft) = 26.7 sq ft
- Release agent covers approximately 200–300 sq ft per gallon
- One gallon is more than sufficient for this pour — buy one for future projects
Step 5: Cost Summary
| Item | Quantity | Cost Range | Notes |
|---|---|---|---|
| 2×6 × 10 ft lumber | 9 boards | $80–$135 | $9–$15 per board, varies by region |
| Form stakes (2×2 × 4 ft) | 22 stakes | $35–$55 | $1.50–$2.50 per stake |
| 2×4 bracing lumber | 4 boards (8 ft) | $25–$40 | Cut to 6 ft for corner braces |
| Nails or screws | 1 box | $8–$15 | 16d common nails or 3" exterior screws |
| Form release agent | 1 gallon | $12–$25 | Water-based; covers 200–300 sq ft |
| Total formwork material | — | $160–$270 | Excludes labor, concrete, and subgrade prep |
The formwork material cost is a small fraction of the total pour cost — the concrete itself for a 400-square-foot, 4-inch slab is approximately 5 cubic yards, or $600 to $1,000 delivered. But the formwork is what determines whether that concrete ends up as a clean, square, properly graded slab or as a wavy-edged, out-of-square pour that needs to be ground, patched, or in the worst case, demolished and re-poured. Spending the extra hour on stakes, bracing, and the 3-4-5 check is the highest-return step in the entire project. The Concrete Calculator confirms the concrete volume: 400 square feet at 4-inch thickness is approximately 4.9 cubic yards — order 5 cubic yards with waste allowance. The Cubic Yards Calculator handles the conversion if you prefer to work in cubic feet.
Frequently Asked Questions
Choose lumber by the height of the form and the rate of concrete placement. For slabs up to 4 inches thick, 2×4 or 2×6 boards work well as edge forms. For slab edges of 6 to 8 inches, use 2×6 or 2×8. For wall forms or thick slabs over 8 inches, double 2×8 or 2×10 boards stacked horizontally. The lumber must be straight, dry, and free of knots in the contact face — wet or warped lumber will not hold a straight form line under concrete pressure.
Place corner stakes at every corner and every change in direction. Along the sides, space edge stakes 4 feet apart on soft soil (sand, silt, clay) and up to 6 feet apart on firm granular soil. For a standard residential slab form, 4-foot spacing on average soil is the safe default. Each stake should be driven at least 12 inches into the ground (more on soft soil) and set so the top of the form board rests on or near the stake top, with at least one nail or screw connection between the board and each stake.
Use the 3-4-5 method: measure 3 feet from one corner along one form, and 4 feet from the same corner along the perpendicular form. The distance between those two points must be exactly 5 feet. If it is longer or shorter, the corner is out of square. For larger slabs, use multiples: 6-8-10, 9-12-15, or 12-16-20. Measure the diagonal of the entire slab — both diagonals should be equal within 1/2 inch for a properly squared form.
Do not remove forms on a calendar schedule — remove them based on concrete strength. As a general guide, light residential wall forms can usually be removed after 24 to 48 hours when the concrete has reached about 500 PSI. Slab edge forms are typically stripped after 24 to 48 hours. Structural wall forms holding load-bearing concrete may need 7 days or more. In cold weather, add 50 to 100 percent more time. Never strip forms if the concrete surface shows signs of cracking, sagging, or discoloration — these indicate the concrete has not yet gained adequate strength.
Use a purpose-made concrete form release agent — not motor oil, not cooking spray, not leftover paint thinner. Form release agents come in three types: water-based (easy cleanup, good for most residential work), chemical-based (reacts with the concrete surface to create a bond breaker), and oil-based (high release performance but messy and environmentally regulated). Apply a thin, even coat with a sprayer or roller just before placing concrete. Too much release agent will stain the concrete surface and can prevent proper bonding if a second pour is placed against the first.
The pressure depends on plywood thickness, grade, and how the plywood is supported. Standard 3/4-inch BC or B-C exterior plywood rated for concrete formwork can handle approximately 60 to 80 pounds per square foot when supported on 2×4 studs at 16 inches on center, at a wall height of about 4 feet, with a normal pour rate. Doubling the plywood thickness or reducing the stud spacing to 12 inches on center increases the capacity significantly. For walls taller than 4 feet or for fast pours (above 4 inches per hour), use heavier plywood (1-inch or double 3/4-inch), closer stud spacing, and form ties rated for the expected pressure.
Yes — concrete form lumber can typically be reused 5 to 10 times if it is straight, undamaged, and not saturated with concrete. After each pour, scrape off concrete residue, allow the boards to dry fully, and store them flat to prevent warping. Boards that have warped, split, or absorbed concrete water (making them swell) will not form a straight edge and should be discarded or used for non-formwork purposes. Plywood forms have a shorter reuse life than dimensional lumber — typically 3 to 5 pours — because the face veneer degrades with each release.
Form bulges and blowouts are caused by insufficient bracing, undersized materials, or excessive pour rate. Concrete placed faster than the forms can resist produces higher lateral pressure than the design assumed. Other causes include stakes driven too shallow, stakes spaced too far apart, bracing not tied back to a stable anchor, wet or damaged lumber that loses strength, and form ties that are too short or too few for the wall height. Prevention: use the correct lumber for the pour height, space stakes per the reference table, brace every form wall back to stakes or ground anchors, and place concrete in lifts rather than filling tall forms in one continuous pour.
References
- American Concrete Institute, ACI 347R — Guide to Formwork for Concrete, concrete.org — formwork materials, design loads, pressure calculations, and removal criteria.
- American Concrete Institute, ACI 302.1R — Guide for Concrete Floor and Slab Construction, concrete.org — slab formwork practices, edge forming, and finishing requirements.
- American Concrete Institute, ACI 332.1R — Guide to Residential Concrete Construction, concrete.org — residential formwork methods, material selection, and common practices.
- Portland Cement Association, Concrete Forms and Forming, cement.org — formwork materials, bracing, release agents, and stripping guidelines.
- Portland Cement Association, Concrete Floors on Ground, cement.org — slab edge forming, grade setting, and flatwork construction.
- Dayton Superior, Formwork Design Manual, daytonsuperior.com — form tie selection, pressure tables, and wall form engineering guidance.
- Leviat, Concrete Forming Systems Technical Guide, leviat.com — modular form systems, tie spacing, and pour rate limits.
- Fine Homebuilding, Concrete Formwork for Slabs and Walls, finehomebuilding.com — practical residential formwork methods and job-site techniques.
Disclaimer: This guide provides general educational information about concrete formwork and is not engineering or architectural advice. Actual formwork requirements vary by concrete mix, pour rate, wall height, climate, and site-specific conditions. Form design for walls taller than 8 feet, pours faster than 4 inches per hour, or structural applications must be reviewed by a qualified engineer or follow manufacturer specifications. Always verify requirements with your local building department and the formwork material manufacturer before starting work.