
ON THIS PAGE:
What Is Concrete Block Paving?
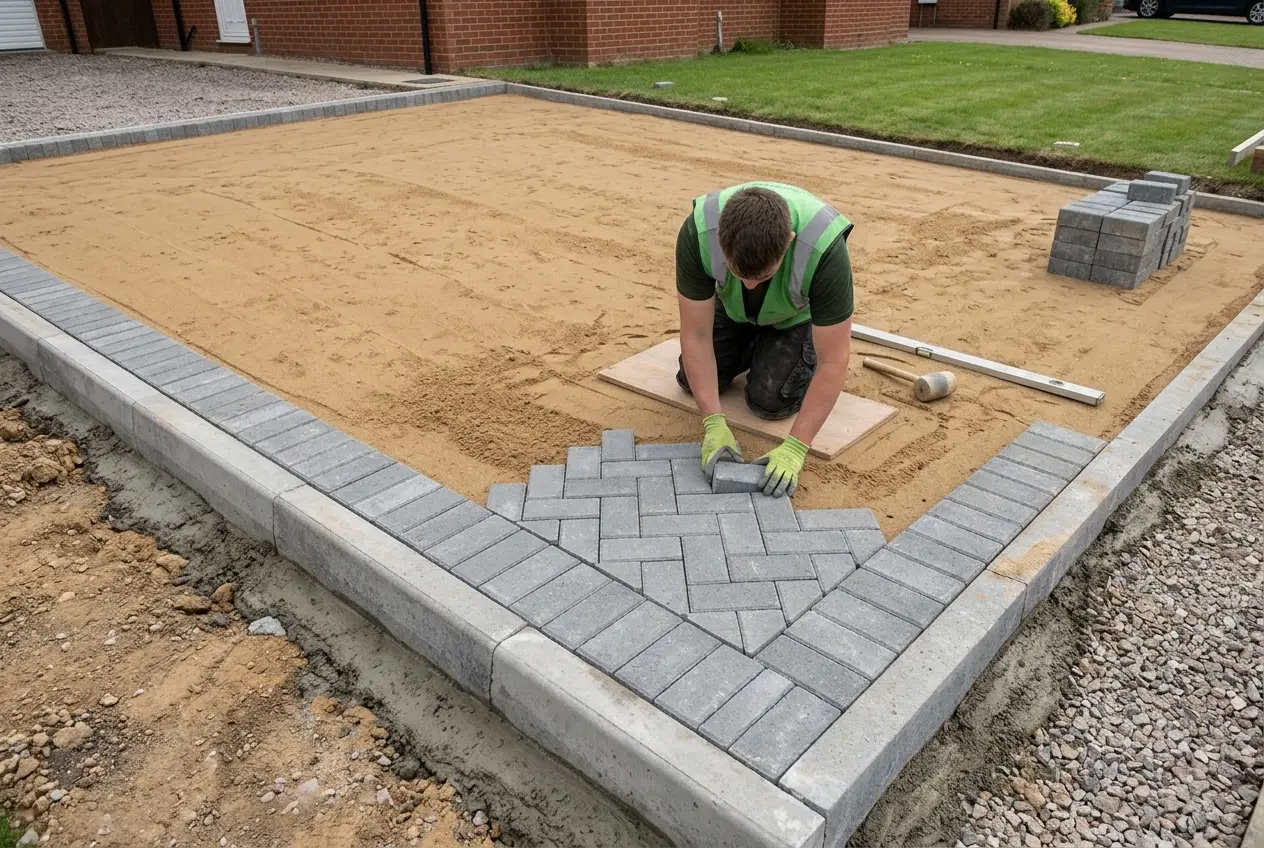
Concrete block paving is a modular paving system made from precast concrete units — usually rectangular blocks 200mm long by 100mm wide, in thicknesses from 50mm to 80mm — laid on a prepared granular base and held in place by interlock, jointing sand, and edge restraints. Unlike poured concrete, which forms a monolithic slab, block paving is an assembly of individual units that distribute load through friction between the blocks and the base below. That assembly is what makes it repairable: a damaged block can be lifted and replaced without cutting, breaking out, and repouring a section of slab.
Block paving is used for driveways, patios, pedestrian paths, parking areas, and light-duty industrial surfaces. It is popular because it combines structural durability with a wide range of colors, textures, and laying patterns, and because a competent DIYer can install it with standard tools — no formwork, no wet trades, and no curing time. The trade-off is that the quality of the installation depends almost entirely on what is hidden below the surface: the excavation depth, the sub-base material and compaction, the laying course, and the edge restraints. Get those right and the surface will last decades; get them wrong and no amount of care in laying the blocks will prevent settlement, rutting, and displacement.
Why Block Paving Instead of Poured Concrete?
Poured concrete and block paving solve the same problem — creating a hard, load-bearing surface — but they differ in how they behave under stress and how they fail. Poured concrete is rigid: it resists load as a single slab, but when it cracks (and concrete always cracks), the crack runs through the full thickness and the slab loses continuity. Block paving is flexible: the joints between blocks accommodate small movements without cracking, and when individual blocks are damaged or stained, they can be replaced individually. Block paving also drains better through its joints, handles freeze-thaw cycles more gracefully because small movements do not create structural cracks, and can be relaid in a different pattern or color without demolition. The main advantages of poured concrete are lower initial cost for large areas, a smoother surface for vehicles and equipment, and no joints to maintain. The choice between them comes down to budget, aesthetics, repairability preference, and whether permeable drainage is required.
Block Types & Specifications
Concrete paving blocks come in several categories, each with different properties, costs, and applications. The standard block size worldwide is 200 × 100mm (approximately 8 × 4 inches), which gives a 2:1 length-to-width ratio that works cleanly in herringbone and stretcher bond patterns. Thickness is the primary variable that determines what traffic a block can carry.
Block Types Comparison
| Block Type | Typical Size | Thickness | Typical Use | Permeability | Cost Range (per m²) |
|---|---|---|---|---|---|
| Standard concrete block | 200 × 100mm | 50–80mm | Driveways, patios, paths, parking | Impermeable — water runs off surface | $3–$8 materials |
| Permeable concrete block | 200 × 100mm (wider joints) | 60–80mm | Driveways and patios where SuDS compliance is required | Porous structure — water drains through blocks and joints | $5–$12 materials |
| Textured / embossed block | 200 × 100mm | 50–65mm | Patios and decorative driveways | Impermeable | $5–$10 materials |
| Color block (pigmented) | 200 × 100mm | 50–80mm | All applications; multiple colors for patterns | Impermeable | $4–$10 materials |
| Natural stone paver | Various (flagstone, setts) | 30–80mm | Patios, paths, premium driveways | Varies by stone | $15–$40 materials |
| Cobbles / setts | 100 × 100mm or irregular | 50–100mm | Driveways, heritage and decorative work | Varies | $20–$50 materials |
Thickness Guide by Application
| Application | Minimum Thickness | Recommended Thickness | Notes |
|---|---|---|---|
| Pedestrian paths and patios | 50mm | 50mm | No vehicle loads; 50mm is standard for foot traffic |
| Domestic driveway (cars, light vans) | 50mm | 60–65mm | 50mm works for cars on a well-built base; 65mm provides a safety margin |
| Driveway with heavy vehicles | 65mm | 80mm | SUVs, vans, delivery vehicles; thicker block resists crushing and edge damage |
| Commercial parking / loading | 80mm | 80mm+ | Heavy and repeated loads; often combined with reinforced sub-base |
Block compressive strength for paving is typically specified at 35 to 50 MPa — far above the contact pressure that domestic vehicles exert. Thickness matters more than strength for most applications because a thinner block on a good base will outlast a thicker block on a poorly compacted one. The Concrete Block Calculator helps estimate how many blocks a given area needs for a standard wall; for paving area coverage, the Paver Calculator handles the block count, sand, and base material quantities.
Sub-Base & Foundation
The sub-base is the structural layer of the block paving system — the part that carries the load and transfers it to the ground below. It is made from compacted granular material, typically MOT Type 1 crushed stone (a graded aggregate with particles ranging from 63mm down to dust, which locks together when compacted to form a dense, stable layer). The sub-base does the heavy lifting; the blocks on top are essentially a wearing surface. If the sub-base fails, the surface fails — no matter how well the blocks were laid.
Sub-Base Depths by Application
| Application | Sub-Base Depth | Material | Notes |
|---|---|---|---|
| Pedestrian path / patio | 100mm (4 in) | MOT Type 1 or equivalent | Minimum for foot traffic on reasonable ground |
| Domestic driveway | 150mm (6 in) | MOT Type 1 | Standard for cars and light vans on clay or soft ground |
| Driveway on soft/clay ground | 200mm (8 in) | MOT Type 1, compacted in layers | Soft soils need deeper base to prevent settlement |
| Commercial parking / heavy vehicles | 200mm+ (8 in+) | MOT Type 1 or Type 3 (no fines) | Often engineered with geogrid reinforcement for heavy loads |
Layer Structure
A complete block paving build-up, from the bottom up, has four layers. The subgrade is the natural soil, excavated to the required depth and compacted to provide a firm working platform. The geotextile membrane lies directly on the subgrade — it separates the sub-base from the soil, filters water, and suppresses weed growth. The sub-base is 100–200mm of compacted MOT Type 1, placed in one or two layers depending on depth and compacted with a vibrating plate compactor. The laying course is 25–35mm of coarse building sand, screeded to an even depth with notched rails or a screeding board — this is the bed that the blocks sit on, and its thickness and uniformity determine how flat the finished surface will be. On top of the laying course sit the blocks, laid in the chosen pattern and locked together with kiln-dried jointing sand.
Excavation Depth Calculation
Total excavation depth equals the sum of all layers above the subgrade. For a standard domestic driveway: 150mm sub-base + 35mm laying course + 65mm block = 250mm total excavation depth, plus any allowance for compacted subgrade. For a patio: 100mm sub-base + 30mm laying course + 50mm block = 180mm. When calculating excavation for a driveway, the volume tools on the Concrete Calculator convert the area and depth into cubic yards or cubic meters of spoil to remove and aggregate to bring in. The Crushed Stone Calculator estimates the MOT Type 1 tonnage required for the sub-base.
Laying Patterns
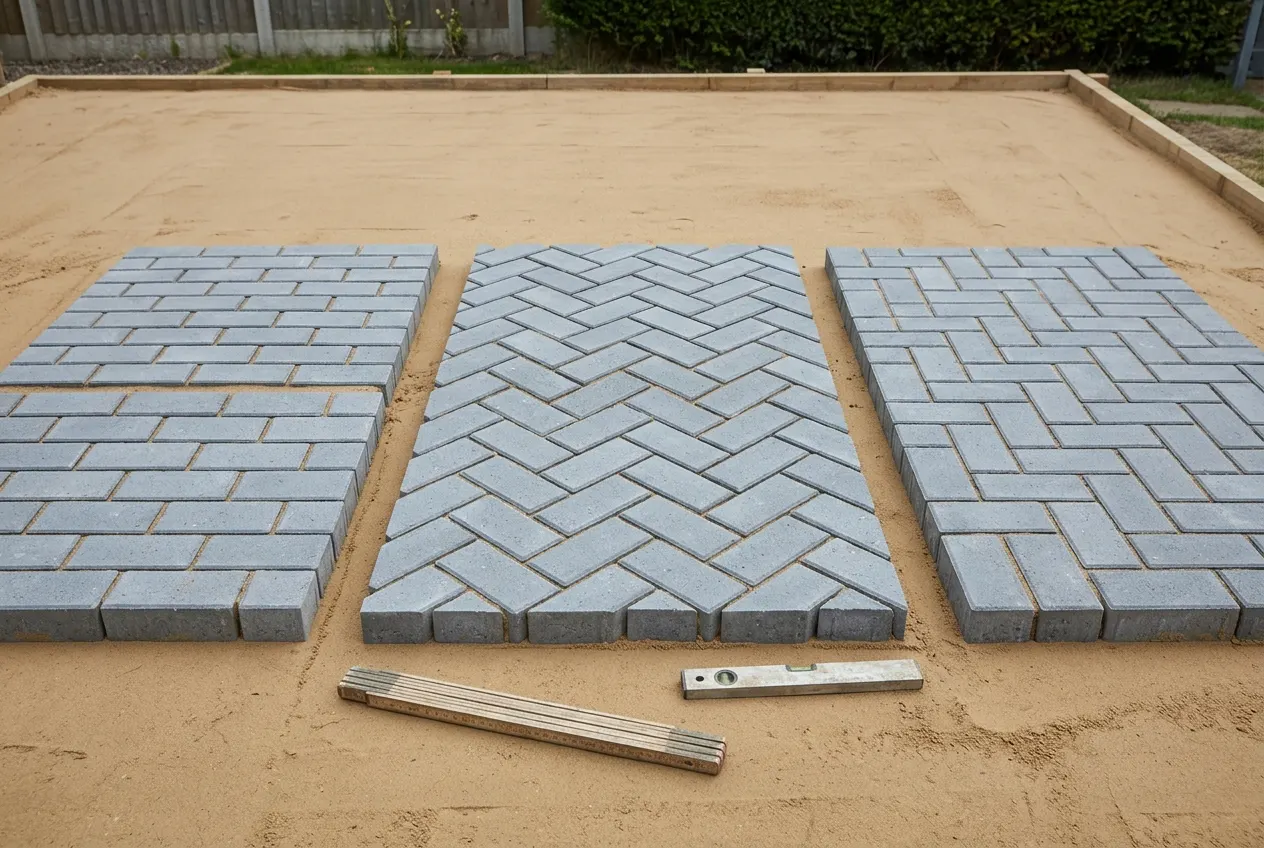
The laying pattern determines both how the finished surface looks and how well it resists movement under load. Each pattern creates a different degree of interlock — the mechanical connection between blocks that prevents them from shifting sideways when a vehicle brakes, turns, or accelerates on the surface. Patterns with high interlock are essential for driveways; decorative patterns with lower interlock are acceptable for patios and paths.
Pattern Comparison
| Pattern | Description | Interlock Strength | Difficulty | Best For |
|---|---|---|---|---|
| Stretcher bond | Blocks laid in parallel rows with each block offset half a length from the row below — the same pattern used in brick walls | Low to moderate | Easy — simplest pattern to set out and lay | Patios, paths, low-traffic areas |
| Herringbone 90° | Blocks laid at 90 degrees to each other in a zigzag pattern running parallel to the edges | Very high | Moderate — requires careful set-out but edges run straight | Driveways — strong interlock resists vehicle loads |
| Herringbone 45° | Same zigzag geometry as 90° but rotated so the pattern runs diagonally across the area | Very high | Moderate to hard — more cutting at edges, but strongest pattern | Driveways — the standard choice for vehicle traffic |
| Basket weave | Pairs of blocks laid side by side, with each pair oriented perpendicular to the next | Moderate | Moderate — repetitive but requires consistent pair spacing | Patios and decorative areas |
| Chequered | Blocks alternate orientation in a checkerboard pattern | Moderate | Moderate — visual pattern requires consistent alignment | Patios, garden paths |
| Dual-size offset | Two block sizes laid together with offset courses | Moderate | Moderate to hard — managing two sizes adds complexity | Decorative patios and commercial areas |
Setting Out Herringbone
Herringbone is the pattern to use for any driveway, and setting it out correctly is the difference between a surface that locks together and one that drifts. Start by establishing a reference line along the longest edge of the area — snap a chalk line parallel to the boundary, offset by half a block width plus joint allowance. Lay the first course of blocks along this line in a straight row, using a string line and spirit level to keep it true. Then lay the second course at 90 degrees to the first, nesting the blocks into the V formed by the first course. Continue alternating courses, keeping the zigzag consistent and checking alignment frequently with a straightedge. At 45 degrees, the pattern runs diagonally — set out a 45-degree reference line from the corner and work outward from it. Cutting at the edges is more extensive at 45 degrees than at 90 degrees, but the diagonal geometry distributes vehicle loads more effectively across the interlock. Both herringbone orientations provide excellent interlock; 45 degrees is slightly stronger and 90 degrees is slightly easier to lay.
Installation Steps
Block paving installation follows a fixed sequence. Each step depends on the one before it, and skipping or reordering steps creates defects that do not appear until the surface is in use. The sequence below covers a standard domestic driveway; patios and paths follow the same order with reduced depths.
Step-by-Step Installation
| Step | What You Do | Tools / Materials | Key Detail |
|---|---|---|---|
| 1. Excavate | Dig out the area to the total required depth (sub-base + laying course + block) | Spade, mattock, mini excavator (for large areas) | Depth: 250mm for a standard driveway; check falls with a laser level as you dig |
| 2. Lay geotextile membrane | Roll out membrane over the excavated subgrade, overlapping joints by 300mm | Geotextile fabric, sharp knife | Separates sub-base from soil; prevents weed growth from below |
| 3. Place and compact sub-base | Spread MOT Type 1 in 75–100mm layers; compact each layer with a plate compactor | MOT Type 1, wheelbarrow, rake, vibrating plate compactor | 150mm for domestic driveway; compact each layer before adding the next |
| 4. Screed laying course | Spread coarse sand over the sub-base; screed to 25–35mm using notched rails or a screeding board | Coarse building sand, screed rails/board, spirit level | Do not walk on the screeded sand; work from a scaffold board or kneel on the sub-base edge |
| 5. Install edge restraints | Set edge restraints (concrete kerbs, timber edging, or poured concrete haunching) along all boundaries | Kerbs or timber edging, cement mix, spirit level | Edge restraints must be installed BEFORE laying blocks — they contain the lateral forces |
| 6. Lay blocks in pattern | Lay blocks in the chosen pattern, starting from the edge course and working inward | Paving blocks, rubber mallet, string line | Lay on the screeded sand without stepping on it; use a kneeling board; tap each block level with the mallet |
| 7. Cut blocks to fit | Mark blocks that need cutting at edges and around obstacles; cut with a diamond-blade saw | Diamond blade saw, pencil, measuring tape | Cut blocks bed on a cement mix rather than sand — they need a solid bed to stay in place |
| 8. Sweep jointing sand | Spread kiln-dried sand over the surface and sweep it into the joints with a broom | Kiln-dried jointing sand, stiff broom | Work sand into every joint; repeat until joints are full |
| 9. Compact the surface | Run a vibrating plate compactor over the entire surface to bed blocks and lock joints | Vibrating plate compactor | Minimum 2 passes; the vibration settles blocks into the sand and forces jointing sand down into the joints |
| 10. Final sand sweep | Sweep excess sand off the surface; top up any joints that have settled after compaction | Stiff broom, kiln-dried sand | Repeat the sand-and-compact cycle if joints are not full after the first pass |
The critical steps are sub-base compaction and edge restraints. A well-laid pattern on a poorly compacted base will fail within a few years as the sub-base settles unevenly. Edge restraints installed after the blocks are laid cannot contain the lateral forces that vehicle tires exert — they must be in place before laying begins. The Paver Calculator estimates the number of blocks, sand, and base material needed for a given area and pattern.
Edge Restraints
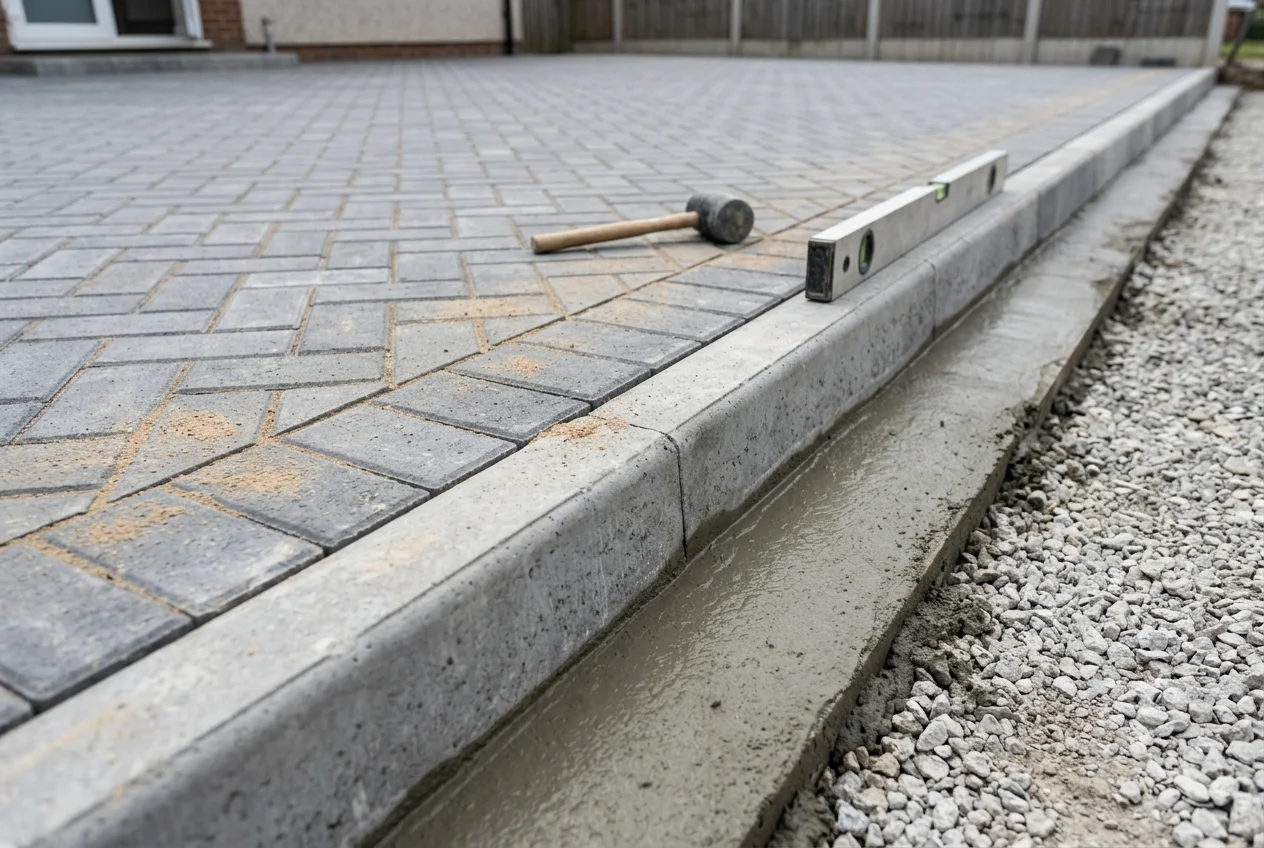
Edge restraints are the boundary elements that hold the paving in place laterally. Without them, the blocks at the edge of the paved area are free to move outward under load — vehicle tires push blocks sideways, freeze-thaw cycles expand and contract the surface, and rainwater washes jointing sand out of the perimeter joints. Over time, the edge sags, blocks loosen, and the failure propagates inward. Edge restraints are not optional; they are a structural component of the system.
Edge Restraint Types
| Type | Material | Application | Pros | Cons |
|---|---|---|---|---|
| Concrete kerbs | Precast concrete, various profiles | Driveways, paths, commercial areas | Strong, durable, available in colors to match blocks | Heavier; requires cement haunching to hold in place |
| Timber edging | Pressure-treated timber (4×2 or 6×2) | Patios, garden paths, low-load areas | Easy to install; inexpensive; flexible curves | Rot over time (10–15 years); less resistance to vehicle loads |
| Poured concrete haunching | Site-mixed concrete | All applications; used with kerbs or as standalone edge | Continuous, strong, adapts to any edge shape | Requires formwork and curing time; messier installation |
| Plastic / composite edging | Recycled plastic or composite | Patios, paths, garden areas | Lightweight; easy to install; does not rot | Less resistance to heavy vehicle loads; can flex under pressure |
For driveways, concrete kerbs set in a concrete haunching are the standard choice. The kerb is placed on the edge of the sub-base and locked in position by a concrete haunch — a poured concrete fillet on the outer face of the kerb, typically 100mm wide and extending down to the sub-base level. For patios and paths, timber edging or plastic edging is acceptable and easier to install. The edge course — the first row of blocks laid against the restraint — should be set on a cement mix rather than sand, because these blocks take the brunt of the lateral forces and need a solid bed to resist movement.
Jointing Sand
Jointing sand fills the gaps between blocks and serves two functions: it locks the blocks together through friction (the sand grains wedge between the block faces and resist sliding), and it prevents water from washing the sub-base material up through the joints. The standard jointing material is kiln-dried sand — fine, dry sand that flows freely into narrow joints. Regular building sand contains moisture and clay particles that cause it to cake and fail to fill joints completely.
Jointing Sand Application
After the blocks are laid and cut, spread kiln-dried sand across the entire surface in a thin, even layer. Work the sand into the joints with a stiff broom, using diagonal strokes across the joints rather than parallel to them — diagonal sweeping pushes sand down into the joint rather than along its surface. Sweep the sand repeatedly until the joints are full to the surface. Then run a vibrating plate compactor over the entire area — the vibration settles the blocks into the laying course and forces the jointing sand deeper into the joints. After compaction, sweep off the excess sand and inspect the joints: any that have settled below the block surface need to be topped up and re-compacted. A second sand-and-compact cycle is normal and often necessary to get joints completely full.
Jointing Sand Types
| Type | Properties | Best For | Notes |
|---|---|---|---|
| Kiln-dried sand | Fine, dry, flows freely into narrow joints | Standard concrete block paving | The default choice; does not contain clay or moisture that causes caking |
| Polymeric sand | Fine sand blended with polymer binders that harden when wetted | Premium installations; areas prone to weed growth or ant nesting | More expensive; forms a flexible but semi-rigid joint; requires clean, dry joints at application |
| Gap-graded aggregate | Coarser, single-size aggregate (typically 2–5mm) | Permeable block paving | Leaves larger voids between particles so water can drain through the joints |
Re-sanding is a routine maintenance task, not a one-time installation step. Under normal domestic use, joints lose sand gradually through rain washout, pressure washing, and freeze-thaw action. When joints are no longer full, blocks begin to rock under load, weeds establish in the voids, and water infiltrates the sub-base. Plan to re-sand every 2 to 3 years, or sooner if you notice sand loss after heavy rain. The process is the same as the initial installation: sweep kiln-dried sand into the joints, compact, sweep off the excess.
Drainage & Falls
Every paved surface must shed water — standing water on block paving creates slip hazards, accelerates joint erosion, undermines the sub-base through freeze-thaw action, and promotes weed and moss growth. The mechanism for shedding water is the fall (slope) built into the surface during installation. Water flows down the fall and exits the paved area through a drainage channel, a soakaway, or a permeable sub-base, depending on the system design.
Fall Requirements
| Application | Minimum Fall | Preferred Fall | Notes |
|---|---|---|---|
| Domestic driveway | 1:60 (1.7%) | 1:80 (1.25%) | Fall runs from the building toward the road or a drainage channel |
| Patio | 1:60 (1.7%) | 1:80 (1.25%) | Fall runs away from the building wall |
| Pedestrian path | 1:60 (1.7%) | 1:80 (1.25%) | Along the length of the path, not across it |
| Commercial parking | 1:80 (1.25%) | 1:100 (1%) | Flatter falls acceptable with surface water drainage systems |
The fall is established during excavation and maintained through the sub-base and laying course. You cannot correct a flat installation after the blocks are laid — the sand bed is screeded to follow the sub-base gradient, and the blocks follow the sand. Check the fall with a laser level or a long spirit level during excavation and again during sub-base compaction. Cross falls (slope across the width of the paved area) are used on roads and large parking areas; longitudinal falls (slope along the length) are standard for driveways and paths. The Concrete Driveway Slope guide covers grade establishment, drainage channels, and slope measurement in detail.
Where Water Goes
There are three main options for managing surface water from block paving. Surface drainage: water flows along the fall to a drainage channel (slot drain, trench drain, or ACO drain) set at the low point, which carries it to the storm sewer or a soakaway. Soakaway: water passes through permeable joints or a permeable sub-base into a lined or lined-and-filled pit that lets it percolate into the ground. Permeable paving: the blocks themselves are porous and the sub-base is designed to store and slowly release water — this is the SuDS approach covered in the next section. The choice depends on soil permeability, site gradient, local regulations, and whether the area is within a flood zone. In many jurisdictions, new driveways above a certain size must demonstrate that surface water is managed on-site rather than discharged to the sewer — check with your local planning department before designing the drainage.
Compaction
Compaction is the process of removing air voids from granular material by applying mechanical vibration and pressure, which forces particles closer together and increases the density and load-bearing capacity of the layer. In block paving, compaction happens at three stages: the sub-base is compacted as it is placed, the laying course is compacted after screeding (or settled by the block-laying process itself), and the finished surface is compacted after the blocks are laid and jointed. Skipping any of these stages leaves voids that will settle under load, creating depressions, rocking blocks, and water pooling.
Compaction Equipment
| Equipment | Force Type | Best For | Notes |
|---|---|---|---|
| Vibrating plate compactor | Impact + vibration | Sub-base layers, finished block surface, jointing sand | The standard tool for block paving; available in 60kg to 90kg weights for residential work |
| Roller compactor (small) | Static weight + vibration | Large sub-base areas; commercial projects | More efficient for very large areas; heavier to transport |
| Hand tamper | Impact | Edges, around obstacles, small areas the plate cannot reach | Slower than plate compaction; necessary for detail work |
| Wheeled rammer (jumping jack) | Impact | Trenches, narrow strips, pipe bedding | Higher impact force per pass; useful for confined spaces |
For sub-base compaction, place the MOT Type 1 in layers no thicker than 150mm — thicker layers do not compact fully through their depth. Compact each layer with a vibrating plate compactor in overlapping passes, covering the entire area. The surface should be firm enough that the compactor does not leave deep ruts as it passes. For the finished block surface, run the plate compactor over the laid and jointed blocks in at least two passes — the vibration beds the blocks into the laying course and forces jointing sand down into the joints. After compaction, sweep off excess sand and inspect the surface for any blocks that have settled unevenly; lift and re-bed any that are proud or sunken.
Permeable Paving & SuDS
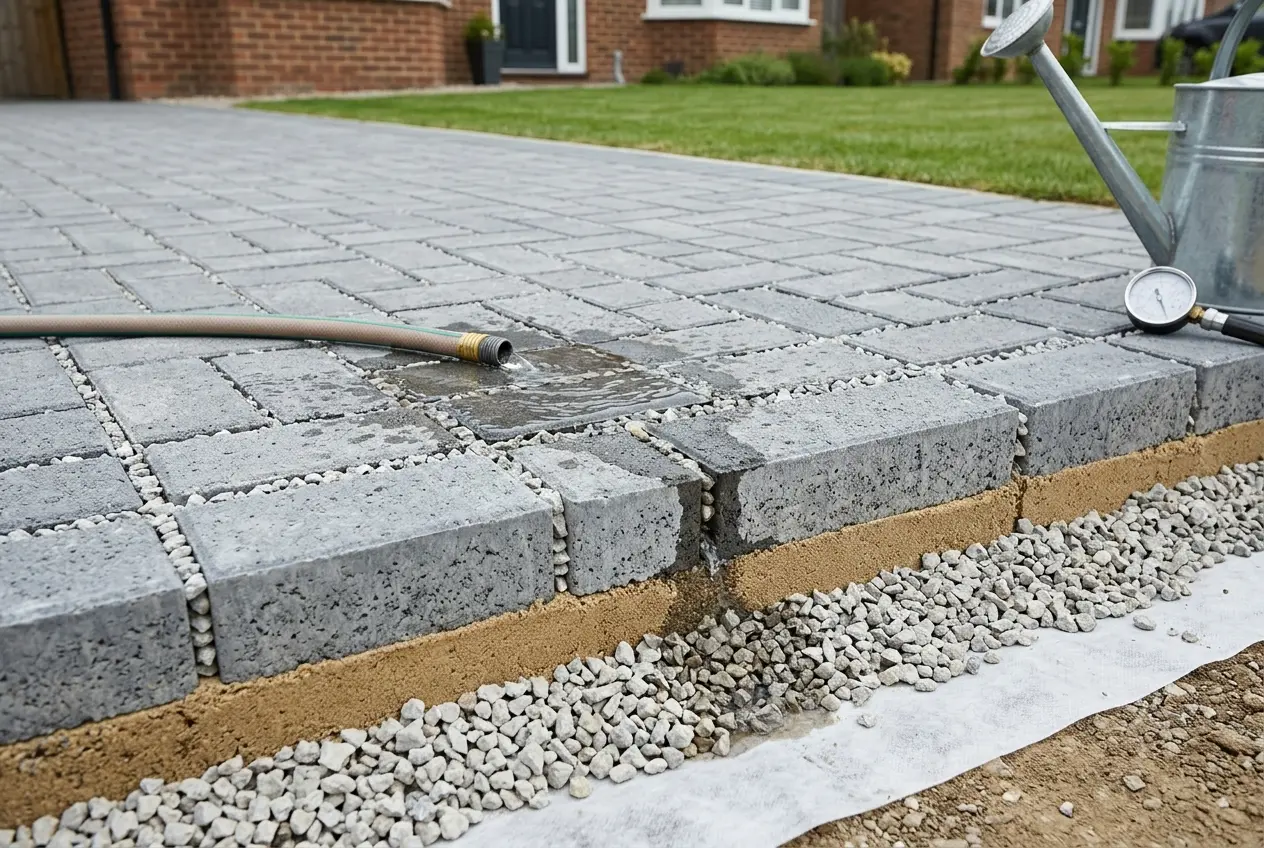
Sustainable Urban Drainage Systems (SuDS) are a design approach that manages surface water at its source rather than piping it away. Traditional impermeable surfaces — standard concrete paving, asphalt, poured concrete — generate runoff that overwhelms storm drains, causes downstream flooding, and carries pollutants into watercourses. SuDS-compliant surfaces allow water to infiltrate the ground on-site, reducing runoff volume, filtering pollutants, and recharging groundwater. Permeable block paving is one of the most common SuDS surfaces because it combines the structural performance of block paving with the drainage performance of a porous system.
How Permeable Block Paving Works
Permeable blocks differ from standard blocks in two ways. The block itself has a porous internal structure — air voids within the concrete matrix that let water pass through the block, not just around it. And the joints are wider — typically 5mm compared to the 2–3mm joints of standard paving — and are filled with a single-size gap-graded aggregate (usually 2–5mm stone) rather than kiln-dried sand. The gap-graded aggregate leaves voids between particles, creating a drainage path that carries water from the surface down into the sub-base below. The sub-base in a permeable system is also different: it is designed to store water temporarily in its voids and release it slowly, either into the ground or into a drainage pipe. A geotextile filter layer between the sub-base and the subgrade prevents fine soil particles from clogging the storage voids.
BS 7533-102 and SuDS Compliance
In the UK, permeable block paving installations are governed by BS 7533-102 — the code of practice for the construction of permeable flexible pavements. The standard specifies sub-base depth, aggregate grading, joint width, and drainage performance requirements. Many local authorities now require new driveways above a certain size (often 5 m²) to either be permeable or discharge to a soakaway — impermeable direct-to-sewer connections are being restricted to reduce stormwater loading on Victorian-era sewer systems. In the US, SuDS-equivalent requirements are growing under Low Impact Development (LID) and Green Infrastructure ordinances, though regulations vary widely by municipality. Check with your local planning or building department to determine whether permeable paving or a soakaway is required for your project.
Permeable vs Standard: Trade-Offs
| Factor | Standard Block Paving | Permeable Block Paving |
|---|---|---|
| Drainage | Surface runoff — water must be managed by falls and drainage channels | Water drains through blocks and joints into the sub-base — no surface runoff under normal rainfall |
| SuDS compliance | May require a separate drainage system (channel drain, soakaway) | Inherently SuDS-compliant; designed to manage water on-site |
| Sub-base | Standard MOT Type 1, compacted dense | Porous, open-graded sub-base designed to store water temporarily |
| Joint material | Kiln-dried sand | Gap-graded aggregate (2–5mm) |
| Maintenance | Re-sand joints every 2–3 years; pressure wash surface | Re-agg joints as needed; vacuum-sweep to prevent clogging; avoid sand-contaminating surfaces nearby |
| Cost | Lower — standard materials, simpler base | Higher — porous blocks, specialized sub-base, gap-graded aggregate |
| Frost resistance | Good with air-entrained concrete blocks | Excellent — water does not sit in the surface to freeze and expand |
The decision between standard and permeable paving is usually driven by regulation rather than preference. If your local authority requires on-site water management for the driveway size you are building, permeable paving is the straightforward solution — it meets the requirement without the added complexity of a separate drainage system. If no such requirement exists, standard paving with proper falls and a drainage channel is simpler and cheaper to install and maintain.
Cost Data
Block paving cost depends on three factors: the block type and thickness, the area being paved, and whether the installation is DIY or professional. Material costs are relatively predictable; installed costs vary significantly by region, ground conditions, access, and the complexity of the layout (more cutting and edge work means more labor). The table below provides typical ranges for both materials-only and fully installed costs.
Cost per Square Meter
| Block Type | Materials Only (per m²) | Installed (per m²) | Notes |
|---|---|---|---|
| Standard concrete block (50mm) | $25–$45 | $95–$140 | Most common choice; wide range of colors available |
| Standard concrete block (65mm) | $30–$55 | $100–$150 | Recommended for driveways; slight premium over 50mm |
| Permeable concrete block | $40–$70 | $120–$170 | Higher materials cost; specialized sub-base adds to installed cost |
| Textured / embossed block | $35–$60 | $105–$155 | Decorative finish; similar installation to standard blocks |
| Natural stone paver | $80–$180 | $170–$250 | Premium material; often laid by specialist contractors |
| Cobbles / setts | $100–$220 | $180–$300 | Highest cost; labor-intensive laying pattern |
Cost Breakdown (Standard Domestic Driveway)
For a typical 50 m² domestic driveway with 65mm standard concrete blocks, the cost components break down approximately as follows. These are broad ranges — actual costs vary by region, contractor, ground conditions, and site access.
| Cost Component | Typical Range (50 m² driveway) | Notes |
|---|---|---|
| Excavation and spoil removal | $300–$800 | Depends on depth, ground conditions, and whether spoil is taken off-site |
| Geotextile membrane | $40–$80 | Inexpensive; covers entire excavated area with overlaps |
| MOT Type 1 sub-base (material + delivery) | $400–$700 | 150mm depth over 50 m² ≈ 11–12 tonnes; price varies by region |
| Coarse sand for laying course | $80–$150 | 25–35mm depth over 50 m² ≈ 1.5–2 tonnes |
| Paving blocks (material + delivery) | $1,500–$2,750 | 50 m² of 65mm blocks; price varies by color and supplier |
| Edge restraints (kerbs + haunching) | $200–$500 | Depends on perimeter length and kerb type |
| Kiln-dried jointing sand | $40–$80 | Multiple bags; quantity depends on joint width and pattern |
| Plate compactor hire (if DIY) | $50–$100/day | Professional installers include this in their rate |
| Professional labor (if not DIY) | $1,500–$3,000 | Largest single cost component; varies most by region |
DIY installation eliminates the labor cost but requires significant physical effort and access to a plate compactor. For a competent DIYer, materials for a 50 m² driveway typically total $2,600–$4,300. Professional installation of the same area ranges from $5,000–$8,500 depending on region and contractor. The Paver Calculator helps estimate material quantities and costs for a specific area and block type; the Crushed Stone Calculator estimates the sub-base tonnage; and the Sand Calculator covers the laying course and jointing sand.
Sealing (Optional)
Sealing block paving is not required for structural performance, but it provides surface protection that extends the interval between maintenance cycles and improves appearance. A sealer forms a film or penetrating layer on the block surface that resists oil stains, tire marks, water penetration, and weed growth in the joints. It is optional for most domestic installations, but it is recommended for driveways where vehicle fluids are a concern and for light-colored blocks that show staining readily.
Sealer Types
| Type | How It Works | Best For | Lifespan |
|---|---|---|---|
| Acrylic-based sealer | Forms a film on the block surface; water-based or solvent-based | Most domestic applications; color enhancement; stain resistance | 1–3 years depending on traffic and exposure |
| Penetrating sealer | Soaks into the block surface; does not form a surface film | Areas where a natural, non-glossy look is desired; frost protection | 3–5 years |
| Polyurethane sealer | Forms a durable, chemical-resistant film | Heavy-traffic driveways; commercial areas; oil-prone surfaces | 3–5 years |
| Joint stabilizer | Applied to joints only; hardens the jointing sand | Weed-prone areas; joint erosion problems; complement to surface sealer | 2–4 years |
Sealing should be done only after the paving has been laid, jointed, compacted, and allowed to dry thoroughly — typically 48 hours or more after installation, and never in wet or cold conditions. The surface must be clean: sweep all loose sand and debris, and pressure wash if necessary, before applying sealer. Apply with a roller or sprayer in thin, even coats per the manufacturer's coverage rate. Avoid over-application, which can leave a sticky film that traps dirt. Reapply every 2 to 5 years depending on sealer type and traffic levels. Note that sealed paving is harder to re-sand because the sealer film resists sand penetration — if you plan to seal, install and joint the paving first, then seal after the initial sand has been in place for a few weeks.
Maintenance
Block paving requires minimal maintenance to perform well over its service life. The main maintenance tasks are keeping the surface clean, replenishing jointing sand, controlling weeds, and re-sealing if a sealer was applied. None of these tasks are complex, but neglecting them — particularly jointing sand replenishment — is the most common cause of premature deterioration in block paving surfaces.
Maintenance Schedule
| Task | Frequency | How To | Why It Matters |
|---|---|---|---|
| Sweep surface | Weekly (or as needed) | Stiff broom; remove leaves, dirt, and debris | Prevents organic matter from breaking down in joints and promoting weed/moss growth |
| Rinse with hose | Monthly (or as needed) | Standard garden hose; low pressure | Removes surface dirt and prevents stain buildup |
| Re-sand joints | Every 2–3 years | Sweep kiln-dried sand into joints; compact; sweep off excess | Replenishes the friction lock between blocks; prevents rocking, weed growth, and water infiltration |
| Weed control | As needed (typically spring and autumn) | Hand weeding, herbicide, or pressure washing | Weeds in joints lift blocks and accelerate sand loss |
| Pressure wash | Every 1–2 years | Pressure washer at moderate pressure; avoid high pressure on joints | Deep-cleans surface and joints; removes moss and algae |
| Re-seal (if sealed) | Every 2–5 years | Clean surface thoroughly; apply sealer per manufacturer instructions | Maintains stain resistance and appearance; prevents sealer film failure |
| Inspect edge restraints | Annually | Check for movement, gaps, or haunching damage | Edge failure propagates inward; early detection prevents larger repairs |
Pressure washing is the most effective cleaning method, but it accelerates jointing sand loss — use moderate pressure and re-sand afterward. Avoid pressure washing sealed surfaces at high pressure, which can strip the sealer film. For oil stains on driveways, absorb the oil with cat litter or sawdust immediately, then clean with a degreaser designed for paving; sealing the surface makes stain removal significantly easier. The most important maintenance task is re-sanding — it is inexpensive, takes an afternoon, and prevents the majority of problems that lead to expensive repairs.
Common Installation Mistakes
Most block paving failures are not caused by the blocks themselves — they are caused by errors in the hidden layers below: insufficient sub-base depth, inadequate compaction, missing or inadequate edge restraints, and incorrect falls. The table below lists the most common mistakes, their consequences, and how to prevent them.
Mistakes and Prevention
| Mistake | Consequence | Prevention |
|---|---|---|
| Insufficient sub-base depth | Settlement, rutting, and uneven surface under vehicle loads | Use 150mm minimum for domestic driveways; 200mm on soft ground; compact in layers |
| Inadequate sub-base compaction | Progressive settlement; rocking blocks; water pooling | Compact each 100–150mm layer with a vibrating plate compactor; test firmness by walking on it |
| No edge restraints | Lateral movement; edge splaying; blocks working loose at boundaries | Install edge restraints BEFORE laying blocks; use concrete kerbs with haunching for driveways |
| Wrong laying pattern for the application | Shifting and instability under vehicle loads (especially with stretcher bond on driveways) | Use herringbone 45° or 90° for driveways; stretcher bond is acceptable only for patios and paths |
| Insufficient fall | Standing water; slip hazard; accelerated joint erosion; sub-base undermining | Establish 1:60 fall minimum during excavation; check with laser level before laying sand |
| Skipping compaction after laying | Loose blocks; joints not filled; uneven surface | Run a plate compactor over the finished surface in at least 2 passes; repeat sand-and-compact if joints are not full |
| Using building sand instead of kiln-dried sand | Joints do not fill completely; sand cakes; weed growth | Use kiln-dried jointing sand only — it flows into joints without moisture or clay to cause caking |
| Laying blocks on un-screeded or wet sand | Uneven surface; blocks cannot be tapped level | Screed the laying course to a uniform 25–35mm depth before laying; do not lay in wet conditions |
| Ignoring geotextile membrane | Sub-base contamination from soil below; weed growth from subgrade | Lay geotextile between subgrade and sub-base; overlap joints by 300mm |
| Walking on screeded sand | Depressions in the laying course; uneven block surface | Work from a kneeling board; lay blocks from a scaffold board where possible |
Three of these mistakes — insufficient sub-base depth, inadequate compaction, and missing edge restraints — account for the majority of block paving failures within the first five years. All three are preventable with proper planning and equipment. The blocks themselves are extremely durable; it is the installation beneath them that determines whether the surface lasts 5 years or 40.
Worked Example: 20×12 Driveway
The following walkthrough applies the installation sequence to a real project: a 20-foot by 12-foot domestic driveway (240 square feet, approximately 22.3 m²), using 65mm standard concrete blocks in a herringbone 90° pattern, on ground that is firm clay with no unusual drainage issues. Sub-base depth is 150mm of MOT Type 1, laying course is 35mm of coarse sand, and total excavation depth is 250mm.
Materials Estimate
| Material | Quantity | Notes |
|---|---|---|
| 65mm concrete paving blocks (200 × 100mm) | 1,200–1,250 blocks | 240 sq ft ÷ 0.215 sq ft per block ≈ 1,116 blocks + 10% waste allowance for cutting |
| MOT Type 1 sub-base | ≈ 5.5 tonnes | 150mm depth over 22.3 m²; bulk bag or loose delivery |
| Coarse building sand (laying course) | ≈ 1.2 tonnes | 35mm depth over 22.3 m² |
| Kiln-dried jointing sand | 4–6 bags (25kg each) | Quantity depends on joint width and pattern; buy extra for re-sanding later |
| Geotextile membrane | 25 m² | Covers excavated area with 300mm overlaps |
| Concrete kerbs (edge restraints) | ≈ 64 linear feet | Perimeter of 20×12 area minus the road boundary; set in concrete haunching |
Installation Timeline
| Day | Step | Details |
|---|---|---|
| Day 1 | Excavation | Dig out 240 sq ft to 250mm depth. Check falls with a laser level — establish a 1:60 fall from the house wall toward the road. Remove spoil from site. |
| Day 1 | Membrane + sub-base (first layer) | Lay geotextile membrane over excavated subgrade with 300mm overlaps. Spread first 75mm layer of MOT Type 1; compact with plate compactor. |
| Day 2 | Sub-base (second layer) | Spread second 75mm layer of MOT Type 1; compact thoroughly. Check fall again — sub-base gradient determines final surface gradient. Lay edge restraints (concrete kerbs set in cement haunching) along all boundaries. |
| Day 3 | Screeding + laying | Screed 35mm coarse sand using notched rails. Lay blocks in herringbone 90° pattern starting from the edge course, working inward. Use a kneeling board; tap each block level with a rubber mallet. Cut blocks at edges with a diamond-blade saw; bed cut blocks on cement mix. |
| Day 3 | Jointing + compaction | Sweep kiln-dried sand into joints; run plate compactor over the surface in 2 passes; sweep off excess sand; top up any joints that have settled; compact again if needed. |
| Day 4 | Finishing | Final sand sweep; inspect surface for any uneven blocks; lift and re-bed any that are proud or sunken. Allow 48 hours before driving on the surface if a sealer is planned. |
Key Decisions for This Driveway
Pattern: Herringbone 90° — chosen for its very high interlock, which resists the lateral forces that vehicle tires exert on the surface. The 90° orientation was selected over 45° because the driveway edges run parallel to the house and road, so 90° produces less cutting at the boundaries while providing nearly the same interlock strength.
Block thickness: 65mm — the recommended thickness for a domestic driveway carrying cars and light vans. 50mm would work on a well-built base, but 65mm provides a safety margin against edge damage and crushing under repeated vehicle loads.
Sub-base: 150mm of MOT Type 1, compacted in two 75mm layers. The ground is firm clay, so 150mm is adequate; on soft or made-up ground, 200mm would be specified. The geotextile membrane separates the sub-base from the clay subgrade and prevents fine soil particles from migrating up into the crushed stone.
Fall: 1:60 from the house wall toward the road, established during excavation and verified again after sub-base compaction. This fall ensures that rainwater runs off the surface toward the road drainage rather than pooling against the building.
Edge restraints: Concrete kerbs set in concrete haunching along the garden boundary and the side of the driveway. The road boundary uses the existing street kerb as the edge restraint. Edge restraints were installed before block laying began — they contain the lateral forces that the herringbone pattern transfers to the perimeter.
Frequently Asked Questions
For a domestic driveway carrying passenger vehicles, the sub-base should be 150mm (about 6 inches) of compacted MOT Type 1 crushed stone or equivalent. Pedestrian paths and patios can use 100mm (about 4 inches). Commercial parking areas and driveways with heavy vehicles or trucks need 200mm or more. The sub-base sits below a 25–35mm laying course of coarse sand, and the total excavation depth equals sub-base depth plus laying course plus block thickness — typically 200–240mm for a standard domestic driveway.
Herringbone at 45 degrees is the strongest laying pattern for driveways because the interlocking geometry resists the lateral forces that vehicle tires exert on the surface. Herringbone at 90 degrees is nearly as strong and easier to set out because the blocks run parallel to the edges. Stretcher bond — the simple running-bond pattern used on walls — is the easiest to lay but provides the least interlock, making it better suited to patios and paths than driveways. Basket weave and chequered patterns are decorative options for patios where vehicle loads are not a concern.
Block paving should be laid with a minimum fall of 1:60 (about 1.7 percent) away from buildings and toward a suitable drainage point. A 1:80 fall (about 1.25 percent) is preferred for larger areas where a steeper gradient would be visually noticeable. The fall is established during excavation and maintained through the sub-base and laying course — it is not something you can correct after the blocks are laid. Insufficient fall causes water to pool on the surface, which creates slip hazards, accelerates joint erosion, and can undermine the sub-base over time.
Yes, block paving is one of the more DIY-friendly hardscaping projects because the blocks are modular, the process is sequential, and no wet trades are involved. The work is physically demanding — excavation, barrowing sub-base, screeding sand, and plate compaction all require real effort — but the techniques are straightforward. What separates a successful DIY installation from a failed one is preparation: getting the sub-base depth right, establishing proper falls, installing edge restraints before laying, and compacting in stages. A competent DIYer can complete a small patio in a weekend; a driveway typically takes several days including excavation and sub-base work.
Standard concrete block paving has a dense, relatively impermeable surface — water runs off the blocks and exits through the jointing sand or surface drainage. Permeable block paving uses blocks with a porous internal structure and typically wider joints (around 5mm) filled with a special gap-graded aggregate that lets water drain through the surface into the sub-base below. Permeable systems are designed to comply with Sustainable Urban Drainage Systems (SuDS) requirements, which in many jurisdictions now mandate that new driveways manage surface water on-site rather than discharging it into the sewer system. Permeable paving is governed by BS 7533-102 in the UK.
Kiln-dried jointing sand should be replenished every 2 to 3 years under normal domestic use, or sooner if you notice sand washing out of the joints after heavy rain or pressure washing. The jointing sand serves two purposes: it locks the blocks together through friction, and it prevents the blocks from rocking under load. When sand is lost, blocks begin to move, joints widen, weeds establish, and water infiltrates the sub-base. Re-sanding is straightforward: sweep kiln-dried sand across the surface, work it into the joints with a broom, then compact with a plate compactor to bed the sand down, and sweep off the excess.
A geotextile membrane between the subgrade and the sub-base is strongly recommended for almost all block paving installations. It serves three functions: separation (keeps the clean crushed stone sub-base from mixing with the soil below), filtration (lets water pass through while preventing fine soil particles from migrating up into the sub-base), and weed suppression (blocks weed growth from below). The membrane is laid after excavation, before the sub-base is placed, and should overlap by at least 300mm at joints. It is inexpensive insurance against the most common cause of block paving failure — sub-base contamination and loss of structural support.
A properly installed concrete block paving driveway or patio typically lasts 25 to 40 years or more with basic maintenance. The blocks themselves are extremely durable — concrete compressive strength for paving blocks is usually 35 to 50 MPa, far exceeding what domestic vehicle loads require. What determines lifespan is the quality of the installation underneath: a well-compacted sub-base with proper edge restraints and drainage will support the blocks indefinitely, while a poorly built base will cause settlement, rutting, and block displacement within a few years. Natural stone pavers last longer still — often 50 years or more — but cost significantly more.
References
- British Standards Institution, BS 7533-102:2019 — Guide for the construction of permeable flexible pavements containing precast concrete paving units, bsigroup.com — permeable block paving construction requirements, sub-base specification, and drainage performance.
- British Standards Institution, BS 7533-1:2017 — Guide for the construction of flexible surfaces for vehicular and pedestrian areas, bsigroup.com — general code of practice for block paving construction, laying courses, and compaction.
- Paving Expert, Block Paving: Flexible and Rigid Construction, pavingexpert.com — flexible vs rigid methods, edge courses, herringbone setting out, screeding, and cutting-in procedures.
- Paving Expert, Laying Flexible Block Paving: Detailed Construction, pavingexpert.com — layer-by-layer construction detail, laying course specifications, and edge restraint haunching dimensions.
- Thomas Armstrong (Concrete Blocks) Ltd, Block Paving Installation Guide, thomasarmstrongconcreteblocks.co.uk — block sizes, sub-base depths per application, laying patterns, and jointing sand specifications.
- Thomas Armstrong (Concrete Blocks) Ltd, Block Laying Patterns, thomasarmstrongconcreteblocks.co.uk — stretcher bond, herringbone 45° and 90°, dual-size offset, chequer, and basket weave pattern descriptions with layout diagrams.
- Marshalls plc, Gardens & Driveways: Block Paving Products, marshalls.co.uk — product specifications, pack coverage, color ranges, and thickness recommendations for domestic driveways.
- Tobermore, Block Paving Installation Guide, tobermore.co.uk — excavation depth calculations, fall requirements (1:60–1:80), DPC clearance, and BS 7533-102 compliance for permeable installations.
- Cost Estimator, Block Paving Cost Guide, costestimator.co.uk — installed cost ranges for concrete blocks, permeable blocks, and natural stone pavers per square meter.
- Block Paving Direct, Block Paving Patterns Guide, blockpavingdirect.co.uk — pattern comparison with suitability ratings for driveways, patios, and commercial applications; thickness guides by traffic type.
Disclaimer: This guide provides general educational information about concrete block paving and is not engineering or construction advice. Actual installation requirements vary by soil conditions, traffic loading, climate, local regulations, and intended use. Sub-base depths, fall requirements, and material specifications are typical values and must be confirmed for your specific site. Permeable paving installations and driveways in regulated areas may require planning permission or must comply with local SuDS or stormwater management requirements. Always verify requirements with your local building or planning department and the paving manufacturer before starting work.