
ON THIS PAGE:
The Rectangle Method
Nearly every irregular room in a house is built from rectangles that meet at right angles. A T-shaped room is two rectangles. A U-shaped room is three. A room with an alcove is a large rectangle plus a small one. If you can split the room into rectangles, you can measure it accurately with nothing more than a tape and a sketch.
The method has three steps, and each one has a failure mode worth knowing:
- Sketch the room. Draw the shape roughly in proportion on paper and label every wall. You do not need a scale drawing, but you do need to see where each wall meets the next, because that is where the split lines go.
- Split it into rectangles. Draw dashed lines where the room naturally divides. Where you draw them does not matter as long as every square inch of floor belongs to exactly one rectangle — nothing counted twice, nothing skipped.
- Measure and add. Measure length and width for each rectangle at floor level, multiply, and sum the sections. That total is your room's measured area.
The single most useful habit is to add a check column. Write each section's area beside its dimensions, add them twice, and compare. If two additions differ, you have misread a number rather than mis-measured a wall, and the second reading finds it in seconds.
This is the same approach the L-shaped room guide uses, and it extends to any plan built from right angles. For a room that is mostly one rectangle with a small complication, the square footage guide covers the gross-versus-net distinction that decides which boundary you measure to in the first place.
T-Shaped Rooms
A T-shaped room is a wide rectangle with a narrower rectangle extending from the middle of one side. Common examples: a living room with a dining bump-out, or a bedroom with an extended closet wing. It splits cleanly into two rectangles.
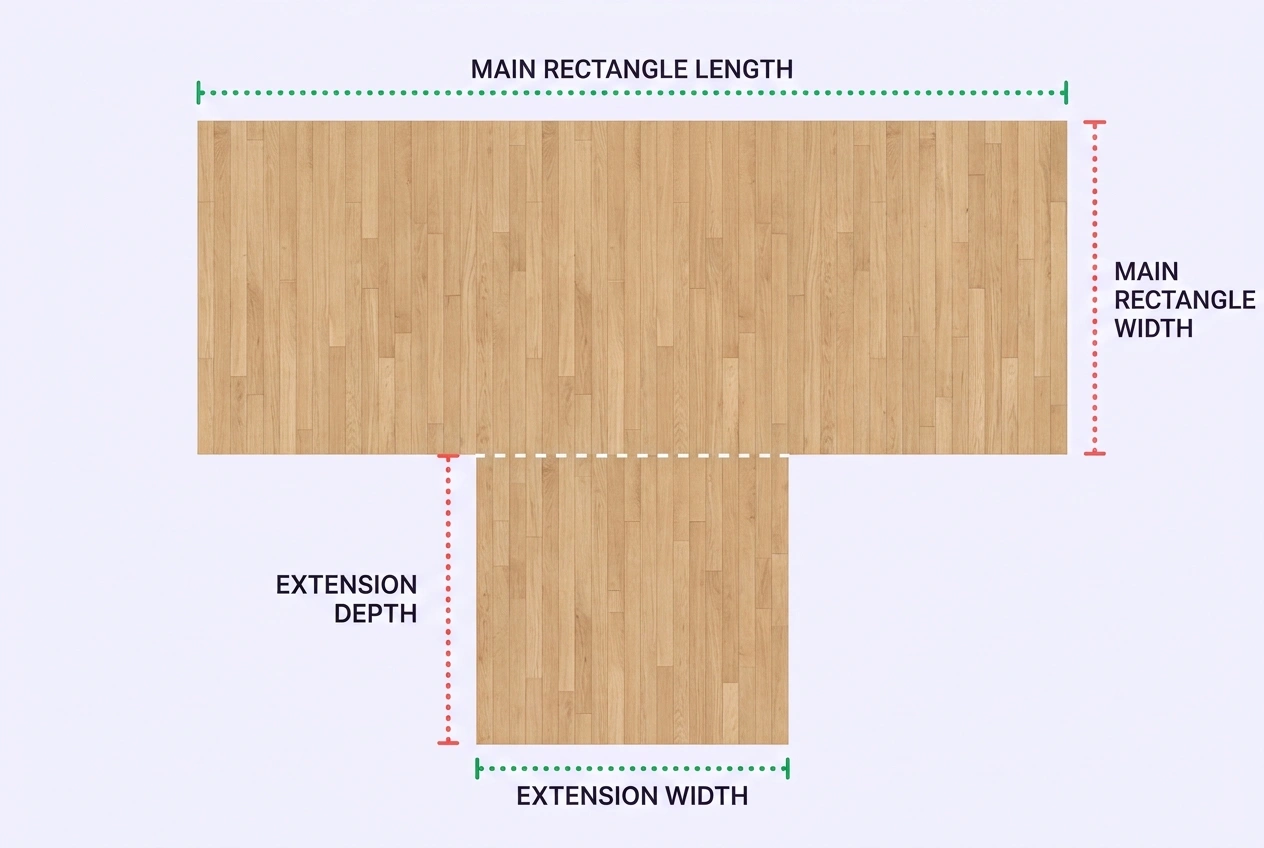
- Measure the main rectangle: the full width of the room and its depth, measured only to the wall where the extension attaches.
- Measure the extension rectangle: how far it projects and how wide its opening is.
- Check the fit: the extension width should be less than the main rectangle's width. If it is not, the sketch is wrong, not the tape.
- Add the two areas: (main width × main depth) + (extension width × extension depth).
The two rectangles meet at a wall line and do not overlap, so a straight addition is always correct. The classic error is measuring the main room's depth all the way to the tip of the extension and then adding the extension's full depth on top. That counts the extension twice, and on a 250 square foot floor it is an 80 square foot error — four boxes of plank.
U-Shaped Rooms
U-shaped rooms happen around stairwells, fireplaces, built-in storage, and open-plan layouts that wrap around a central core. The shape splits into three rectangles: two legs and a connecting section.
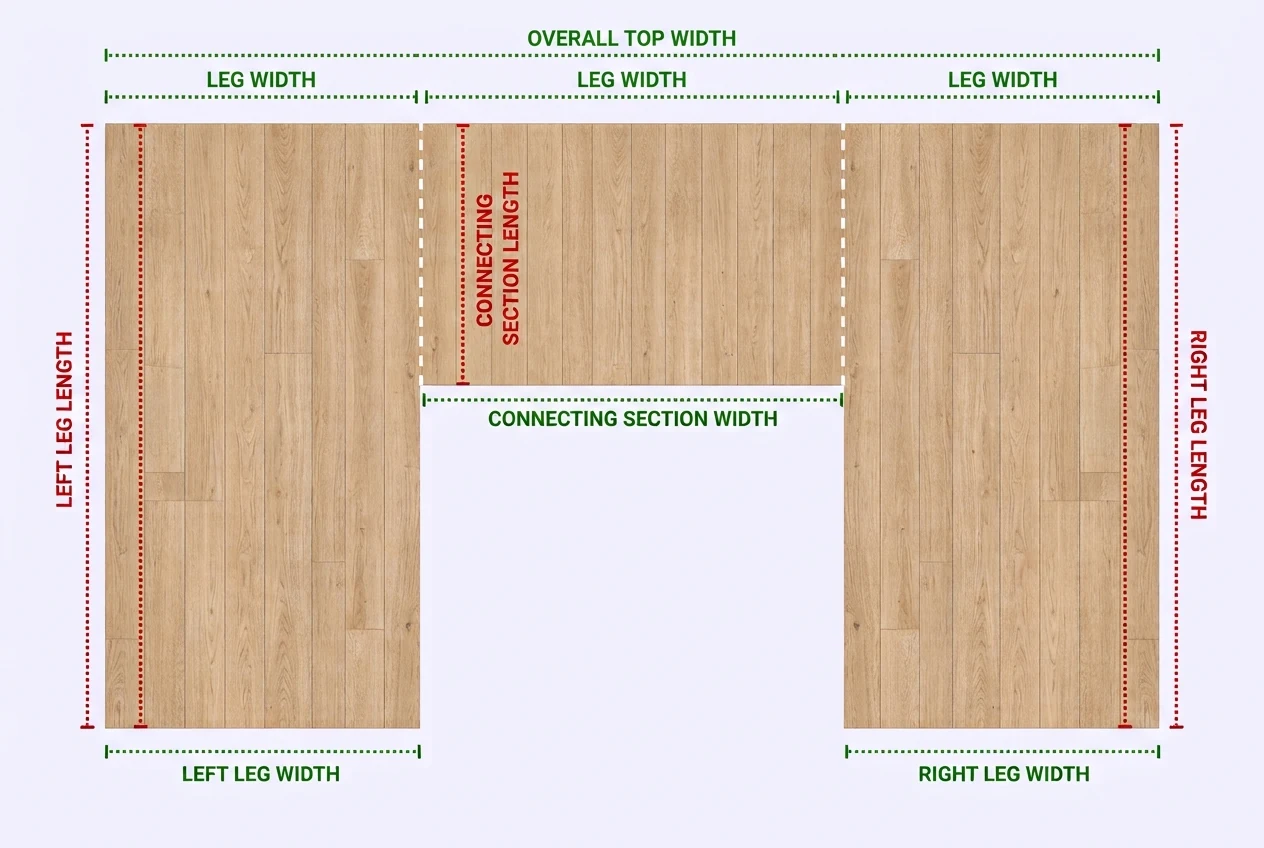
- Identify the two legs (the parallel sections) and the connecting section that joins them at one end.
- Measure each leg separately: length and width of each, from the inner face of the connecting section outward.
- Measure the connecting section: its length spans the outside of both legs, and its depth is the width of the bridge.
- Add all three areas. If two legs are mirror images, measure both anyway; framing is rarely as symmetrical as the drawing.
Do not measure a U-shape as one large rectangle minus the notch. It works mathematically, but it requires you to measure the size of the missing core accurately — and the core is usually occupied by a chimney breast, a stair, or a built-in that makes the tape awkward. Measuring the three real sections keeps every reading on a surface you can reach.
Alcoves and Offsets
An alcove is a shallow recess: a window seat, a bump-out for a bookcase, a step-out in a wall. Alcoves are the easiest irregular feature to handle because they are single rectangles hanging off a main room.
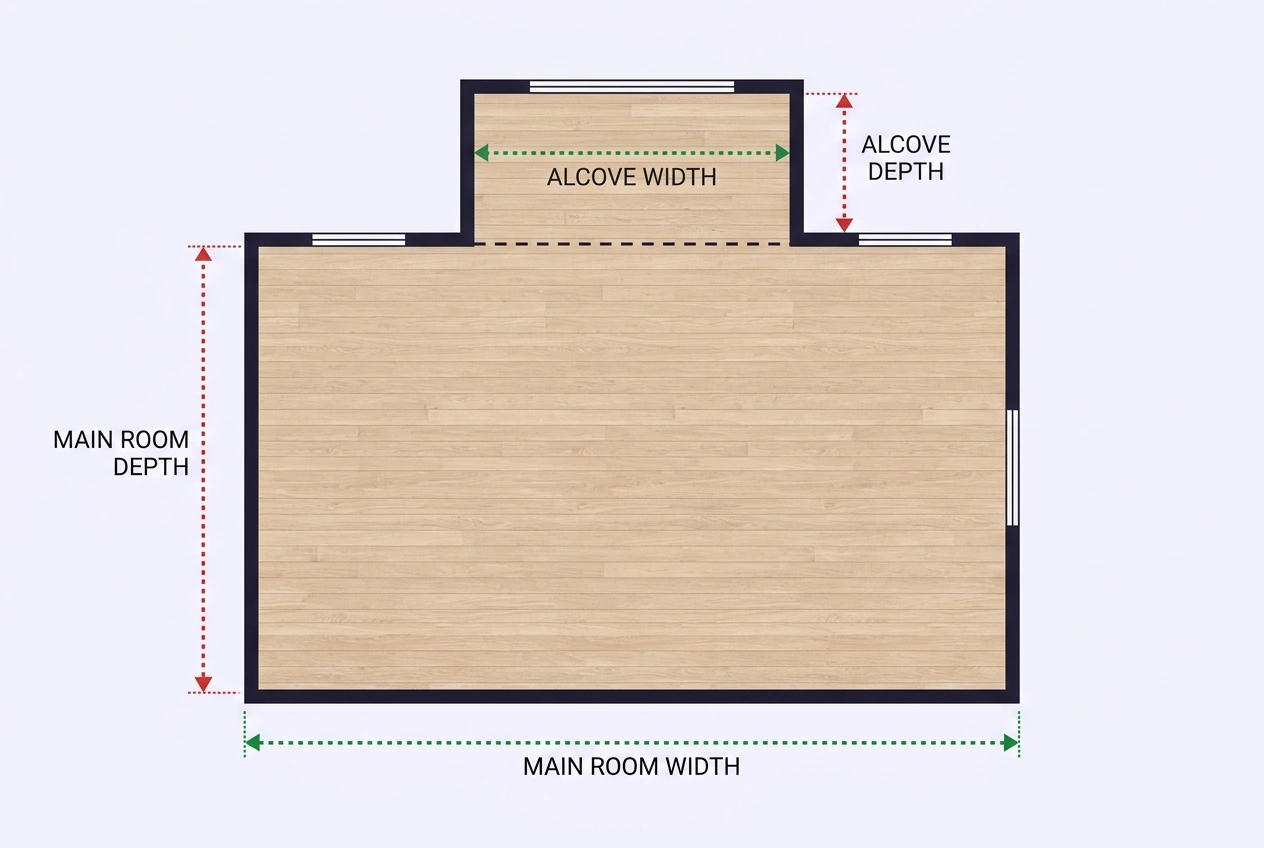
- Measure the main room as a full rectangle, ignoring the alcove entirely.
- Measure the alcove on its own: depth (how far it projects past the main wall face) and width (the clear opening).
- Multiply and add. A 6 ft wide, 18 in deep window seat is 9 square feet — small, but two of them plus a closet return adds up to most of a box.
- Decide whether it is floor. A raised window seat with a fixed top is not walkable floor, so measure it only if you are covering it.
Alcoves are common in the niches and bay windows guide, which covers what to do when a room has four or five of them and the counting gets confusing. For a bay with angled sides, the geometry is a rectangle plus two triangles rather than one alcove rectangle.
Rooms with Odd Angles
Some rooms have walls meeting at something other than 90 degrees: a slanted closet wall, a diagonal entry, a corner cut for a staircase. Rectangles cannot cover these, and the fix is to split the angled part into a rectangle plus a triangle.
- Split so the angled wall is the long side of a right triangle, with the other two sides running along square walls.
- Measure the base and the height — the two legs that meet at 90 degrees. Neither is the slanted wall.
- Compute the triangle area: base × height ÷ 2.
- Add the rectangle areas plus the triangle area.
If the corners are not square, drop a perpendicular from the far corner down to a measured base line and use that perpendicular as the height. The formula is unchanged; only the way you find the height changes. A common mistake is measuring the slanted wall and using it as if it were a side of a rectangle, which always overstates the area — a 10 ft slant over an 8 ft base inflates a 24 square foot triangle to 80 square feet of imaginary floor.
Angled rooms also change the installation, not just the quantity. Every row of plank or tile meets the angled wall at a different length, so waste climbs and the layout needs a decision about whether the pattern runs parallel to the square walls or to the angle. The diagonal layout guide covers the second case.
Curves, Bays, and Round Corners
Curved features are rare in floor plans and common in older houses: a rounded bay, a curved stair landing, a turret room. Three approximations cover almost all of them.
| Feature | Shape to use | Formula | Typical size |
|---|---|---|---|
| Full semicircular bay | Half circle | π × r² ÷ 2 | A 6 ft wide bay adds about 14 sq ft |
| Shallow curved bay (segmental) | Rectangle plus two small triangles | Split and add | 8–15 sq ft |
| Rounded corner or turret | Quarter circle plus rectangles | π × r² ÷ 4 | 3–8 sq ft |
| Curved stair landing | Half circle or quarter circle | π × r² ÷ 2 or ÷ 4 | 10–25 sq ft |
Approximation is acceptable here because curves are small relative to the room and because curved cuts generate above-average waste anyway. Measure the width across the opening and the depth at the centre; those two numbers let you reconstruct radius and depth for any of the shapes above. Where a curve is a fixed feature — a hearth, a raised platform — it is not floor, and it comes out of the total rather than into it.
Worked Example: T-Shaped Living Area
A combined living and dining space forms a T. The main rectangle is 14 ft × 12 ft, and the dining bump-out projects 8 ft from the main wall and is 10 ft wide.
- Main rectangle: 14 ft × 12 ft = 168 sq ft
- Dining extension: 10 ft × 8 ft = 80 sq ft
- Total measured area: 168 + 80 = 248 sq ft
- Waste at 12 percent for an irregular shape: 248 × 1.12 = 277.8 sq ft
- Boxes: 277.8 ÷ 22 sq ft per box = 12.6, so 13 boxes
Without the extension you would have ordered 8 boxes for 168 square feet and finished roughly 110 square feet short — a stopped job, a second delivery, and a dye lot that may not match. That is the entire argument for splitting the plan: the extension is one extra measurement, and skipping it costs the project.
Run your own numbers through the Flooring Calculator. Enter the measured total and a waste percentage and it converts to boxes and cost; it does not know the shape of your room, so the split has to happen on paper first.
How Much Waste to Add
Waste is material you buy and never install: cut-offs, mis-cuts, and planks damaged in transit. Every project has some, and irregular rooms need more because every corner and every direction change means another cut.
| Room shape | Suggested waste | Why |
|---|---|---|
| Simple rectangle, straight lay | 8–10% | Perimeter cuts only |
| L-shape or single alcove | 10–12% | One inside corner, one direction change |
| T-shape or three or more corners | 12–15% | Multiple short rows and returns |
| U-shape around a core | 12–15% | Two inside corners plus a narrow bridge |
| Angled walls, straight lay | 15% | Every row meets the angle at a different length |
| Angled walls, diagonal layout | 15–20% | Pattern waste plus angle waste |
| Multiple small rooms | 15–20% | Each room pays its own perimeter cost |
Then round up to whole boxes and expect the delivered quantity to exceed your allowance. A 264 square foot requirement at 23.8 square feet per box becomes 12 boxes, or 285.6 square feet — an effective 19 percent over the measured area even though only 10 percent was allowed. That is box rounding, not extra waste, and the flooring waste factor guide works through the arithmetic.
Checking Your Numbers
Three cheap checks catch nearly every measurement error before it becomes an order.
- Sum of parts against the overall outline. A room's true area cannot exceed the bounding rectangle (longest dimension × widest dimension). If your total is larger, a shape has been counted twice.
- Perimeter walk. Add every wall length once and compare with the sum of the section dimensions you used. They should reconcile; a gap means a wall was measured twice or skipped.
- Two additions. Add the section areas in a different order. Simple arithmetic slips are far more common than tape errors, and re-adding takes ten seconds.
A fourth check costs more but pays for itself on large jobs: measure one long dimension twice, from opposite ends. If the two readings differ by more than an inch over 20 feet, the room is out of square or a wall is bowed, and the larger reading is the one that governs material consumption.
Recording the Sketch
The sketch is the deliverable. A number without a drawing cannot be checked later, and a drawing without numbers cannot be ordered from.
| On the sketch | Why it matters |
|---|---|
| Room name and floor level | Two rooms can share dimensions and still need separate waste |
| Every dimension along the wall it measures | Shows which wall each number belongs to when you re-check |
| Dashed split lines with section labels (A, B, C) | Makes the addition auditable |
| Doors, openings, and floor-level changes | Explains deductions and transitions later |
| Section areas plus the total | The number that goes into the calculator |
| Date and initials | Tells you whether the note is current |
Photograph the sketch with your phone before leaving the room. Paper sketches live in pockets, and the photo is what you will actually consult at the store. If several rooms are involved, the multi-room project guide covers keeping a running total without losing a wall.
Frequently Asked Questions
References
- National Wood Flooring Association, Measuring and Estimating Guidelines — room measurement, net area, and waste practice, nwfa.org
- ANSI, ANSI Z765 Standard for Measuring, Calculating, and Reporting Square Footage — area measurement conventions for residential property, ansi.org
- Carpet and Rug Institute, Installation Standards — room measurement, seam planning, and irregular space estimating, carpet-rug.org
- Tile Council of North America, TCNA Handbook for Ceramic, Glass, and Stone Tile Installation — layout planning and cutting allowances in non-rectangular spaces, tcnatile.com
- National Institute of Standards and Technology, NIST Handbook 44 — measurement units and conversion factors used in trade, nist.gov
- U.S. Bureau of Labor Statistics, Occupational Employment and Wage Statistics — flooring installer and estimator wages by area, bls.gov/oes
Disclaimer: This guide explains geometric methods for measuring non-rectangular rooms for planning and material ordering. It is not a survey, an appraisal, or a professional takeoff. Real rooms are rarely square, walls bow, and floor-level features sometimes make an area unsuitable for covering, so confirm critical dimensions on site and check material quantities against the manufacturer's coverage figures before ordering.