
ON THIS PAGE:
Measure Room by Room
A multi-room project is a series of single-room measurements added together. Nothing about the geometry gets harder; what changes is that every space now has to be recorded, attributed, and totalled without duplication.
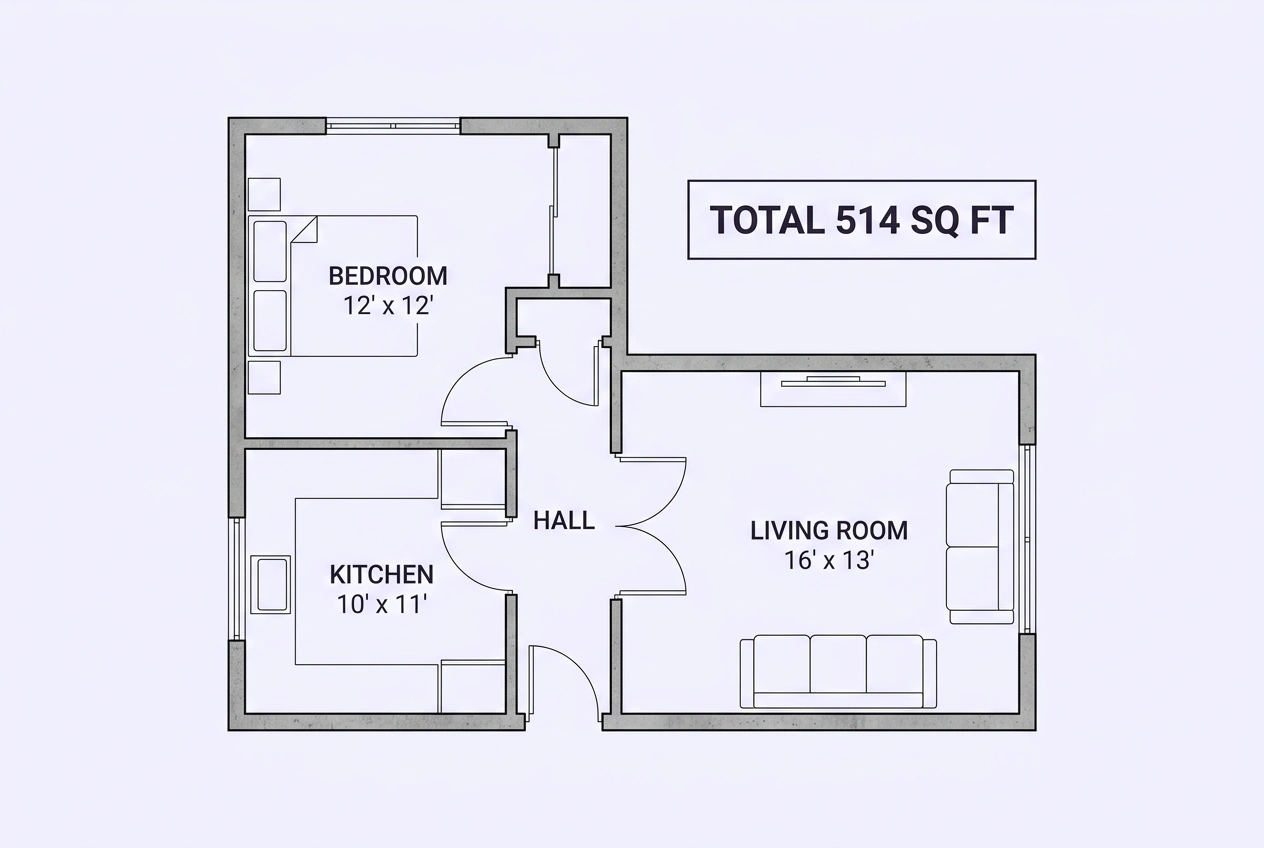
- Sketch the entire floor. Every room, hallway, closet, landing, and return you intend to cover. Draw it roughly proportional; you are mapping adjacency, not drafting.
- Measure each space as its own shape. One rectangle for a bedroom, two for an L, three for a U. The irregular rooms guide covers the splits.
- Label every measurement with the room name — bedroom 1, hall east, linen closet — so the list matches the floor when you check it.
- Add a total column and update it as you go. A running total catches a missed room instantly, because the number stops matching your expectation.
- Include only spaces getting the same material. If a closet stays carpeted or a bathroom keeps tile, leave it out and mark the transition on the sketch.
Measure in a fixed order — clockwise from the front door is the usual habit — so a second pass follows the same route. When the total disagrees with your estimate, walking the same route again finds the discrepancy faster than re-reading the list.
Keeping a Running Total
The takeoff sheet is the whole system. Six columns handle any residential project, and they take about a minute per room to fill.
| Space | Length | Width | Area (sq ft) | Notes | Running total |
|---|---|---|---|---|---|
| Living room | 18 ft 0 in | 14 ft 0 in | 252.0 | One doorway to hall | 252.0 |
| Hall east | 16 ft 0 in | 3 ft 6 in | 56.0 | Three doorways | 308.0 |
| Kitchen | 12 ft 0 in | 11 ft 0 in | 132.0 | Island cut-out | 440.0 |
| Bedroom 1 | 13 ft 0 in | 12 ft 0 in | 156.0 | Plus closet 12 | 608.0 |
| Closet 1 | 6 ft 0 in | 2 ft 0 in | 12.0 | Reach-in, same material | 620.0 |
Two habits make the sheet trustworthy. First, write dimensions in feet and inches rather than decimal feet, because that is what the tape shows and conversion errors happen when you translate on the fly. Second, total the column by hand once and let a calculator confirm it — the hand total catches a transposed digit that a calculator will happily carry forward.
Hallways and Transitions
Hallways are the spaces people forget, and they are also where the layout gets complicated. Every door along a hall is a cut, and the hall usually meets each room at 90 degrees to that room's rows.

- Measure the hall as length × width. A 20 ft × 3 ft hall is 60 square feet of material and a meaningful share of a project total.
- Count the doorways. Each is a cut, and each is a candidate for a transition strip if the adjoining room's rows run perpendicular.
- Plan continuous runs where possible. Carrying the same rows through a hall and into the rooms it serves reduces cuts, hides thresholds, and looks intentional.
- Budget the hall's waste honestly. Hallways have the highest cut density per square foot in a house — narrow width, many openings, and often a turn or two.
Hallways are also the best place to spend offcuts. A 2-foot remainder from a bedroom row frequently fits a hall return, a closet floor, or the strip beside a door. That reuse is why project-level waste can sit lower than per-room waste: the offcuts have somewhere to go.
Doorways and Openings
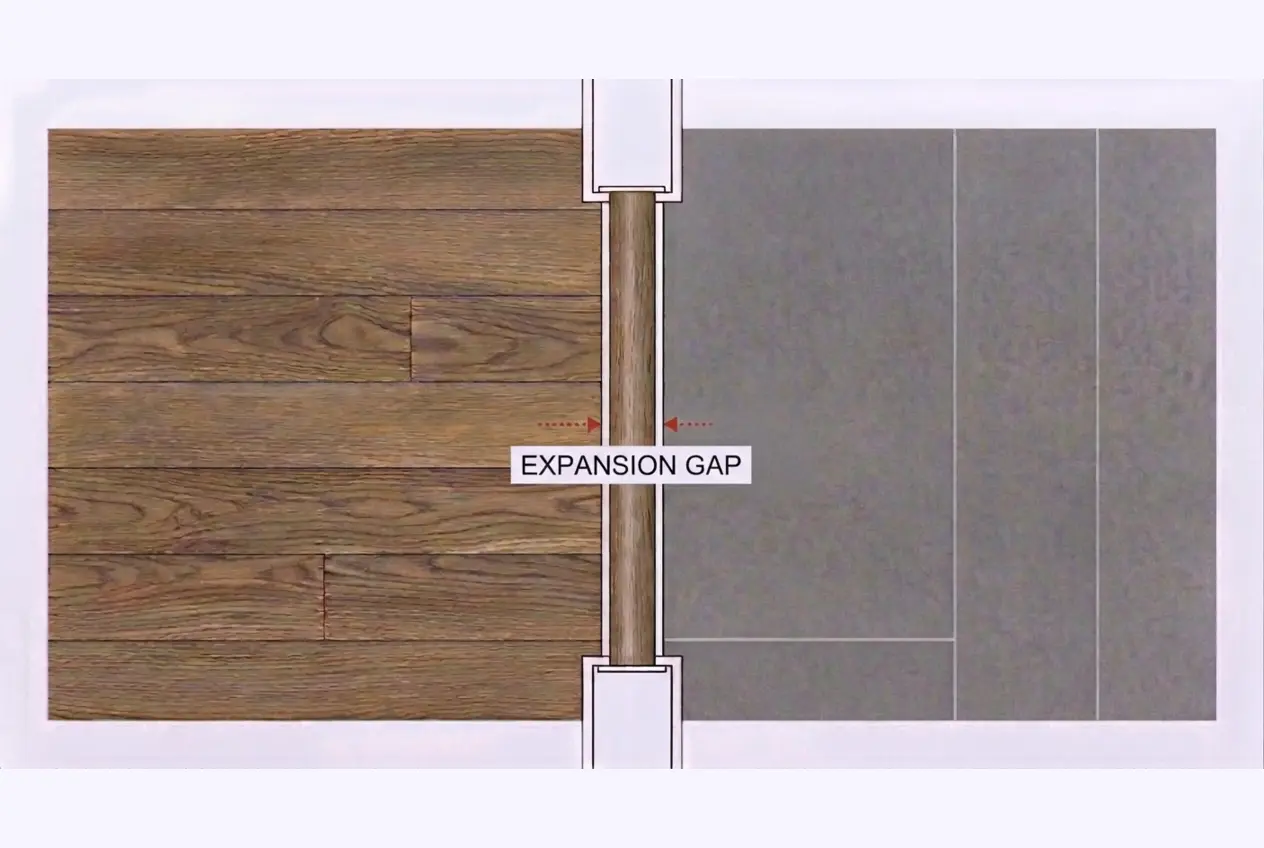
A doorway decides whether the floor runs through or stops, and that decision changes both the quantity and the hardware order. Make it before you order, not on install day.
| Approach | What it needs | Best when |
|---|---|---|
| Continuous run | Planks span the opening; no strip | Same material both sides, rows align |
| T-moulding | 2 in of extra floor each side plus the profile | Same material, rows run perpendicular |
| Reducer | Height difference plus a profile | Different floor thicknesses meet |
| Threshold | Profile plus the opening width | Material change or exterior door |
| End cap | Profile at a fixed edge | Flooring stops at carpet or a cabinet |
Measure every opening where flooring meets flooring, flooring meets tile, or flooring meets carpet, and list the widths for the transition order. A typical house needs 5 to 15 profiles. At a few dollars per linear foot they are a small line item, but they are the item that stops a job when it was not ordered with the flooring — and matching a profile colour two weeks later is the same dye-lot problem in miniature.
The flooring transitions guide covers which profile suits which height difference, and the Linear Feet Calculator totals the runs once you have the widths.
Waste: Per Room vs Whole Project
For one room, waste is a percentage of that room. For a project, waste belongs to the project total, and the allowance can usually drop a little because offcuts become useful.
Project order = (sum of all room areas) × (1 + project waste factor)
| Project type | Waste on the total | Why |
|---|---|---|
| One material, one straight layout, several rooms | 8–10% | Offcuts flow between rooms and into halls and closets |
| One material, mixed patterns | 12–15% | Diagonal or herringbone areas cannot reuse straight-lay offcuts |
| Different materials per room | Per material | Waste cannot be shared between products |
| Many small rooms and bathrooms | 15%+ | Each room pays its own perimeter cost |
| Plus attic stock | One extra box | A spare for future repairs, bought in the same run |
Rounding matters as much as the percentage. Three rooms that each round up a half box can add a full box to the project total, which is one reason to calculate the whole order at once rather than buying room by room. The Flooring Calculator accepts a measured area and waste percentage and returns boxes and cost, so you can compare the per-room and project-level approaches before committing.
One Order, One Dye Lot
Flooring is manufactured in runs, and runs vary slightly in colour. Planks from different runs installed side by side can show a visible shade change in the middle of a room — not a defect, just manufacturing variation that becomes visible once the material is flat under one light.
- Order the entire project at once, including the spare box, so every carton comes from one run.
- Check the labels on arrival. If two runs appear, resolve it before installation starts, not after the first room is down.
- Mix cartons as you install. Open several boxes at once and pull planks in rotation so minor variation spreads across the floor instead of clustering at one end.
- Keep 2 to 3 spare planks or a full box, labelled with the run number and stored flat indoors.
This is the practical argument for measuring the whole project before buying anything. A second order is not merely more freight — it is a colour-match risk with no reliable fix, because the matching run may be gone by then. The flooring waste factor guide covers dye lots and returns in more detail.
Worked Example: Three Rooms Plus a Hall
A project covers a living room, a kitchen, a bedroom, and the hallway between them. One laminate, one straight layout, 22 square feet per box.
- Living room: 18 ft × 14 ft = 252 sq ft
- Kitchen: 12 ft × 11 ft = 132 sq ft
- Bedroom: 13 ft × 12 ft = 156 sq ft
- Bedroom closet: 6 ft × 2 ft = 12 sq ft
- Hallway: 16 ft × 3.5 ft = 56 sq ft
- Project total: 252 + 132 + 156 + 12 + 56 = 608 sq ft
- Waste at 10% on the total: 608 × 1.10 = 668.8 sq ft
- Boxes: 668.8 ÷ 22 = 30.4, so 31 boxes, or 682 sq ft delivered
- Transitions: five doorways at about 3 ft each = 15 linear feet of profile
Now compare the per-room habit: rounding each room up separately at 10 percent gives 278 + 146 + 172 + 14 + 62 = 672 square feet before box rounding, and the box count can land one higher. The difference is small in money and meaningful in the message: the project total is the number the store needs, and the per-room list is how you verify it.
Add the spare box from the same run and the order becomes 32 boxes. That is the quantity to quote, and it is the quantity to check against the delivery note.
Walking the Project Route
Before ordering, walk the entire installation route with the sketch in hand. This is the step that catches what the table cannot.
- Open every door, including closets, linen cupboards, and the space under the stairs. Each may need floor.
- Check the thresholds. Confirm which openings get a strip and which run through, and note any height difference that needs a reducer.
- Look for floor-level changes. A step down to a sunken room, a raised hearth, or a platform is measured as its own level.
- Find the fixed obstacles. Islands, built-in benches, and floor-mounted cabinets are not floor. Mark them so nobody measures around them twice.
- Confirm what stays. A tiled bathroom, a carpeted stair, or a closet with shelving that cannot come out — mark each as excluded.
The walk takes ten minutes and is the cheapest error-correction available. Most multi-room shortages are not arithmetic errors; they are spaces nobody walked into.
Phasing Rooms Over Time
Many projects are installed in stages — a living room this month, bedrooms next year. Phasing changes the buying strategy, not the measuring method.
| Approach | Advantage | Risk |
|---|---|---|
| Buy everything now, install in stages | One dye lot, one delivery, price locked | Storage space; material must stay flat and dry |
| Buy per stage | Lower upfront cost | Colour match risk; discontinued products |
| Buy now plus attic stock | Covers repairs and small later areas | Spare box must be stored properly |
If the material is a stock item with stable production, staging is low risk. If it is a closeout, a special order, or a product line that turns over quickly, buy the whole project at once even if installation takes a year. Store cartons flat, off the floor, indoors, and away from exterior walls on a slab.
The Takeoff Sheet
The finished sheet should let a stranger order the material. That is the test.
| Element | What it should contain |
|---|---|
| Sketch | Whole floor, every space labelled, split lines dashed |
| Dimensions | Feet and inches, written along the wall they measure |
| Areas | Per space, plus a project total |
| Exclusions | Spaces not being covered, with the reason |
| Transitions | Opening widths and profile type per doorway |
| Waste and boxes | Percentage applied, boxes rounded up, spare included |
| Date and initials | Because measurements get revised |
Keep the sheet with the purchase receipt and the run numbers. When a repair is needed two years later, the sheet tells you what was bought and the label tells you what to ask for. The room square footage guide explains why the total on the sheet will differ from a listing figure, and which one to trust for material.
Frequently Asked Questions
References
- National Wood Flooring Association, Measuring and Estimating Guidelines — project measurement and waste practice, nwfa.org
- North American Laminate Flooring Association, Installation Guidelines — transitions, expansion gaps, and layout continuity between rooms, nalfa.com
- Carpet and Rug Institute, Installation Standards — room measurement, seam planning, and multi-room estimating, carpet-rug.org
- Tile Council of North America, TCNA Handbook for Ceramic, Glass, and Stone Tile Installation — movement joints and transitions between finishes, tcnatile.com
- ANSI, ANSI Z765 Standard for Measuring, Calculating, and Reporting Square Footage — area measurement conventions for residential property, ansi.org
- U.S. Bureau of Labor Statistics, Occupational Employment and Wage Statistics — flooring installer and estimator wages by area, bls.gov/oes
Disclaimer: This guide explains how to measure a multi-room flooring project for planning and ordering. It is not a professional takeoff or a supply contract. Room dimensions, transition requirements, and packaging coverage vary by property and product, and colour consistency across separate orders cannot be guaranteed. Verify every dimension on site and confirm carton coverage, run numbers, and return terms with your supplier before buying.