
ON THIS PAGE:
What a Transition Has to Do
A transition is a small piece of trim solving four problems at once. Miss one and the strip will loosen, the floor will buckle, or someone will catch a toe on it.
- Cover the gap. Two floors rarely meet perfectly. The profile spans the joint so dirt and drafts cannot enter and the cut edges are hidden.
- Allow movement. Floating floors expand and contract with humidity and temperature. The profile has to cover the expansion space without pinning it shut.
- Resolve the height. A transition either bridges two level floors or slopes between two different ones. It must do so without a step that catches a foot.
- Survive traffic. The strip takes the same wear as the floor around it, plus the concentrated load of every footstep crossing the seam.
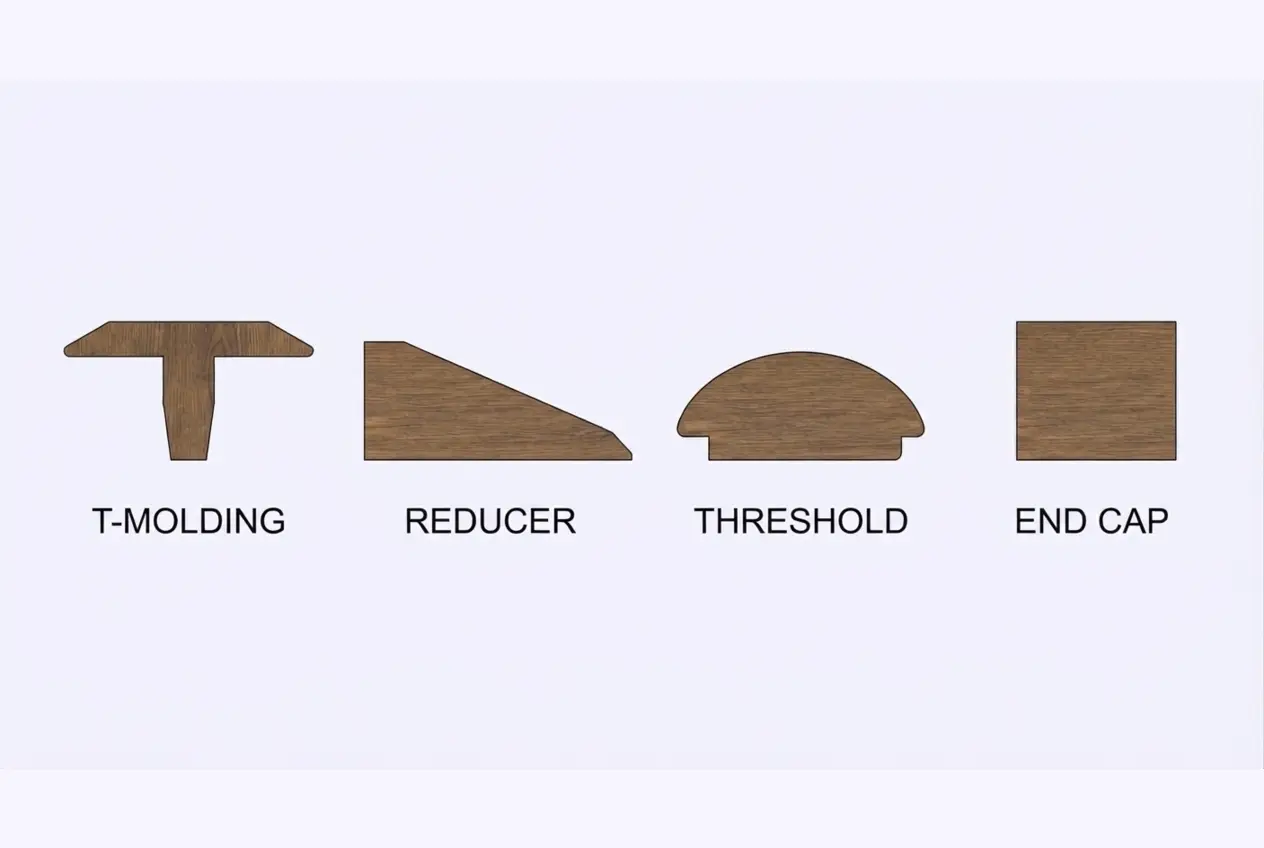
The Five Profiles
| Profile | What it does | Where it goes | Typical price |
|---|---|---|---|
| T-mold | Flat top, stem drops into the gap; joins level floors | Same-height laminate, LVP, or tile in adjoining rooms | $15–$40 per 6–8 ft |
| Reducer | Slopes from a high floor to a low one | Plank floor to tile, thin vinyl to hardwood | $20–$50 |
| Threshold | Wide, low profile spanning a doorway | Exterior doors, bathrooms, unequal but close heights | $25–$60 |
| End cap | Covers a cut edge without a second floor | Floor meeting a wall, slider, or carpet edge | $15–$35 |
| Stair nosing | Wraps the step edge and caps the riser joint | Every stair tread, especially hardwood and LVP | $25–$60 each |
Profiles come in three mounting styles: track-mounted (a base screws down and the cover snaps on), adhesive-mounted, and nail-down. Track systems are the most forgiving because they can be removed and reinstalled without damaging the floor. Solid wood profiles can be sanded and refinished with a hardwood floor; vinyl and laminate profiles cannot.
Matching Two Heights
Measure the finished height of each floor, not the product thickness. Underlayment, thinset, backer board, and pad all add height, and the difference is usually larger than homeowners expect.
| Height difference | Solution | Notes |
|---|---|---|
| 0–1/8 in | T-mold or flat transition strip | Effectively level; a flat strip is enough |
| 1/8–1/2 in | Reducer or threshold | Most common case; choose the slope that matches the drop |
| 1/2–1 in | Reducer plus underlayment build-up, or a custom wood threshold | Consider building up the lower floor instead of a steep ramp |
| Over 1 in | Step with a nosing, or structural change | A ramp that steep is a trip hazard; treat it as a step |
Where the difference is awkward, building up the lower floor with plywood or an underlayment panel often gives a cleaner result than a steep reducer. That decision has to happen before the flooring is installed, not after.
Expansion Gaps and Movement
Floating floors move. A laminate floor in a 20-foot room can grow and shrink by more than a quarter inch between winter and summer, and the transition is where that movement has to be absorbed.
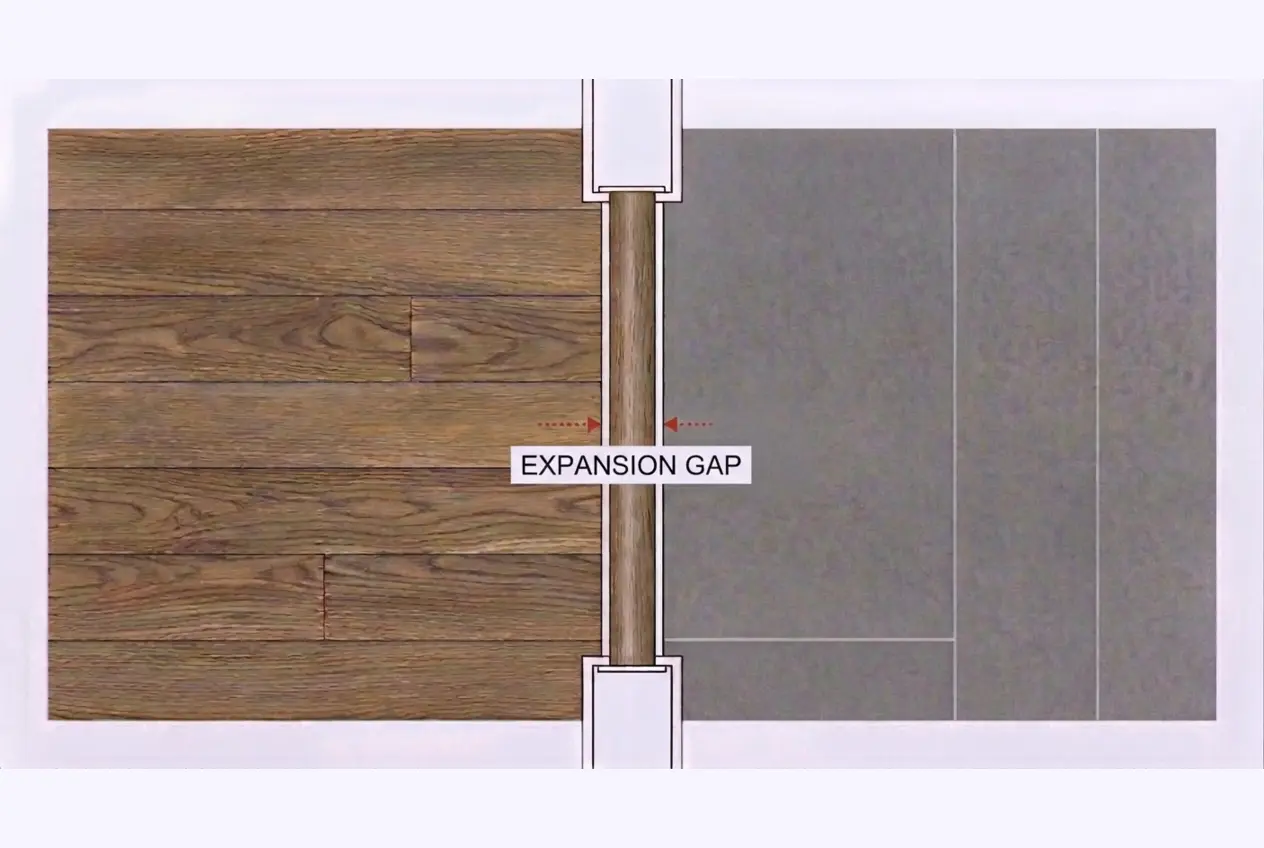
- Gap size: at least the thickness of the plank, commonly 1/4 inch, and 3/8 inch for thick planks, wide rooms, or homes with large humidity swings.
- Never fill it. Adhesive, grout, or caulk in the gap turns a moving floor into a buckling one.
- Cover it, do not clamp it. The profile should float above the gap or be fixed to the substrate, never screwed through both floors.
- Continuous runs: very long floors need intermediate expansion breaks, which are exactly what a T-mold at a doorway provides.
Tile and glue-down floors do not need expansion gaps at transitions in the same way, but they do need movement joints at room perimeters and large fields. The underlayment guide covers the substrate side of these assemblies.
Transitions by Material Pair
| Junction | Best profile | Watch for |
|---|---|---|
| Laminate to laminate | T-mold | Leave expansion gap on both sides; do not join the two floors |
| LVP to tile | Reducer or T-mold depending on height | Tile plus backer board is usually taller than plank |
| Hardwood to tile | Reducer, often custom wood | Wood moves; do not grout against it |
| Tile to carpet | Carpet bar or Z-bar | Tack strip set back from the tile edge; pile height |
| Carpet to carpet | Seam or metal edge strip | Match pile direction and dye lot |
| Plank to exterior door | Threshold with weather seal | Door clearance and exterior step-down |
| Floor to stair | Stair nosing | Nosing must meet code overhang and slip resistance |
Matching the finish matters as much as the shape. Most manufacturers sell the same color in several profiles, so standardize the finish across the house and vary only the profile shape.
Doors, Casings, and Undercuts
A transition at a doorway has to fit under the door and inside the jamb. This is where a floor replacement goes wrong most often: the new floor is thicker than the old one, the door no longer clears it, and the transition has no room to sit.
- Check clearance first. With the new floor down and the transition in place, the door should clear by 1/8 to 1/4 inch. Undercut the door or lift it on its hinges before installing the transition.
- Cut the casing, not the door, when possible. A flush-cut saw lets the floor slide under the casing for a cleaner finish than shoe mold around the jamb.
- Keep the strip inside the jamb line. A profile that projects past the casing catches socks and looks like an afterthought.
- Mind the swing. A reducer under an inswing door needs the door to clear its high side, not just the floor.
Installing a Transition
- Dry-fit the profile. Set it in place before fastening. Check that it covers both floor edges and sits flush with the higher surface.
- Cut to the jamb, not past it. Measure between the casings and cut square; a slightly long strip bows and lifts in the middle.
- Fasten the track to the substrate. Screws every 8 to 12 inches into solid subfloor, or adhesive on clean, dry concrete. Never fasten through the floating floor.
- Snap or nail the cover. Tap with a rubber mallet and a scrap block. If it resists, the track is misaligned, not the cover.
- Seal exterior thresholds. A bead of exterior sealant under the threshold keeps water out of the floor assembly.
What Transitions Cost
Profiles are inexpensive compared with the floors they join, but the count adds up in a whole-house job.
| Item | Material | Installed |
|---|---|---|
| T-mold, laminate or vinyl | $15–$40 per length | $40–$80 |
| Reducer, matching wood | $20–$50 | $50–$95 |
| Threshold, exterior door | $25–$60 | $60–$120 |
| Stair nosing | $25–$60 each | $50–$100 each |
| Carpet bar / Z-bar | $10–$25 | $35–$75 |
| Door undercut | — | $10–$40 per door |
Worked Example: A Three-Room Job
A living room in new LVP meets a tiled kitchen at one doorway and a carpeted bedroom at another. The LVP sits about 3/8 inch lower than the tile and 1/4 inch higher than the carpet.
- LVP to tile: reducer, 3/8 inch drop, 36-inch doorway → $35 material plus $55 install = $90
- LVP to carpet: carpet bar and tack strip, 1/4 inch drop → $20 plus $45 = $65
- Two door undercuts: $30 each = $60
- Total: $215 for the transitions, or roughly 4 percent of a $5,000 flooring job.
Four percent is typical, and it is the part most often left out of a homeowner's budget. Ask for transitions as a line item on the quote, including the count and the profile type.
Common Transition Mistakes
- Buying the profile after the floor. The profile determines the required gap and height; order it with the flooring.
- Screwing through both floors. That pins the floating floor and causes buckling within a season.
- Skipping the gap because "it looks tight". Tight today means buckled in July.
- Using a reducer where a T-mold belongs. A sloping profile between level floors rocks underfoot.
- Ignoring door clearance. Undercutting is cheaper before the floor is down than after.
- Mismatched finishes. Five different transition colors read as a patchwork; standardize the finish.
Frequently Asked Questions
References
- National Wood Flooring Association, Installation Guidelines: Transitions and Expansion — movement gaps and profile selection, nwfa.org
- Tile Council of North America, TCNA Handbook for Ceramic, Glass, and Stone Tile Installation — movement joints and tile-to-dissimilar-material junctions, tcnatile.com
- North American Laminate Flooring Association, Installation Guidelines — expansion gaps and transition requirements, nalfa.com
- Carpet and Rug Institute, Installation Standards — carpet edges, tack strip, and hard-surface junctions, carpet-rug.org
- U.S. Bureau of Labor Statistics, Occupational Employment and Wage Statistics — flooring installer and trim carpenter wages, bls.gov/oes
- International Code Council, International Residential Code — stair nosing, tread, and guard provisions where floors meet stairs, iccsafe.org
Disclaimer: This guide explains common flooring transition profiles and installation practice for general planning. It is not an installation standard or a code ruling. Height differences, expansion requirements, and stair nosing dimensions vary by product and jurisdiction, and local building codes govern stair and guard conditions. Follow the flooring manufacturer's instructions and confirm stair details with the authority having jurisdiction.