
ON THIS PAGE:
Pattern Comparison Chart
Four numbers separate the patterns: extra material, extra labor, the room shapes it suits, and how much attention it demands from the installer.
| Pattern | Extra material | Labor multiplier | Best room shape | Difficulty |
|---|---|---|---|---|
| Straight lay (plank or tile rows) | 5–10% | 1.0× (baseline) | Any rectangle | Low |
| Grid / stack (tile aligned) | 8–10% | 1.0× | Square or rectangular baths and kitchens | Low |
| Brick bond / offset rows | 10–12% | 1.1–1.2× | Hallways, long narrow rooms | Low to moderate |
| Diagonal (45°) | 15% | 1.3–1.5× | Small or out-of-square rooms | Moderate |
| Herringbone | 20–25% | 1.5–2.0× | Square or near-square rooms, entries | High |
| Chevron | 20%+ | 1.6–2.0× | Long rooms where the V should run lengthwise | High |
The multipliers apply to installation labor, not to the material price. A $3.50 per square foot straight-lay labor rate becomes roughly $5.25 to $7.00 for herringbone in the same room, before waste is added. The Flooring Calculator handles the quantity side once you know which pattern you are buying for.
Straight Lay
Planks or tiles run parallel to a wall, usually the longest one, with joints offset in a repeating stagger. It is the cheapest pattern to install because almost every cut is a straight crosscut against a wall, and offcuts from one row often fit the next.
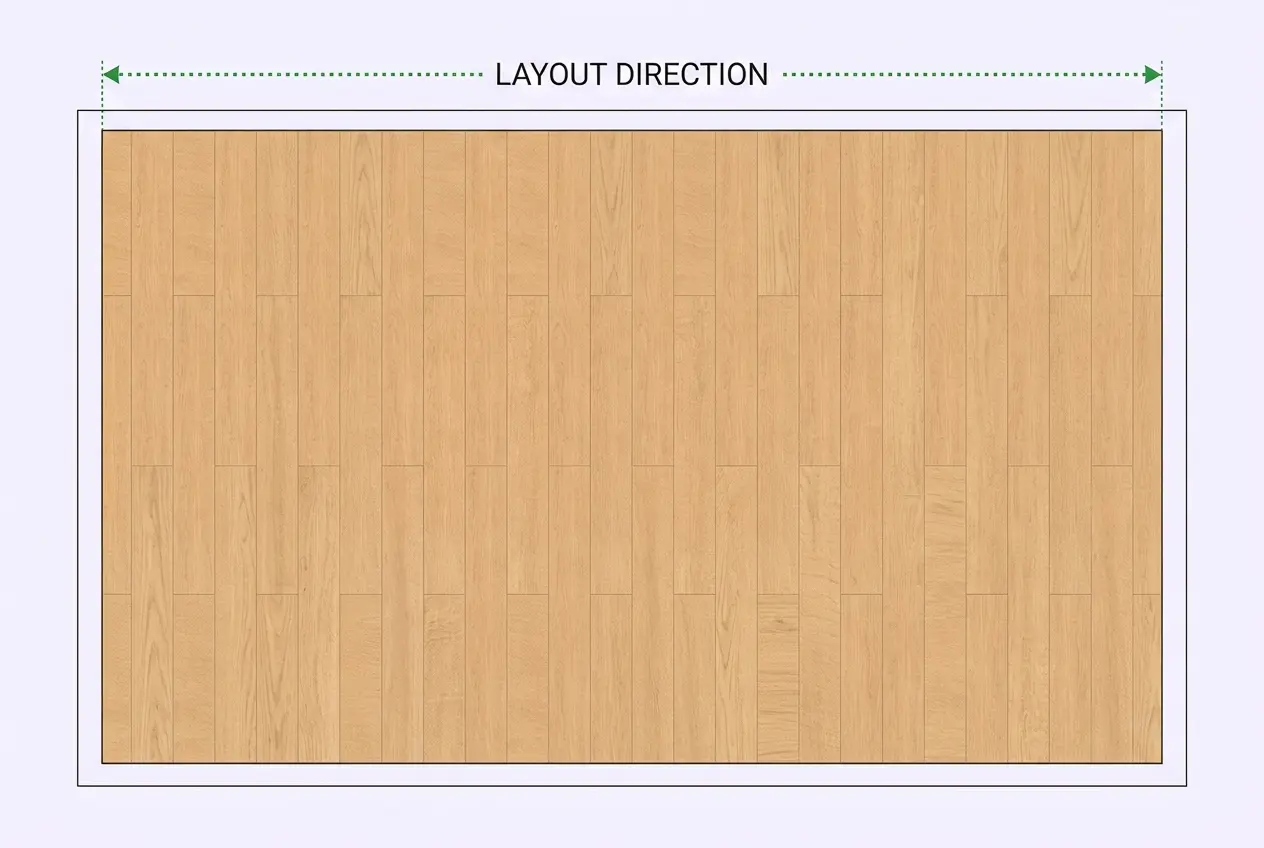
- Direction matters. Run the length along the main sightline, usually from the entry into the room. A long run makes the space feel bigger and pushes end joints out of view.
- Stagger the joints. For plank flooring, end joints should be at least 6 to 8 inches apart from row to row, and never aligned across adjacent rows. Tile is usually laid in a straight grid or a 1/3 offset.
- Start from the longest continuous wall. Establish a chalk line, then work outward so the cut row lands at the least visible wall, not in the middle of the floor.
Straight lay is the default because it is honest: it hides nothing, costs the least, and looks correct in nearly every room. If you are selling in the next few years, it is also the safest choice.
Diagonal Lay
A diagonal layout sets the rows at 45 degrees to the walls. It costs more in labor and material, and in exchange it makes a narrow or irregular room feel wider and pulls attention away from walls that are not parallel.
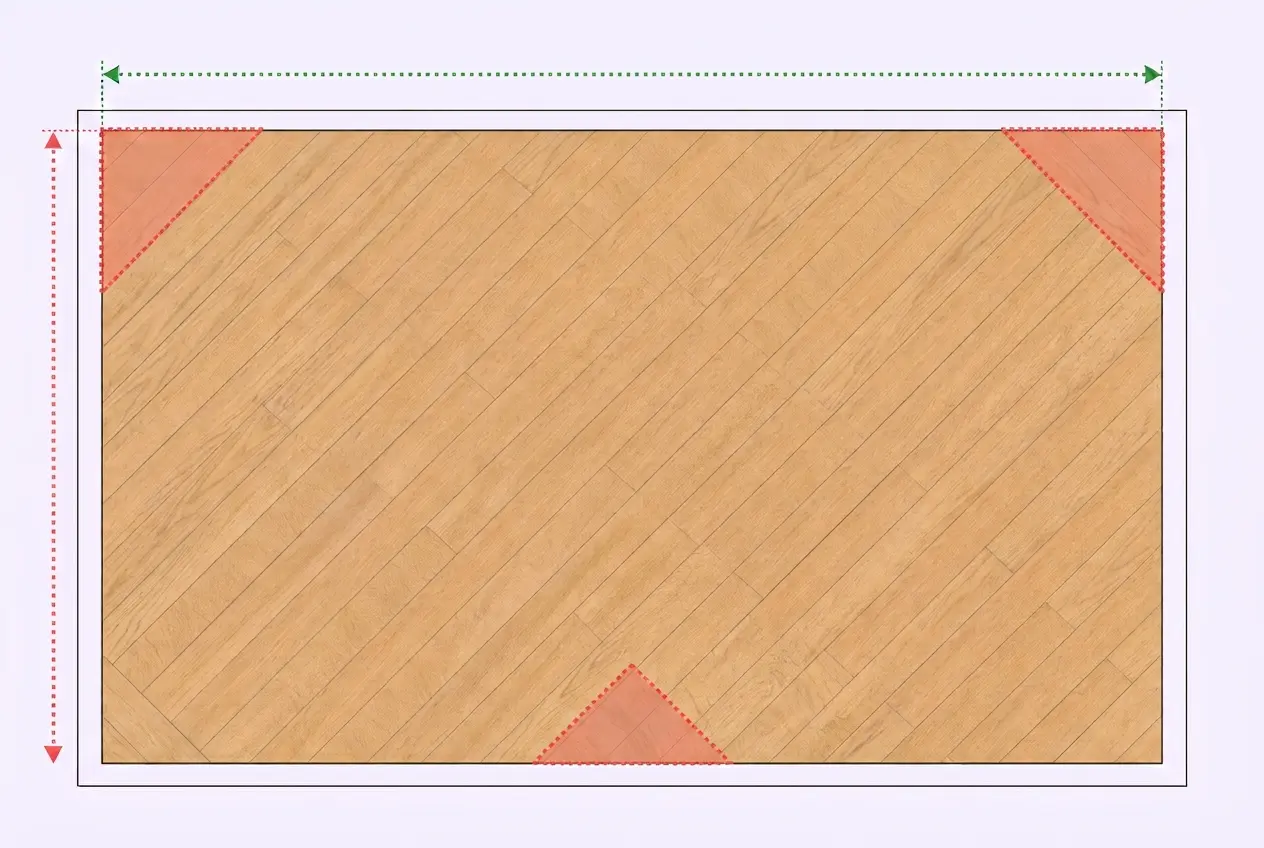
- Every edge is a cut. That is what drives the 15 percent waste and the extra time: no row simply dies into a wall.
- Layout lines carry the whole job. Strike centerlines from the true center of the room, then check them with the 3-4-5 method. A diagonal layout that starts a degree or two off shows at every wall.
- Best with square formats. Square tile and square-edge plank read cleanly on the diagonal; long planks at 45 degrees can look busy in a small room.
The pattern is worth the premium in entries, bathrooms, and rooms where the walls are visibly out of square. In a large, true rectangular living room, it mostly adds cost.
Herringbone and Chevron
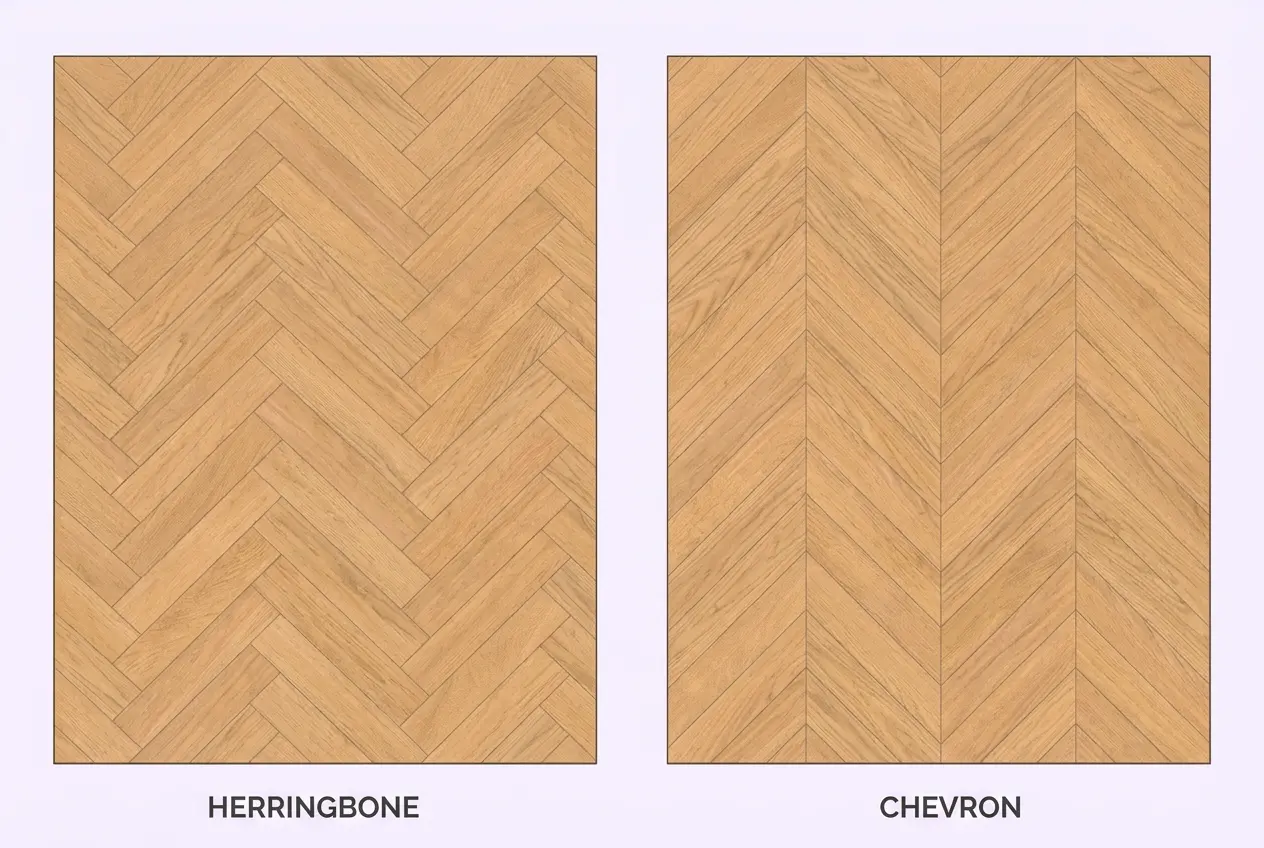
Both patterns create a zigzag, but they are built differently and priced differently.
| Feature | Herringbone | Chevron |
|---|---|---|
| Plank ends | Square cut, laid at 90° to each other | Angle cut on both ends, meeting in a point |
| Material | Standard rectangular planks or tiles | Usually factory-cut chevron planks |
| Waste | 20–25% | 20%+ and often higher on small jobs |
| Labor | 1.5–2.0× straight lay | 1.6–2.0× straight lay |
| Forgiveness | Moderate; mistakes show as broken zigzags | Low; the point must align exactly |
Herringbone is the more practical of the two because standard planks work and the pattern tolerates minor room irregularities. Chevron is a design statement: the continuous V is unforgiving, and a single misaligned point is visible from across the room. Both patterns are strongest in square or near-square rooms where the zigzag can be centered; in a long narrow hall, the pattern tends to end in awkward slivers at both ends.
Brick Bond and Offset Rows
Brick bond, also called a running bond or offset, lays rectangular tiles or planks in rows where each row starts halfway across the previous piece. It is the pattern most associated with subway tile, and it works equally well for plank flooring in a hallway.
- Offset amount: one-half, one-third, or one-quarter of the piece length. Half-offset is classic; third-offset reduces the stair-step effect on long planks.
- Waste: about 10 to 12 percent, because every other row begins with a half piece cut from a full one.
- Watch the lippage: on large-format tile, a 50 percent offset can create a visible step where the tile crowns. Many manufacturers specify a maximum offset of 33 percent for large tile.
It is a low-risk pattern that adds visual interest without the labor premium of diagonal or herringbone, which makes it a sensible choice for hallways, laundry rooms, and rental properties.
Waste by Pattern
Waste is not a fudge factor; it is the material consumed by cuts, defects, and future repairs. The pattern sets the floor of that number, and room shape pushes it higher.
| Pattern | Simple rectangular room | Many corners or closets | Small room (under 50 sq ft) |
|---|---|---|---|
| Straight / grid | 5–10% | 10–12% | 10–15% |
| Brick bond | 10–12% | 12–15% | 12–18% |
| Diagonal | 15% | 15–18% | 18–20% |
| Herringbone | 20% | 22–25% | 25%+ |
Buy the full quantity in one purchase. Dye lots and production runs shift, and a second order months later rarely matches. The waste factors guide explains why the same percentage does not fit every material, and the Flooring Calculator applies waste to your measured area.
Labor Cost by Pattern
Installers price pattern as time, not as style. A pattern that doubles the number of cuts roughly doubles the cutting time, and layout time sits on top of that.
| Pattern | Typical labor per sq ft | What takes the time |
|---|---|---|
| Straight lay | $2.00–$4.00 | Fast row work, square cuts |
| Brick bond | $2.25–$4.50 | Extra cuts at row starts |
| Diagonal | $3.00–$6.00 | Two layout lines, every edge cut |
| Herringbone | $3.50–$8.00 | Doubled cuts, constant pattern checks |
| Chevron | $4.00–$9.00 | Point alignment, factory cuts, slower pace |
Rates vary by region and by material. Tile labor runs higher than plank labor in every pattern, and a small floor carries a minimum charge that can double the effective per-square-foot rate. Ask for the pattern in writing on the quote; "tile installation" on a bid usually means a straight lay.
Choosing a Pattern for Your Room
- Square or near-square room: herringbone can be centered and the cuts stay balanced. This is where the pattern looks best and costs least in waste.
- Long narrow room or hallway: straight lay or brick bond running lengthwise. Diagonal and herringbone create slivers at the ends.
- Small bathroom: diagonal or grid. Diagonal disguises an out-of-square floor; grid is cheaper and equally waterproof.
- Open-plan living area: straight lay in one direction through all connected spaces. Pattern changes mid-floor require a threshold to look deliberate.
- Entry or foyer: herringbone or a bordered field, where the pattern is seen at a slower pace and the extra cost is concentrated in a small area.
A practical rule: choose the pattern for the room where it will be seen most, and keep the rest simple. A herringbone entry with straight-lay bedrooms is a deliberate, affordable composition; herringbone everywhere is a budget decision, not a style one.
Worked Example: 200 Square Feet
A 200-square-foot living room, plank flooring at $3.00 per square foot material and $3.50 per square foot labor in a straight lay:
- Straight lay material: 200 × 1.10 = 220 sq ft × $3.00 = $660
- Straight lay labor: 200 × $3.50 = $700
- Straight lay total: $1,360, or $6.80 per square foot
- Herringbone material: 200 × 1.22 = 244 sq ft × $3.00 = $732
- Herringbone labor: 200 × $6.00 = $1,200
- Herringbone total: $1,932, or $9.66 per square foot
The pattern adds about $572, or 42 percent, and most of that is labor rather than material. In a 40-square-foot entry, the same upgrade adds roughly $115 — which is why pattern upgrades are usually concentrated in small, high-impact spaces.
Common Layout Mistakes
- Starting against a wall without checking the far side. Dry-lay or snap a line first, so the last row is not a 1-inch sliver.
- Ignoring wall square. Measure both diagonals of the room. If they differ, diagonal layouts are more forgiving than straight rows.
- Changing pattern at an open doorway. The transition needs a threshold or a material change to read as intentional.
- Under-buying for a demanding pattern. Herringbone with 10 percent waste will run short, and the second batch may not match.
- Assuming the installer quoted the pattern. Confirm it in writing, including the waste allowance and the layout direction.
Frequently Asked Questions
References
- National Wood Flooring Association, Installation Guidelines: Layout and Direction — pattern selection, expansion, and acclimation, nwfa.org
- Tile Council of North America, TCNA Handbook for Ceramic, Glass, and Stone Tile Installation — substrate flatness, offset limits, and movement joints, tcnatile.com
- North American Laminate Flooring Association, Installation Guidelines — stagger requirements and expansion gaps, nalfa.com
- Carpet and Rug Institute, Installation Standards — seaming, stretching, and pattern matching for soft flooring, carpet-rug.org
- U.S. Bureau of Labor Statistics, Occupational Employment and Wage Statistics — tile and flooring installer wages by state and metro, bls.gov/oes
- U.S. Census Bureau, Construction Spending (C30) — residential improvement and repair spending trends, census.gov
Disclaimer: This guide compares common flooring layout patterns for planning and budgeting. It is not an installation standard or a substitute for the product manufacturer's instructions. Waste percentages and labor multipliers are typical ranges that vary with material, room geometry, substrate condition, and local labor markets. Confirm layout direction, pattern, and waste allowance in writing with your installer before purchasing material.