
ON THIS PAGE:
Why Square Matters
A layout that is a quarter inch out of square at the first row will be an inch out twenty rows later. The error does not stay where it starts; it multiplies with each row you add, and it surfaces at the far wall as a tapered cut that no amount of baseboard will hide.
Two different questions get asked about square, and confusing them causes most layout trouble:
- Is the room square? This is a property of the building. You cannot change it, only measure it and plan around it.
- Is my layout square? This is a property of your reference lines. You control it completely, and it is the one that determines whether the finished floor looks right.
A room can be substantially out of square and still receive a perfectly square layout, because the layout is set from its own centre lines rather than from the walls. The tapers then live at the two opposite edges, where they are expected and where trim covers them. What you cannot do is assume the walls are square and start from a corner, because then the room's error becomes the layout's error.
Timber framing moves as it dries, plaster and drywall are applied by hand, and a house that was square when built may not be square a decade later. Treat every existing room as suspect until measured, including the ones that look obviously rectangular.
The 3-4-5 Method
The 3-4-5 method builds a right angle out of three tape readings. It works because a triangle with sides in the ratio 3:4:5 is a right triangle — a consequence of the Pythagorean theorem, where 3² + 4² = 9 + 16 = 25 = 5².
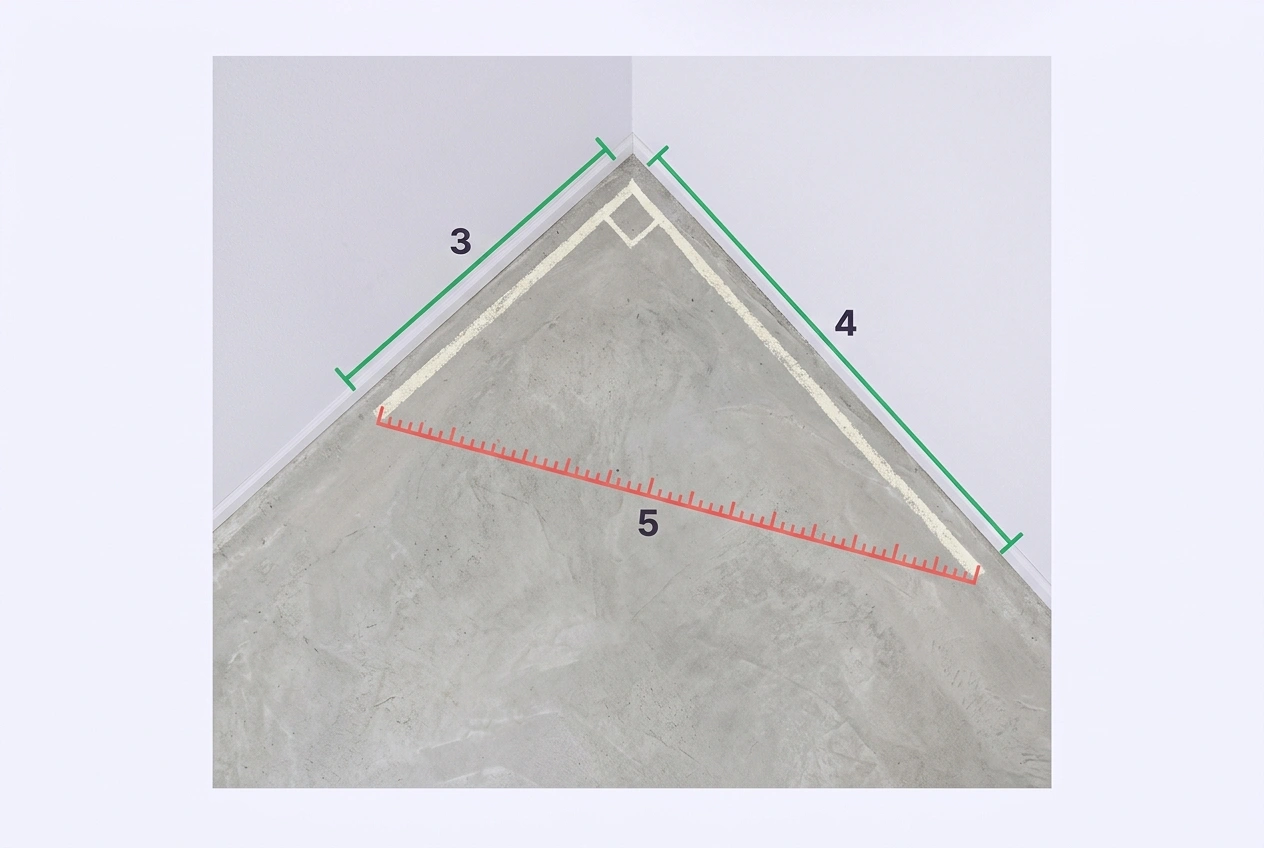
- Mark 3 units along one reference line, measured from the corner or from the crossing point.
- Mark 4 units along the other line, measured from the same point.
- Measure the straight distance between the two marks. This is the hypotenuse, and it is the only reading that matters.
- If it reads exactly 5, the angle between the lines is 90 degrees. Stop.
- If it reads more than 5, the angle is open — bring the second line toward the first. If it reads less than 5, the angle is closed — move the line away.
Any multiple of the triple works identically: 6-8-10, 9-12-15, 15-20-25, 30-40-50. Larger multiples reduce the effect of a wobbling tape end, which is why a big room should never be squared with a 3-foot triangle.
The three readings must all use the same unit. Marking 3 feet on one line and 4 inches on the other gives a diagonal of about 3 feet 0¼ inches, which will look almost plausible on a tape and is meaningless as geometry. This single mistake accounts for more bad layouts than any other.
Checking With Diagonals
The diagonal check answers the other question — whether the whole shape is a true rectangle, not just whether one corner is square.
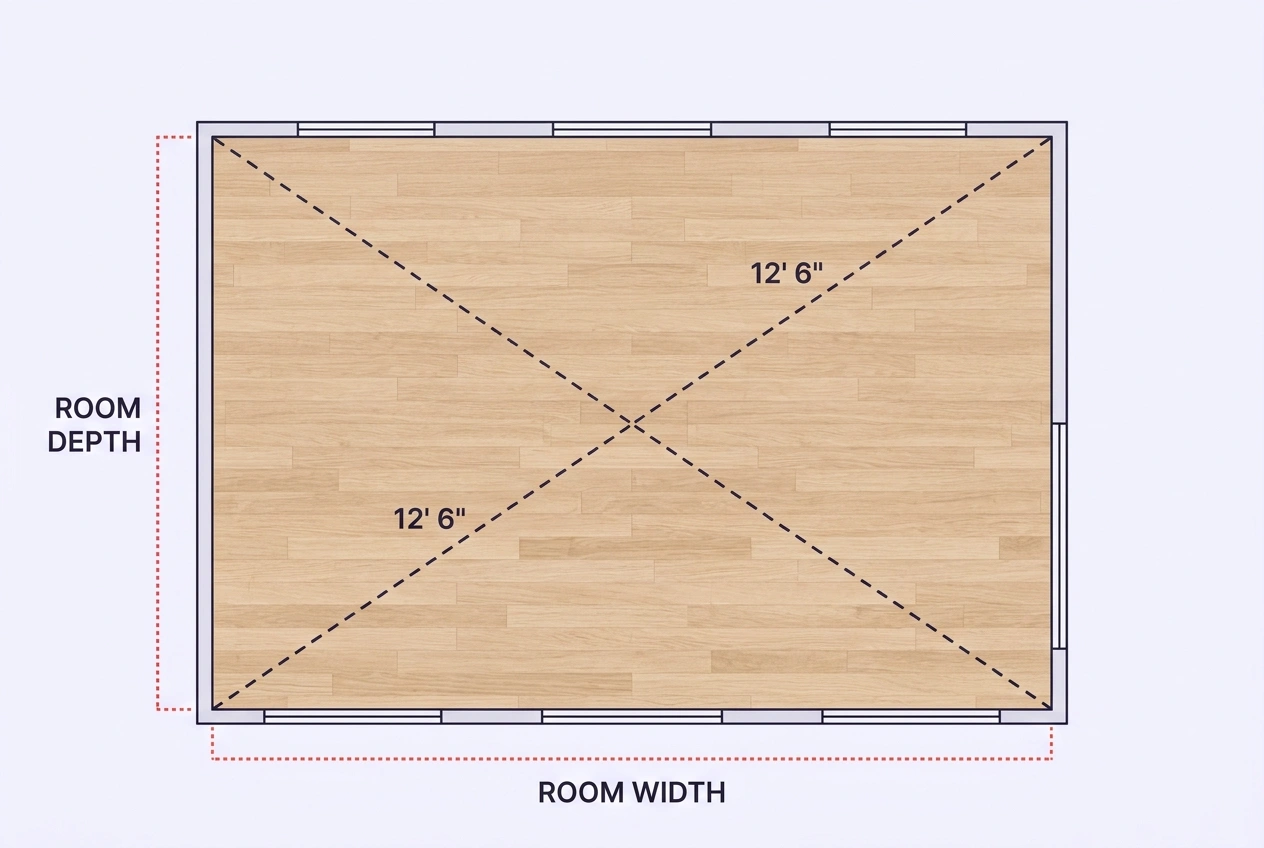
- Measure corner to opposite corner, holding the tape taut and reading at the same point on both ends.
- Measure the other diagonal, the remaining two corners.
- Compare the two numbers. Identical readings mean a true rectangle. A difference means a parallelogram, a trapezoid, or a room with one wall out of position.
- Write both numbers down. The difference is your out-of-square figure, and it drives every layout decision that follows.
Three cautions make the check reliable. Measure at floor level, not across a doorway or over furniture. Read the same reference on both ends of the tape — the body of the tape, not the hook — because the hook slides by its own thickness. And take both diagonals with the same tape, since two tapes can disagree by a sixteenth.
What counts as acceptable depends on the material. A quarter inch across a carpeted bedroom is invisible. A quarter inch across a tiled shower wall is not. Precision is set by what will show, not by an absolute number.
Marking the Layout
Reference lines are only useful if they survive until the last row. Chalk on a prepared floor disappears underfoot within an hour, so the lines need to be transferred to something permanent before installation begins.
- Find the centre line. Measure the room's width at both ends and mark the midpoint; join them for a line that is parallel to the average of the two walls, not to either wall.
- Square the second line to the first at the crossing point using 3-4-5, scaled to the room.
- Check the four quadrants with the diagonal method before committing. Each quadrant should close on itself.
- Transfer the lines. Pencil marks on the skirting or wall at both ends, plus a screw or nail at the crossing point, give you a way to re-snap after the first row is laid.
- Note the offset. Write the distance from each line to its nearest wall on the wall itself. When the line is covered, the note still tells you where it was.
For plank flooring, the layout line usually runs parallel to the longest wall or to the main window, so the boards read straight from the doorway. For tile, a centred layout with equal cuts at both edges is the default, adjusted by half a tile when one edge would otherwise receive a sliver narrower than about a third of a tile.
Where a fixed feature dictates the layout — a cabinet run, a shower tray, a doorway with a perpendicular threshold — the layout takes its direction from that feature and the centre line is adjusted to suit. Squareness is still checked the same way; only the starting reference changes.
Scaling Up for Large Layouts
Foundations, slabs, decks, and patios need the same geometry at a scale where a small angular error becomes a large linear one.
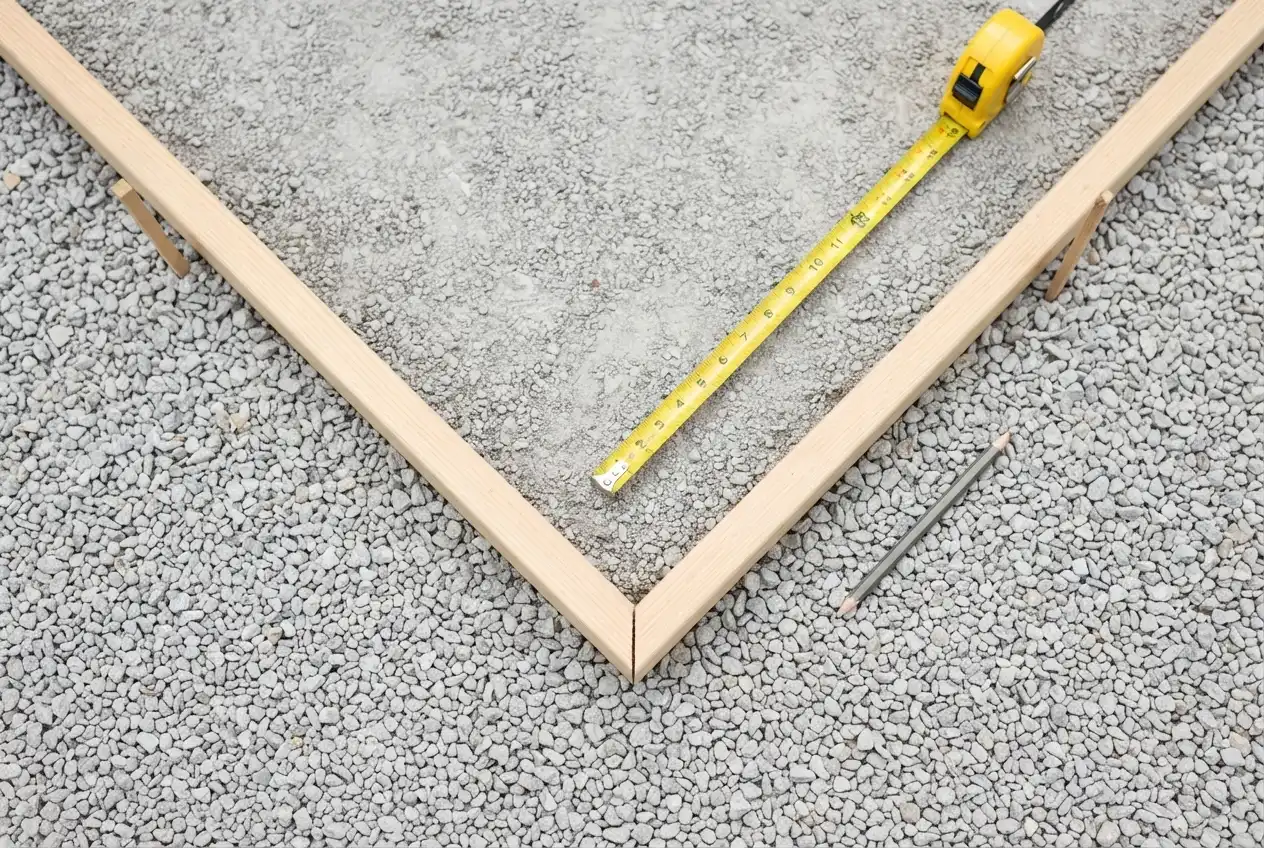
- Set the corner stake and run two strings along the planned edges, long enough to extend past the finished corner.
- Mark 30 ft along one string and 40 ft along the other, measured from the intersection.
- Adjust the strings until the distance between the marks reads 50 ft. At that scale, a sixteenth of an inch of tape error is a negligible angle.
- Repeat at each corner, then confirm the whole rectangle by checking both diagonals and confirming that opposite sides are equal.
Two conditions make a quadrilateral a true rectangle, and both should be checked: opposite sides equal, and diagonals equal. A shape can satisfy one and fail the other — a parallelogram has equal opposite sides but unequal diagonals, which is exactly the error a single diagonal check catches.
On sloping ground, strings sag and measurements drift. Keep the strings tight, check that the tape is level rather than following the ground, and prefer the largest triangle the site allows. On a deck, the ledger board and the house wall are the fixed reference, and the layout is squared from that face rather than from a free corner.
When the Room Is Out of Square
Most rooms are out of square by something. The useful question is not whether, but by how much and where to put it.
| Difference between diagonals | What it means | What to do |
|---|---|---|
| Under 1/4 in | Normal framing tolerance | Proceed; edge cuts absorb it invisibly |
| 1/4 to 1/2 in | Noticeable on a wide room | Centre the layout and split the taper between both edges |
| 1/2 to 1 in | Common in older houses | Centre the layout, plan the wider cut on the least visible wall |
| 1 to 2 in | Significant; one wall is out of position | Investigate the cause, then plan cuts and consider a border or feature |
| Over 2 in | Structural or layout problem | Resolve before covering; a floor will not hide it |
Where the taper lands matters more than its size. Put the widest cut where it is hardest to see: under a sofa, along a wall with a door, behind a cabinet run. The narrowest cut should sit where nothing draws the eye, and it should never be narrower than about a third of the material's width, because slivers are fragile and look like a mistake.
Orientation changes the geometry too. In a rectangular room, laying plank parallel to the long wall puts the taper on the short walls, where a small angular error produces a visible wedge over a short distance. Running the other way spreads the same error across a longer edge and makes it gentler. Neither is automatically right; the choice depends on which wall you want to look straight.
Worked Example: Bathroom Tile
A bathroom measures 8 ft × 6 ft and is being tiled in 12 inch square tiles with balanced edge cuts.
- Centre line along the 8 ft length: 4 ft from each side wall
- Centre line across the 6 ft width: 3 ft from each end wall, squared to the first with 3-4-5 using 3 ft and 4 ft marks
- Diagonal check: both diagonals should read the square root of 8² + 6², or 10 ft. A difference under 1/4 in is fine
- Dry lay along the centre lines: 8 full tiles across the length at 96 in ÷ 12 in, and 6 across the width
- Result: a clean layout with no edge cuts at all, because both dimensions divide evenly
Now change one number. If the room is 8 ft 2 in long, 98 inches divided by 12 gives eight full tiles plus a 2 inch sliver. Shifting the centre line 5 inches puts a 7 inch cut at each end instead — smaller than a full tile, larger than a sliver, and balanced. That adjustment is the entire purpose of laying out from a centre line: the arithmetic is easy, but only after the lines are square.
Once the layout is settled, run the room's measured area through the Tile Calculator for boxes and waste. Layout and quantity are separate calculations, and both need to be finished before the first tile is set.
Common Mistakes
| Mistake | What happens | Fix |
|---|---|---|
| Mixing units in the 3-4-5 triangle | The diagonal reads plausibly but means nothing | Use one unit for all three readings |
| Measuring the diagonal from the corner to a mark | Confirms a distance that was never in question | Measure between the two marks on the lines |
| Checking only one corner | A room can be square at one corner and badly off at another | Square each working corner, then check full-room diagonals |
| Squaring from a wall | The room's error becomes the layout's error | Square from centre lines |
| Reading the tape hook on one end only | A sixteenth of error that multiplies across rows | Read the same reference on both ends, or use one tape throughout |
| Snapping chalk and trusting it | The line vanishes underfoot before row ten | Transfer lines to pencil marks and a fixed pin |
| Fixing the layout by eye | The eye corrects a taper you cannot actually see yet | Measure the difference, then split it deliberately |
The pattern behind most of these is the same: a measurement that answers a slightly different question than the one being asked. Checking square is a small, boring procedure, and its whole value is that it replaces judgement with a number.
Recording the Layout
Layout notes are for the person who comes back to finish the job — often you, three weekends later, after the first room is done.
| Field | Example | Why |
|---|---|---|
| Room and date | Bathroom, 29 October | Rooms get revisited |
| Diagonal readings | 10 ft 0½ in and 10 ft 0⅜ in | States the out-of-square figure |
| Reference lines | Centre line 47 in from left wall | Re-establishes the layout after it is covered |
| Layout direction | Tiles square to the door | The decision, not just the measurement |
| Edge cut sizes | 7 in both ends, 5 in at the door wall | Confirms the layout was balanced deliberately |
| Waste allowance | 12 percent, because of the taper | Explains a quantity that looks generous |
Photograph the floor with the lines snapped and the tape in place. A picture of the centre line relative to a doorway answers a question that no list of numbers can, and it takes five seconds. The diagonal layout guide covers what changes when the pattern itself runs at 45 degrees rather than square to the walls.
Frequently Asked Questions
References
- Tile Council of North America, TCNA Handbook for Ceramic, Glass, and Stone Tile Installation — layout, joint alignment, and substrate flatness requirements, tcnatile.com
- National Wood Flooring Association, Installation Guidelines: Layout and Patterning — establishing reference lines and working around out-of-square rooms, nwfa.org
- International Code Council, International Residential Code — foundation and slab layout tolerances, iccsafe.org
- U.S. Department of Housing and Urban Development, Residential Rehabilitation Inspection Guide — evaluating squareness and structural movement in existing housing, hud.gov
- National Institute of Standards and Technology, NIST Handbook 44 — measurement units and conversion factors used in trade, nist.gov
- U.S. Bureau of Labor Statistics, Occupational Employment and Wage Statistics — tile setters, flooring installers, and construction laborer wages by area, bls.gov/oes
Disclaimer: This guide explains geometric layout methods for establishing square reference lines before installing finishes. It is not a survey, an engineering assessment, or a building-code determination. Rooms and structures are rarely perfectly square, tolerances vary by material and by local requirement, and large deviations may indicate a structural issue, so verify critical lines on site and consult a qualified professional before covering a floor that is significantly out of square.