
Enter Ramp Dimensions
Enter any two of rise, run, and slope ratio, choose a ramp type and configuration (straight, L-shaped, or switchback), then set width and thickness. Switch between imperial and metric units with one click. Results update live as you type.
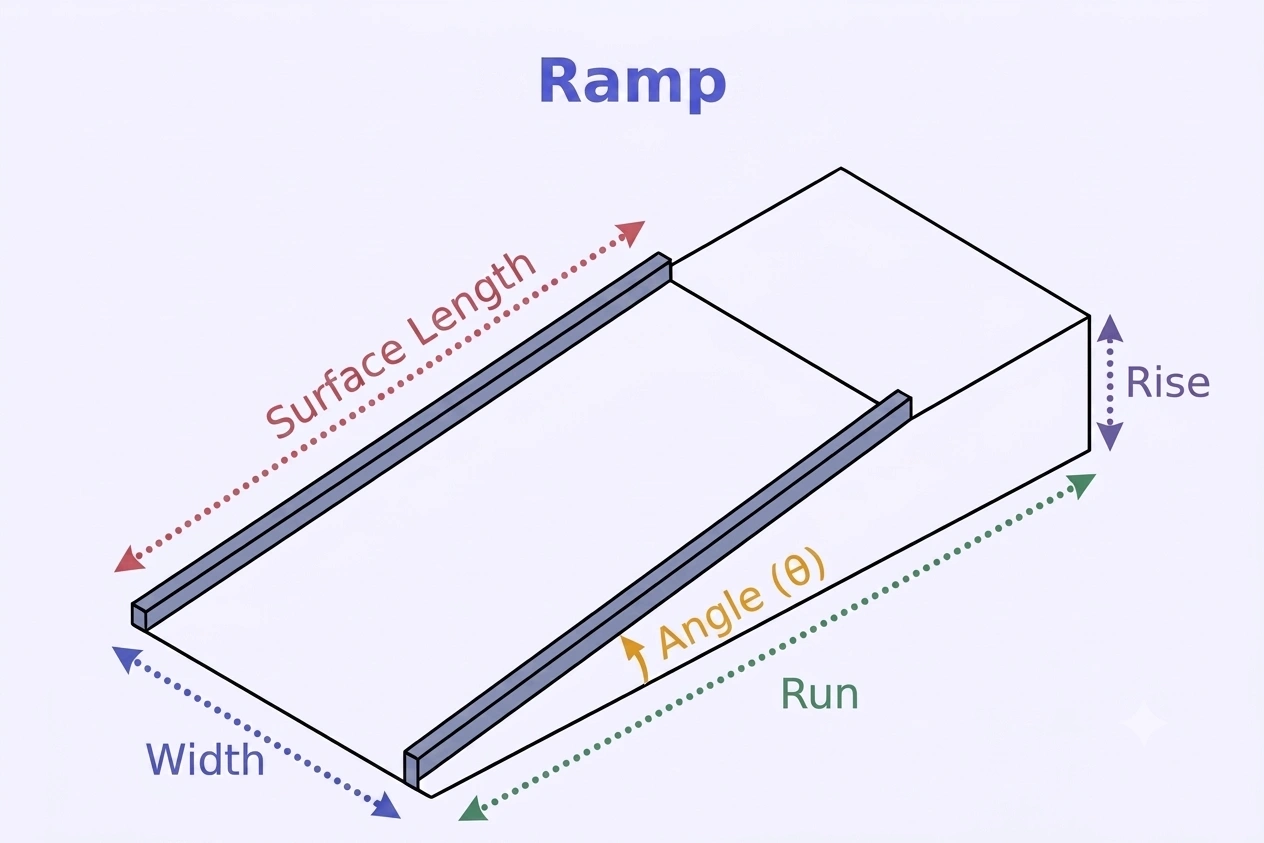
Results
Project Summary
Run computed: rise 24 in × ratio 12 = 24.0 ft
Configuration & Landings
No intermediate landing required — rise ≤ 30 in and run ≤ 30 ft. Top and bottom landings (5 ft min) always required.
Concrete Estimate
Calculation Assumptions
What You Get
- ✓Free — no sign-up, nothing to install
- ✓Live results as you type
- ✓Feet, inches, cm, meters & yards — mix any units
- ✓Export a PDF takeoff in one click
- ✓Shareable link that saves your inputs
- ✓Works on phone, tablet & desktop
- ✓Straight, L-shaped & switchback ramps
- ✓ADA-compliant slope guidance
- ✓Slope ratio, run & angle outputs
ON THIS PAGE:
What Is a Ramp Calculator?
A ramp calculator determines the dimensions, slope, and material requirements for a ramp based on the vertical height (rise) it needs to overcome. Whether you are building a wheelchair ramp for ADA compliance, a loading dock ramp for equipment access, or a temporary ramp for construction sites, this calculator provides the exact measurements you need.
Instead of manually calculating angles, run lengths, and concrete volumes, you enter any two of rise, run, and slope ratio (the calculator solves the third), pick a ramp type and configuration (straight, L-shaped, or switchback), and set your width and slab thickness. The calculator instantly computes the missing dimension, surface length, slope angle, grade percentage, required landings, and estimated concrete. Imperial and metric units are both supported with a single toggle. This eliminates guesswork and ensures your ramp meets building codes.
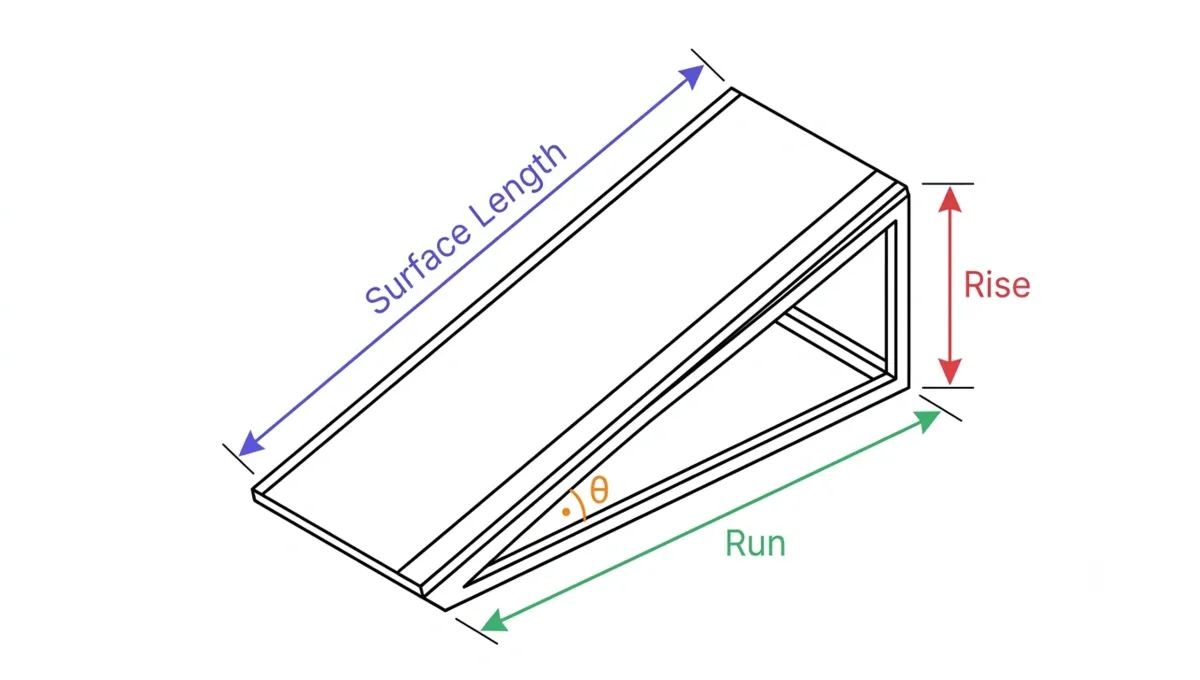
A ramp calculator is essential for:
- ADA compliance — ensuring your wheelchair ramp meets federal and local accessibility standards
- Material estimation — calculating exactly how much concrete, lumber, or aluminum you need
- Cost budgeting — getting accurate material and labor cost projections before construction begins
- Site planning — determining how much ground space the ramp will occupy, including landings
- Safety verification — confirming the slope angle is safe for the intended users
How to Measure Rise
The rise is the single most important measurement for ramp design. An incorrect rise measurement leads to a ramp that is too short (dangerous) or too long (wasteful).
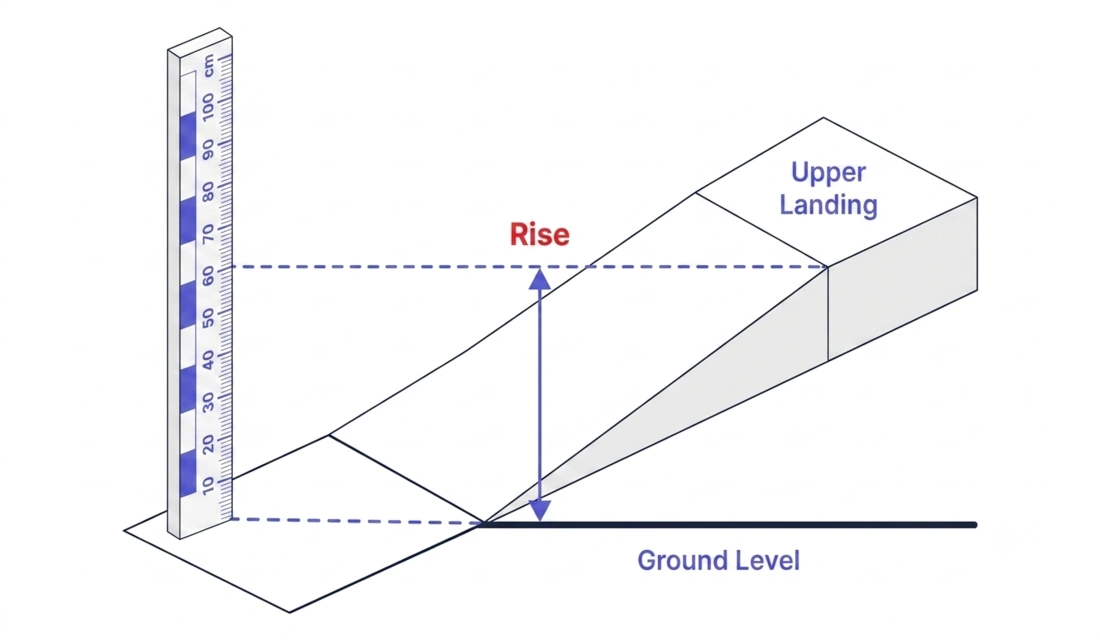
Step-by-Step Rise Measurement
- Step 1: Determine the ground reference point
Identify the exact point where the ramp will begin at ground level. If the ground slopes, measure from the lowest point where the ramp base will sit. For concrete ramps, this is typically the top of the sub-base.
- Step 2: Determine the upper landing height
Measure to the finished floor surface of the doorway, porch, or upper landing. Do not measure to the top of the door frame — measure to the surface the user will roll or walk onto. If a threshold exists, measure to the top of the threshold.
- Step 3: Account for surface finish
If your ramp will have a broom finish or textured surface, add 1/8 inch to the rise. For ramps with anti-slip tape or treads, include their thickness in the measurement.
- Step 4: Use the right tool
A laser level is the most accurate tool for rise measurement over longer distances. For rises under 6 feet, a standard tape measure works well. Place the tape measure vertically against a straight edge to avoid parallax error.
Common Rise Measurement Mistakes
| Mistake | Why It Happens | Impact on Ramp |
|---|---|---|
| Measuring to door frame instead of floor | Confusing the door threshold with the landing surface | Ramp too short by 1-3 inches |
| Ignoring ground slope | Assuming level ground at ramp base | Ramp doesn't reach landing or sits too high |
| Forgetting surface finish thickness | Measuring only the structural slab | Transition lip at top or bottom |
| Measuring at an angle | Tape measure not perfectly vertical | Rise reading 2-5% too high |
Understanding Ramp Slope
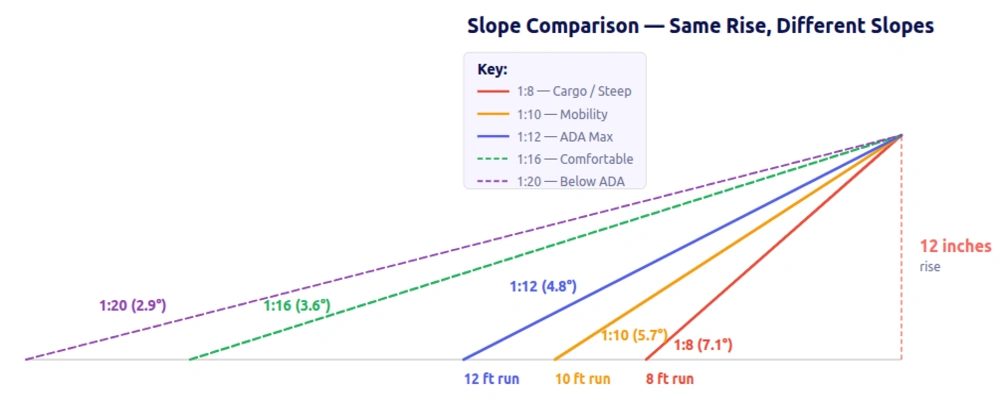
Ramp slope determines how steep the ramp is. A gentler slope (like 1:20) is easier to push a wheelchair up but requires more horizontal space. A steeper slope (like 1:8) saves space but is harder to navigate.
Three Ways to Express Slope
Slope can be expressed in three equivalent forms. They all describe the same steepness:
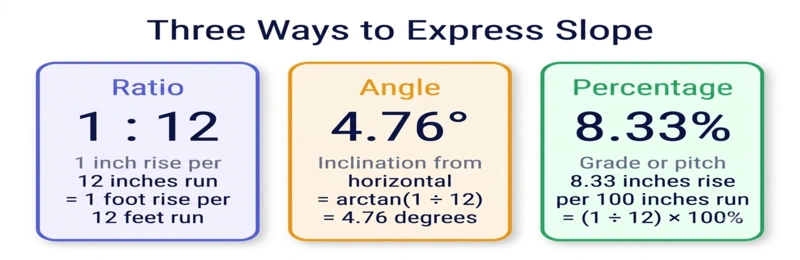
Slope Ratio (1 : N)
The slope ratio is the most common way to describe ramp steepness in construction. A ratio of 1:12 means for every 1 inch of vertical rise, the ramp extends 12 inches horizontally. Lower numbers mean steeper ramps (1:8 is steeper than 1:12). Higher numbers mean gentler ramps (1:20 is gentler than 1:12).
Angle (Degrees)
The angle is measured between the ramp surface and the horizontal ground. Calculate it using: Angle = arctan(Rise ÷ Run). For a 1:12 ramp: arctan(1 ÷ 12) ≈ 4.76°. Angles above 7° can be difficult for manual wheelchair users.
Grade (Percentage)
Grade expresses slope as a percentage: Grade % = (Rise ÷ Run) × 100. For a 1:12 ramp: (1 ÷ 12) × 100 = 8.33%. Note: 100% grade equals 45°, not 90°.
When to Use Each Slope
| Slope | Angle | Grade | Rise per 10 feet Run | Application |
|---|---|---|---|---|
| 1:3 | 18.4° | 33.3% | 40 inches | Heavy equipment, temporary loading ramps |
| 1:6 | 9.5° | 16.7% | 20 inches | Vehicle ramps, garage access |
| 1:8 | 7.1° | 12.5% | 15 inches | Cargo carts, temporary equipment access |
| 1:10 | 5.7° | 10% | 12 inches | Mobility scooters, powered wheelchairs |
| 1:12 | 4.8° | 8.33% | 10 inches | ADA maximum for wheelchair ramps |
| 1:16 | 3.6° | 6.25% | 7.5 inches | ADA recommended comfortable slope |
| 1:20 | 2.9° | 5% | 6 inches | Below ADA threshold — not classified as ramp |
Ramp Formulas Explained
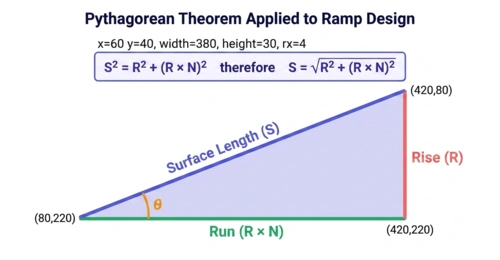
All ramp geometry is right-triangle math. These five formulas cover everything from basic dimensions to material estimates.
Formula 1: Horizontal Run
Run = Rise × Slope Ratio
Multiply the rise by the slope ratio (the N in 1:N). For example, a 24-inch rise at 1:12 gives: Run = 24 × 12 = 288 inches = 24 feet. The calculator can also work this backwards: enter the run and ratio to solve for the rise, or enter the rise and run to solve for the slope ratio.
Formula 2: Surface Length
Surface = √(Rise² + Run²)
The surface length is the actual diagonal distance from bottom to top. For 24 inches rise and 288 inches run: Surface = √(576 + 82,944) ≈ 289 inches ≈ 24.1 feet.
Formula 3: Slope Angle
Angle (°) = arctan(Rise ÷ Run) × (180 ÷ π)
For a 1:12 ramp: Angle = arctan(1 ÷ 12) ≈ 4.76°.
Formula 4: Grade Percentage
Grade % = (Rise ÷ Run) × 100
For a 1:12 ramp: Grade = (1 ÷ 12) × 100 = 8.33%.
Formula 5: Concrete Volume
Volume (yd³) = (Surface Length feet × Width feet × Thickness inches) ÷ 324
The constant 324 equals 27 × 12 (converting cubic feet to cubic yards, then inches to feet). For our example: Volume = (24.1 × 3 × 4) ÷ 324 ≈ 0.89 yd³.
How to Calculate Required Run
The run is the horizontal distance your ramp will cover. It determines whether the ramp fits on your site.

Site Space Calculation
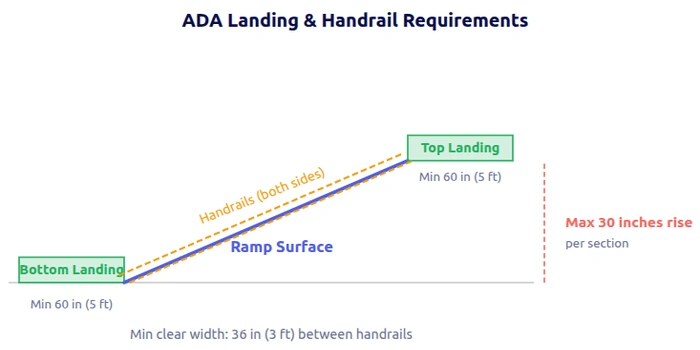
The total ground space required includes landing platforms at the top and bottom. The ADA requires minimum 60-inch (5-foot) landings:
- Bottom landing: 5 feet minimum
- Ramp run: 24 feet (for 24 inches rise at 1:12)
- Top landing: 5 feet minimum
- Total ground space: 5 + 24 + 5 = 34 feet minimum
If your available space is less than the calculated run, use a steeper slope, add intermediate landings, or use an L-shaped or switchback configuration.
Ramp Length Quick Reference
Pre-calculated dimensions for common wheelchair ramp rises at the ADA-required 1:12 slope.
| Rise | Run | Surface Length | Angle | Grade | Concrete (3 feet wide, 4 inch slab) |
|---|---|---|---|---|---|
| 6 inches | 6 feet | 6.1 feet | 4.8° | 8.33% | 0.23 yd³ |
| 12 inches | 12 feet | 12.2 feet | 4.8° | 8.33% | 0.45 yd³ |
| 18 inches | 18 feet | 18.3 feet | 4.8° | 8.33% | 0.68 yd³ |
| 24 inches | 24 feet | 24.1 feet | 4.8° | 8.33% | 0.89 yd³ |
| 30 inches | 30 feet | 30.1 feet | 4.8° | 8.33% | 1.12 yd³ |
| 36 inches | 36 feet | 36.1 feet | 4.8° | 8.33% | 1.34 yd³ |
| 42 inches | 42 feet | 42.1 feet | 4.8° | 8.33% | 1.56 yd³ |
| 48 inches | 48 feet | 48.1 feet | 4.8° | 8.33% | 1.78 yd³ |
Assumes 1:12 slope, 3 feet width, 4 inch slab. Add 5-10% waste factor. Landings not included.
ADA Compliance Requirements
The Americans with Disabilities Act sets specific standards for ramps used in public spaces and commercial buildings. Compliance is not optional.
| Requirement | ADA Standard | Notes |
|---|---|---|
| Maximum slope | 1:12 | 4.8° — steepest allowed for new construction |
| Maximum rise per section | 30 inches | Rises above 30 inches require an intermediate landing |
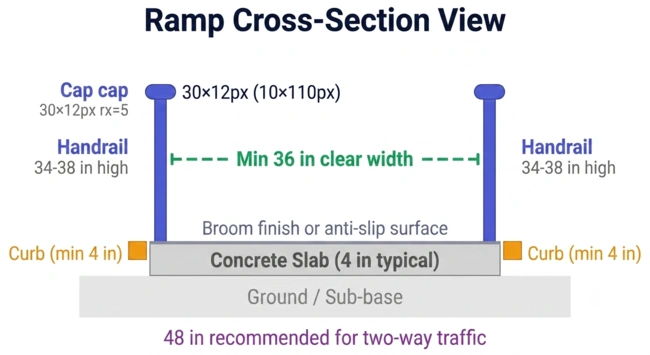
| Minimum clear width | 36 inches | Between handrails; 48 inches recommended for two-way traffic |
| Top/bottom landings | 60 inches min | Must be at least as wide as the ramp |
| Intermediate landings | 60 inches min | Required when rise exceeds 30 inches or run exceeds 30 feet |
| Handrails | Rise > 6 inches or run > 72 inches | Both sides; 34-38 inches height; round grip 1.25-2 inches diameter |
| Edge protection | Minimum 4-inch curb | Prevents wheelchair casters from rolling off |
| Cross slope | Maximum 1:50 (2%) | Lateral slope for drainage |
| Surface | Firm, stable, slip-resistant | No open joints; broom finish recommended |
| Handrail extensions | 12 inches beyond top/bottom | Horizontal extensions at landings |
ADA Exemptions and Variations
- Single-family residential: ADA does not apply to private residences, though local codes may require compliance
- Existing buildings with impractical alterations: If compliance would fundamentally alter the building's character or create undue hardship, modifications may be exempt
- Temporary ramps: Construction-site ramps may be exempt from permanent compliance requirements
- Ramps below 1:20: Slopes gentler than 1:20 are not classified as ramps under ADA
State and local code variations: Many states have stricter requirements than ADA. California's Title 24, for example, mandates additional requirements for handrails and landings. Always check with your local building authority.
Ramp Layouts & Configurations
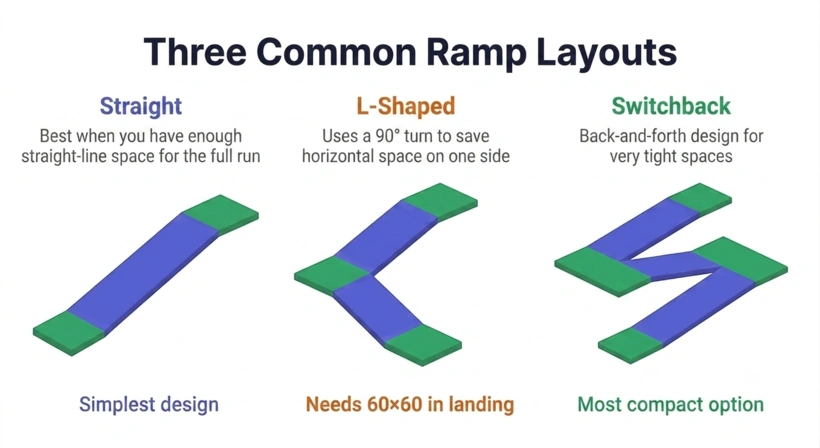
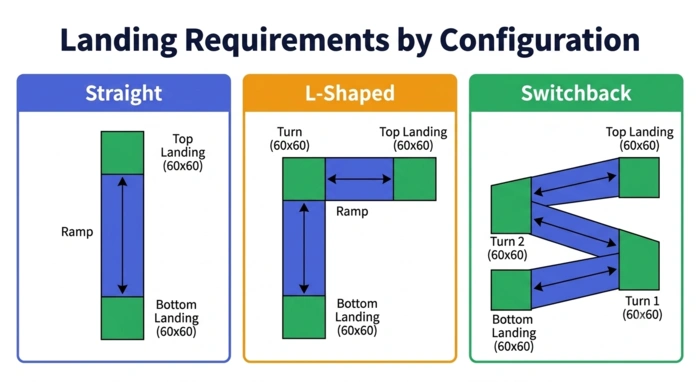
When the required run exceeds available ground space, you need a different layout. The three main configurations are straight, L-shaped, and switchback.
Configuration Selection Guide
| Layout | Space Required | Complexity | Best For |
|---|---|---|---|
| Straight | Long rectangular area | Low | Wide open spaces, long driveways, commercial buildings |
| L-Shaped | Two perpendicular rectangles | Medium | House entrances, narrow side yards, building corners |
| Switchback | Compact rectangular area | High | Urban lots, steep hillsides, space-constrained sites |
Try it in the calculator: use the Configuration dropdown above. L-shaped and switchback layouts split the total run into equal sections around their turn landings, and the calculator counts the intermediate 60-inch landings automatically per ADA 405.6.
Ramp Width & Handrails
Proper width ensures wheelchair users can navigate safely. Handrails provide support and prevent falls.
Width Requirements
| Width | Application | Notes |
|---|---|---|
| 36 inches (3 feet) | ADA minimum for single wheelchair | Clear width between handrails |
| 48 inches (4 feet) | Two-way traffic or power chairs | Recommended for commercial buildings |
| 60 inches (5 feet) | Wide power chairs or stretcher access | Required in healthcare settings |
Handrail Specifications
- Height: 34-38 inches above the ramp surface
- Grip diameter: 1.25-2 inches round cross-section
- Clearance: Minimum 1.5 inches between handrail and wall
- Extensions: 12 inches horizontally beyond the top and bottom
- Continuity: Must be continuous along the full length
- Load capacity: Must withstand 250 pounds of force in any direction
Concrete Quantity & Cost
Calculate how much concrete you need, estimate costs, and plan your order.

Volume Formula
Volume (yd³) = (Surface Length feet × Width feet × Thickness inches) ÷ 324
Waste Allowance
Add 5-10% waste factor for spills, uneven ground, and edge trimming. It is always better to order slightly more than to run short mid-pour.
Ready-Mix vs. Bags
| Bag Size | Bags per Cubic Yard | Best For |
|---|---|---|
| 50 lb | 75 bags | Small patches, minor repairs |
| 60 lb | 60 bags | Medium sections, steps |
| 80 lb | 45 bags | Larger pours, slab sections |
Ordering Tips
- Short-load fees: Most suppliers charge extra for orders under 3 cubic yards
- Delivery timing: Schedule for first thing in the morning
- Weather: Do not pour above 90°F or below freezing
- Crew readiness: Have forms, reinforcement, and tools ready before the truck arrives
Concrete Pricing
Prices vary by region. Urban areas typically cost 10-20% more. Get at least 3 quotes.
Worked Example: 24-Inch Rise Wheelchair Ramp
Let us walk through a complete real-world example with a residential wheelchair ramp.
Scenario
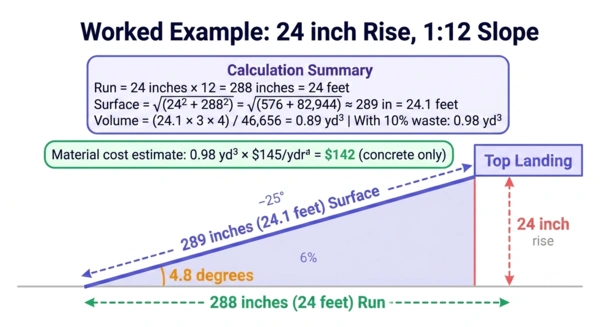
You need to build a wheelchair ramp for a residential front door. The ground to porch rise is 24 inches. The ramp will be 3 feet wide with a 4-inch concrete slab. You want ADA compliance (1:12 slope).
Step 1: Calculate Run
Run = 24 inches × 12 = 288 inches = 24 feet
Step 2: Calculate Surface Length
Surface = √(24² + 288²) = √(576 + 82,944) = √83,520 ≈ 289 inches = 24.1 feet
Step 3: Calculate Slope Angle
Angle = arctan(24 ÷ 288) = arctan(0.0833) ≈ 4.76°
Step 4: Calculate Concrete Volume
Volume = (24.1 × 3 × 4) ÷ 324 = 289.2 ÷ 324 ≈ 0.89 yd³
With 10% waste: 0.89 × 1.10 = 0.98 yd³
Step 5: Estimate Cost
| Item | Quantity | Unit Cost | Total |
|---|---|---|---|
| Ready-mix concrete | 0.98 yd³ | $145/yd³ | $142 |
| Formwork lumber | ~40 linear feet | $2/foot | $80 |
| Rebar (#4, 12 inches OC) | ~6 bars | $8 each | $48 |
| Anchor bolts | ~8 pieces | $2 each | $16 |
| Materials subtotal | $286 | ||
Professional installation adds $6-$20 per square foot, bringing the total installed cost to approximately $640 – $1,800 depending on your region and contractor.
Materials & Construction
Choose the right material based on your ramp's intended use, traffic volume, and budget.
Concrete Ramps
Most durable option for permanent installations. A standard 4-inch slab works for pedestrian wheelchair ramps; use 5-6 inches with rebar reinforcement for cargo or vehicle ramps. Requires proper formwork and 28 days curing time. Cost: $6-$20 per square foot installed.
Wood Ramps
Cost-effective for residential use. Use pressure-treated lumber for outdoor installations. Requires non-slip surface treatment and regular maintenance. Typical lifespan: 15-20 years.
Aluminum Ramps
Modular and portable. Easy to install and remove. No concrete or formwork needed. Best for temporary access or rental properties. Typical lifespan: 20+ years. Higher upfront cost but zero maintenance.
Asphalt Ramps
Good for outdoor and driveway applications. Less expensive than concrete but requires more maintenance. Not recommended for ADA wheelchair access.
Material Comparison
| Material | Durability | Cost (per square foot) | Maintenance | Best For |
|---|---|---|---|---|
| Concrete | 30+ years | $6-$20 | Low | Permanent, high-traffic |
| Wood | 15-20 years | $3-$12 | Medium | Residential, budget |
| Aluminum | 20+ years | $15-$40 | None | Portable, rental |
| Asphalt | 15-20 years | $4-$10 | High | Vehicles, driveways |
Common Ramp Mistakes to Avoid
A poorly planned ramp can be unsafe, non-compliant, or need complete reconstruction.
- Ignoring ADA landing requirements: Wheelchair ramps need a level landing (at least 60 inches) at the top and bottom, plus an intermediate landing every 30 inches of rise. Skipping landings is the #1 code violation.
- Building too narrow: ADA requires minimum 36-inch clear width. For two-way traffic or power chairs, go with 48 inches.
- No edge protection or handrails: Ramps higher than 6 inches need curbs (minimum 4 inches) or railings on both sides.
- Using too-thin concrete: A 4-inch slab is standard for pedestrian ramps. For cargo or heavier loads, use 5-6 inches with rebar reinforcement.
- Ignoring surface traction: A smooth concrete finish becomes slippery when wet. Always specify a broom finish or anti-slip coating.
- Poor drainage: Without a slight cross-slope (1-2%), water pools on the surface creating slip hazards.
- Skipping building permits: Most jurisdictions require permits for permanent ramps. Non-compliant ramps may need to be torn out.
Safety Features
Essential safety elements for any ramp project.
- Non-slip surface: Apply anti-slip tape, textured coating, or broom finish
- Handrails: Install on both sides at 34-38 inches height with round grip rails 1.25-2 inches in diameter
- Wheel stops: Install at the bottom to prevent wheelchairs from rolling off
- Edge barriers: Minimum 4-inch curbs or rails on both sides
- Lighting: Install adequate lighting for nighttime use at transitions and landings
- Signage: Post slope ratio, weight limits, and directional signs at the entrance
Ramp Maintenance
Regular maintenance extends ramp life and keeps it safe for users.
- Monthly inspection: Check for cracks, loose handrails, worn anti-slip surfaces, and drainage issues
- Seasonal cleaning: Remove debris, leaves, and dirt that can create slip hazards or block drainage
- Concrete sealing: Apply concrete sealer every 2-3 years to protect against moisture penetration and freeze-thaw damage
- Handrail tightening: Check and tighten all handrail brackets and connections quarterly
- Crack repair: Fill cracks immediately with concrete patching compound to prevent water infiltration and further deterioration
- Winter care: Use sand or kitty litter for traction instead of salt, which can damage concrete surfaces
Design Considerations
Plan these details before building. Getting them right the first time avoids costly rebuilds.
- Soil conditions: Test soil bearing capacity before pouring. Sandy or clay soils may need a gravel sub-base for proper support.
- Frost depth: In cold climates, footings must extend below the frost line to prevent heaving. Check local frost depth requirements.
- Expansion joints: For ramps longer than 15 feet, include expansion joints every 10-15 feet to prevent cracking from thermal movement.
- Drainage: Ramp surfaces should slope slightly (1-2%) sideways to prevent water pooling. For outdoor ramps, consider channel drains at the base.
- Reinforcement: Use #4 rebar on 12-inch centers for standard wheelchair ramps. For heavier loads, consult a structural engineer.
Frequently Asked Questions
References
- U.S. Access Board, "Accessibility Guidelines for Buildings and Facilities," access-board.gov/ada/guides/chapter-5-ramps/
- ADA Standards for Accessible Design, Section 405 — Ramps, ada.gov/law-and-regs/design-standards/
- International Building Code (IBC), Chapter 11 — Accessibility, iccsafe.org/
- National Ready Mixed Concrete Association, "Concrete Basics," nrmca.org/
- Concrete Construction, "Ordering Ready-Mix Concrete," concreteconstruction.net/
- U.S. Department of Justice, "Americans with Disabilities Act," ada.gov/
- California Building Code, Title 24, Part 2 — California Building Code, bsc.ca.gov/
- American Concrete Institute, "ACI 318 Building Code Requirements for Structural Concrete," concrete.org/
Disclaimer: The ramp calculator results on this page are estimates for planning purposes only. Actual material quantities may vary based on site conditions, local building codes, and construction methods. Always consult a licensed engineer or contractor and verify ADA compliance requirements for your specific project before purchasing materials or beginning construction.
Need a Ramp Built?
Get free estimates from licensed ramp contractors in your area.
Get Free Estimates