
ON THIS PAGE:
Can This Floor Be Refinished?
Refinishing removes a thin layer of wood to expose fresh material, so the whole question is how much wood is left to give. A drum sander takes roughly 1 mm per full pass with the grit sequence; a floor with 2 mm of sandable wood has almost no margin for a second refinish.
- Solid three-quarter-inch strip flooring — the oak in most pre-1980 homes — offers roughly 5 to 6 mm of sandable wood above the tongue and can take three to five full refinishings over its life.
- Engineered flooring with a 3 mm wear layer can be sanded once or twice, depending on how flat the floor is and how careful the operator is.
- Engineered flooring with a 1 to 2 mm wear layer is effectively a factory-finish product. Sanding it exposes the core, and one over-eager pass ruins the floor.
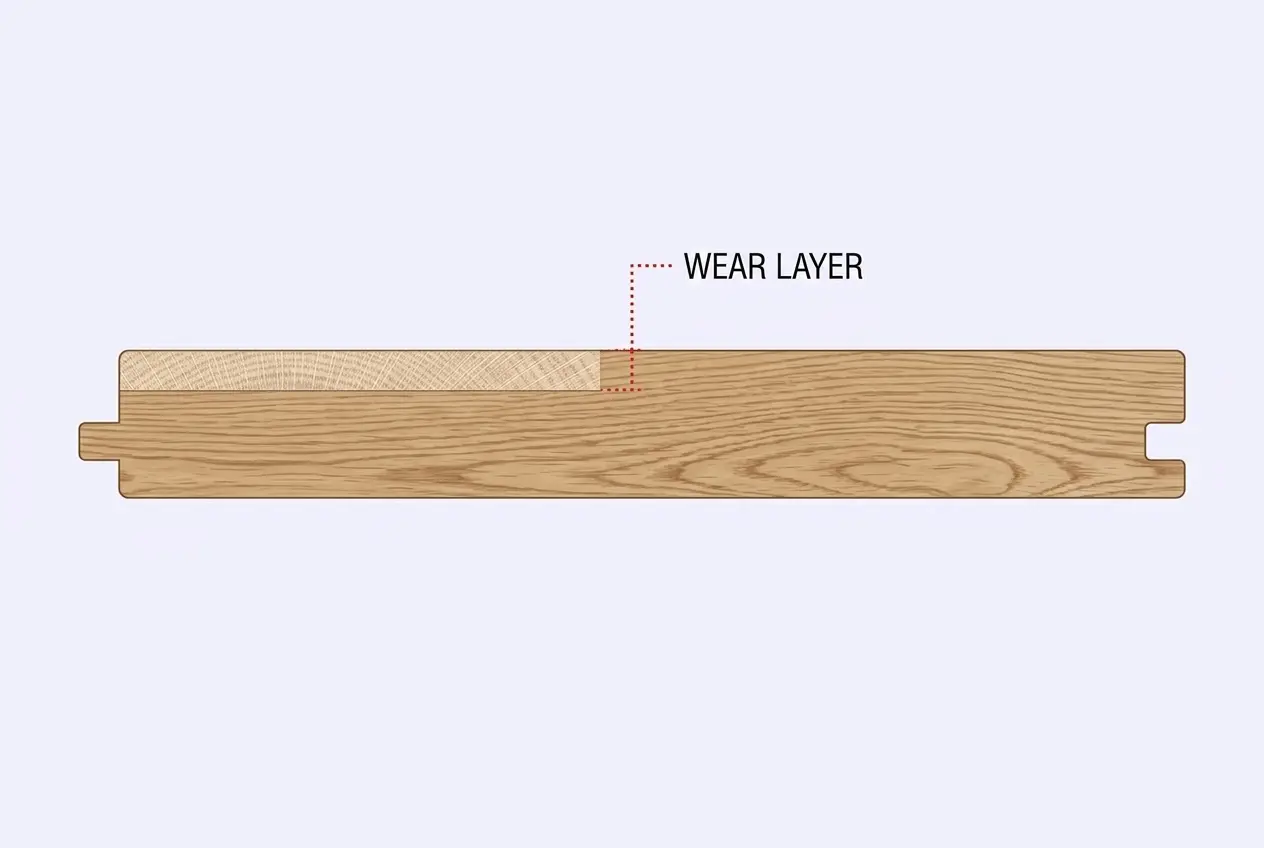
The sandable band sits above the tongue. Once sanding reaches that line, the floor is done — the tongue and groove joints become visible, edges crumble, and no finish hides it. When a floor fails the thickness check, replacement is the honest answer, and the Flooring Calculator gives you the numbers for the new floor.
Checking the Wear Layer
Measure before you book anything. The check takes five minutes and prevents the most expensive mistake in this trade.
- Find a cross-section. A floor register, a threshold, a stair nosing, or a transition strip usually exposes the edge of the boards.
- Measure the wood above the tongue. Use a tape measure for solid flooring and calipers for an engineered wear layer; a 2 mm veneer is hard to judge by eye.
- Inspect for dealbreakers. Black stains that penetrate past sanding reach, widespread cupping, boards split at the ends, or previous drum-sander gouges that already consumed the margin.
- Count past work. A floor already sanded to within a millimetre of the tongue may take one light pass, but not a full refinish.
- Check for staples and nails. Cleats set too deep, or a previous installer's staples, become sander-killing shrapnel and torn paper.

The Sanding Grit Sequence
Sanding is a progression, not an event. Each grit removes the scratches of the previous one, and each skipped step leaves marks that the finish will highlight permanently under raking light.
| Grit | Purpose | Machine | Notes |
|---|---|---|---|
| 36–40 | Cuts off old finish, flattens cupping, removes surface stains | Drum or belt sander | Slow, overlapping passes with the grain |
| 60 | Removes 40-grit scratches; blends edger marks | Drum sander plus edger | Do not skip; edger swirl shows later |
| 80 | The workhorse pass; produces a surface most oil finishes accept | Drum sander plus buffer | Most floors need this grit |
| 100–120 | Final pass before finishing; required for water-based products | Buffer with screen | Vacuum and tack between every pass |
| 150+ | Optional on some species; can burnish and reject stain | Buffer | Too fine can close the grain |
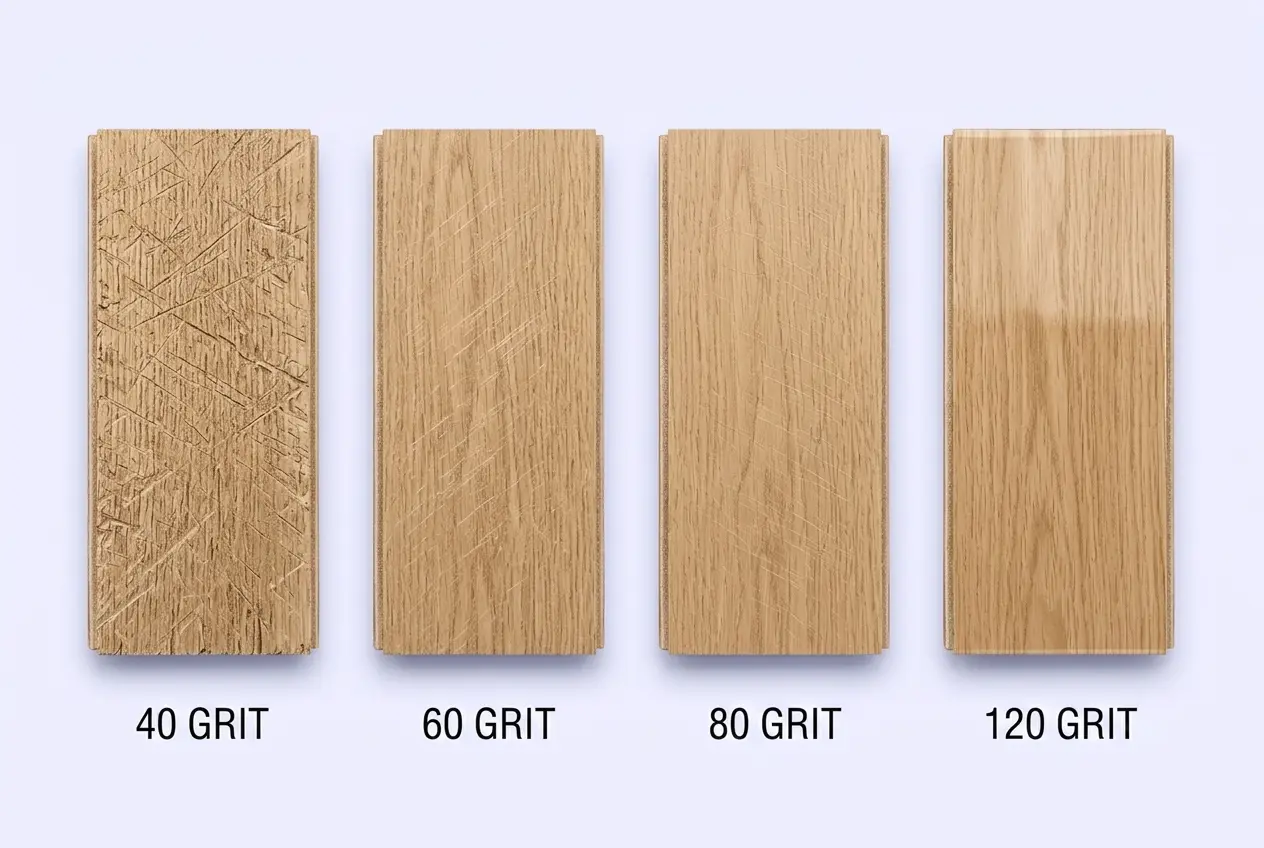
- Never skip more than one step. 40 to 60 to 80 to 100 is the standard path.
- Vacuum and tack between passes. Grit left on the floor gets driven into the wood by the next pass.
- Hand-scrape corners the machines cannot reach before the final grit, or the corners will look sanded by a different person than the field.
- Keep the machine moving. A drum sander held in one spot digs a dip that only resanding can fix.
What Sanding Cannot Fix
Refinishing is a cosmetic process with structural limits. It removes stain, finish, light scratches, and shallow dents. It does not fix these:
| Problem | Can sanding fix it? | Real solution |
|---|---|---|
| Light surface scratches | Usually yes | Refinish or recoat |
| Deep pet stains (black) | Rarely | Replace affected boards |
| Cupping from moisture | Partially — flat until the cause returns | Fix the moisture source first |
| Gaps between boards | No | Accept, or fill during humid season |
| Squeaks | No | Fasten from below or through the subfloor |
| Crowned boards | Yes, if enough thickness remains | Repeated light passes, never one deep cut |
| Board ends splitting | No | Replace the boards |
Cupping deserves its own warning. Sanding a cupped floor flat without fixing the moisture imbalance produces a floor that cups again within a season — and now with less wood to work with. Find the source: a humid crawlspace, a leaking appliance, a missing downspout, or a slab that was never tested.
Stain and Finish Choices
Stain is optional. Many of the best-looking refinished floors are natural oak with a clear finish, and skipping stain keeps future recoats simple. If you do stain, test on the floor itself — a closet or behind a door — because oak's open grain takes colour unevenly and sample chips lie under different lighting.
| Finish | Look | Dry to walk | Coats | Notes |
|---|---|---|---|---|
| Oil-based polyurethane | Warm amber, deepens with age | 24–48 hrs | 2–3 | Toughest single-coat protection; strong fumes |
| Water-based polyurethane | Clear, stays true to the wood | 6–24 hrs | 3–4 | Low odour; dries fast; pricier per gallon |
| Hardwax oil | Natural matte, in-the-grain feel | 24 hrs | 2 | Spot-repairable; needs periodic re-oiling |
| Penetrating oil sealer and wax | Classic satin | 24 hrs | 2–3 | Traditional; high maintenance; not for kitchens |
| Two-component waterborne | Clear, very durable | 4–12 hrs | 2 | Commercial-grade; short pot life |
Two coats minimum on the field, three in entries, kitchens, and anywhere a dog lives. Cut back lightly with a maroon pad or a 320 screen between coats unless the product forbids it, and vacuum every speck — the final coat is a photograph of the floor's cleanliness. Sheen matters as much as chemistry: a matte finish hides dust and scratches that a high-gloss finish reveals from across the room.
Screen and Recoat: The Light Option
When the finish is scuffed but the wood is untouched — no bare spots, no deep scratches through to wood — a full sanding is overkill. A screen-and-recoat abrades the existing finish with a buffer and a 120 to 150 grit mesh screen, then applies one fresh topcoat. It restores sheen, hides micro-scratching, and costs roughly a third of a full refinish.
- Test adhesion first. Scratch a hidden patch and try to lift the old finish with tape. If it peels, recoating will fail and sanding is the route.
- Match chemistry. An oil finish takes an oil recoat; water-based over oil needs a thorough scuff and often a bonding agent. Read the technical sheet.
- Do not recoat over bare wood. The bare patches absorb finish differently and read as dark islands in the new sheen.
- Do not recoat a waxed floor without stripping. Wax prevents adhesion, and the new coat will peel in sheets.
Recoating can be repeated every few years while the finish stays intact, which is why some floors reach 30 years without a full sanding. The moment wear reaches bare wood in traffic lanes, the maintenance strategy changes from recoating to refinishing.
Dust, Fumes, and Living Through It
A refinish is a multi-day operation in the middle of a house. The work itself is straightforward; the logistics are what surprise homeowners.
- Dust containment. Modern sanders attach to HEPA vacuums, but fine dust still travels. Seal doorways with plastic and tape, cover HVAC returns, and remove everything from the work area before sanding starts.
- Ventilation. Oil-based finishes need airflow and open windows; plan for two or three days of odour. Water-based products are far milder but still need ventilation.
- Traffic rules. Stay off the floor for at least 24 hours after the final coat; socks only for the next few days. Furniture goes back after 48 to 72 hours with water-based products, longer with oil.
- Rugs wait. Two to four weeks before area rugs go down, because a rug on an uncured finish traps solvent and can leave a permanent outline.
- Pets and children. Board them elsewhere for the sanding days. Dust and fumes are the issue, not the floor.
Cost: Refinish vs Replace
| Option | Typical cost | Years added | Best when |
|---|---|---|---|
| Screen and recoat (pro) | $1.50–$3.00 / sq ft | 3–7 | Finish is scuffed but wood is intact |
| Full refinish (pro) | $4.00–$8.00 / sq ft | 10–15 | Wear, stain, or colour change |
| DIY sanding and finish | $2.00–$4.00 / sq ft | Same as pro if the sanding is good | Experienced DIY with rental equipment |
| New prefinished hardwood installed | $12–$20 / sq ft | 30–100 | Floor too thin, damaged, or wrong species |
| Engineered hardwood installed | $8–$14 / sq ft | 20–40 | Slab or budget limits rule out solid |
Add to the refinish side: repair of a few boards at $10 to $30 each installed, stair treads at a per-step premium, furniture moving, and the cost of being out of the rooms for a week. Add to the replacement side: tear-out and disposal, which the installed vs material cost guide explains as a separate line, plus baseboard removal and refitting.
On a 1,000-square-foot floor, the arithmetic is stark: a professional refinish at $6.00 per square foot is $6,000, while new prefinished hardwood at $15.00 is $15,000 before tear-out. Refinishing wins whenever the wood allows it, and the decision is a measurement rather than a preference.
Refinishing Stairs
Stairs are priced and scheduled separately, and they are usually the most labor-intensive part of the job per square foot of floor.
- Per-step pricing. Expect $40 to $90 per tread for sanding and finishing, more if a nosing needs repair or a riser is being painted.
- Access sequencing. You cannot sand the stairs and also use them. Plan for the stair work to happen while the household is out, or arrange a temporary access route.
- Edge work by hand. Tread noses and the corners where tread meets riser rarely accept a drum sander; they are scraped and sanded by hand.
- Finish build. Stairs take more coats than field flooring because they carry concentrated traffic — typically three, with a non-slip additive if the household includes older adults.
DIY vs Professional
Renting a drum sander and doing the work yourself saves roughly half the cost. It also produces the single most common expensive mistake in flooring: a gouge from a sander paused in one spot, deep enough that the only fix is to keep sanding until the floor is flat again — sometimes past the wear layer.
| Task | DIY difficulty | What goes wrong |
|---|---|---|
| Screening and recoating | Low | Incompatible finish chemistry |
| Edging and corners | Moderate | Edger swirl marks visible under raking light |
| Drum sanding a field | High | Gouges, dips, and cut-through at the tongue |
| Applying stain evenly | Moderate to high | Lap marks and darker edges |
| Finish coats | Moderate | Dust nibs, brush marks, runs |
A middle path works well: hire out the sanding, which is where the irreversible mistakes happen, and apply the finish yourself. You keep a meaningful share of the savings and the floor gets a professional surface. Whichever route you choose, confirm the finish product's recoat window and the floor's moisture content before the first coat goes down.
Frequently Asked Questions
References
- National Wood Flooring Association, Consumer Guidelines: Sanding and Refinishing — wear-layer limits and finish selection, nwfa.org
- National Wood Flooring Association, Wood Flooring Moisture and Humidity Guidelines — equilibrium moisture content and cupping causes, nwfa.org
- U.S. Environmental Protection Agency, Indoor Air Quality: Volatile Organic Compounds — solvent exposure, ventilation, and low-VOC finishes, epa.gov
- Occupational Safety and Health Administration, Wood Dust — respiratory hazards and dust-control practice, osha.gov
- U.S. Bureau of Labor Statistics, Occupational Employment and Wage Statistics — flooring installer wages by state and metro area, bls.gov/oes
- Building Science Corporation, Moisture Control for Wood Floors — humidity, crawlspace conditions, and seasonal movement, buildingscience.com
Disclaimer: This guide explains common hardwood refinishing practice for general planning. It is not an installation specification, a finish warranty, or a safety plan. Sandable thickness, finish compatibility, and safe solvent handling vary by product and species, and refinishing can expose lead-based finishes in older homes. Follow the manufacturer's technical data sheets, confirm ventilation and respiratory protection, and have the floor assessed on site before committing to a sanding schedule.