
ON THIS PAGE:
Paver Base Depth and Materials
A patio is mostly what you cannot see: the pavers are the easy part, and every decision that keeps them flat for decades happens in the layers underneath. Paver base preparation comes down to a fixed sandwich — compacted native subgrade, geotextile fabric on soft or clay ground, 4 to 6 inches of compacted dense-graded crushed stone (crusher run or road base, compacted in 2- to 3-inch lifts), exactly 1 inch of screeded coarse concrete sand that is never compacted before the pavers go down, then the pavers, joint sand, and edge restraints spiked into the compacted base. The paver base depth per ICPI Tech Spec 2 is 4 inches for a pedestrian patio, 6 inches for a residential driveway, and 10 inches for light-vehicular surfaces, all measured after compaction — so loose stone gets spread 15 to 25 percent deeper than the finished number. What goes under pavers is never sand alone: the crushed stone base for patio work carries the load and drains, the thin sand bed only fine-levels the surface, and the two together are the system. Concrete slab base preparation uses the same subgrade and compacted stone but trades the sand bed for a 4-inch slab, landing at roughly 8 to 10 inches of total excavation. From there the arithmetic is area × depth: a 12 × 16-foot patio at 6 inches needs about 3.6 cubic yards compacted, roughly 6 to 7 tons ordered with the compaction allowance, plus a hair under a cubic yard of bedding sand.
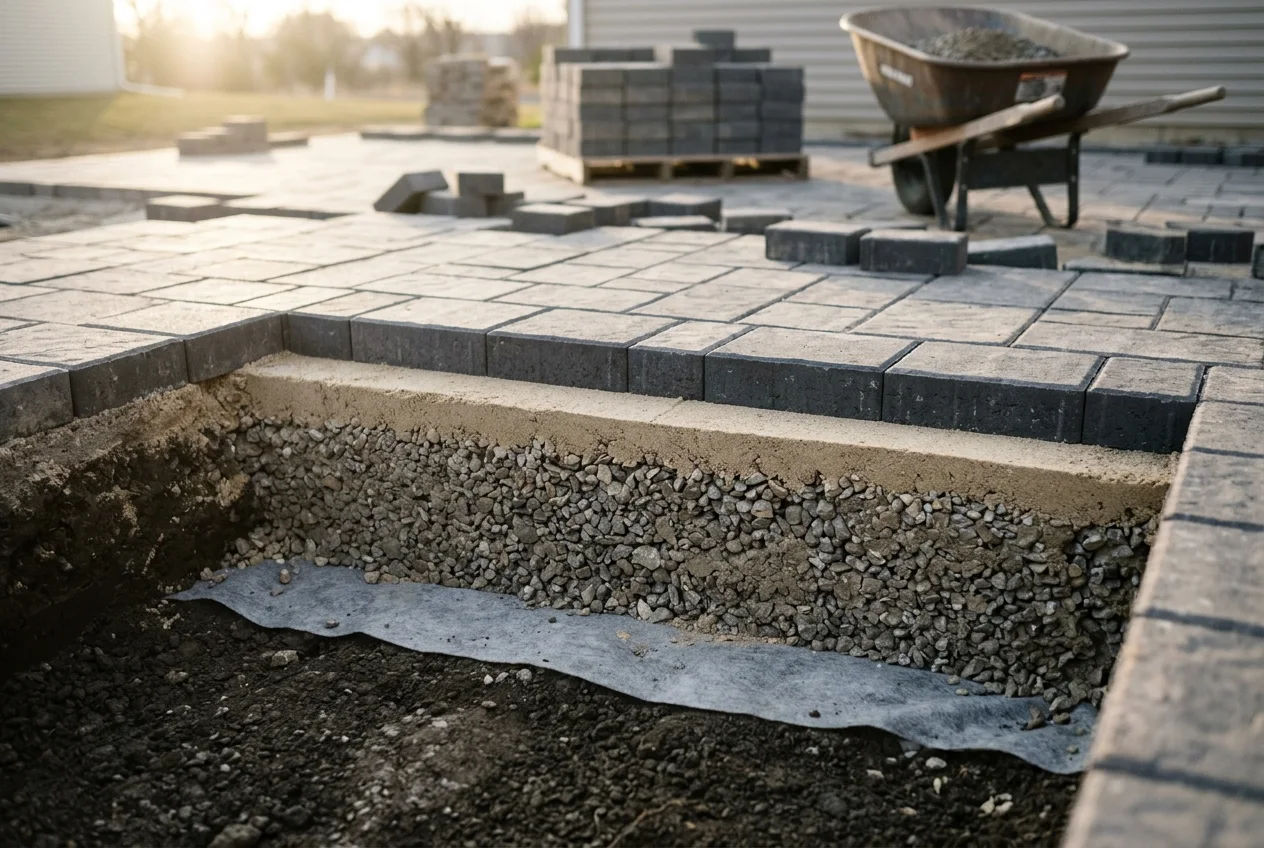
What Goes Under Pavers: The Layer Stack
Every sand-set paver system, from a garden path to a driveway apron, is built from the same ordered layers, and each one has a single job. In paver base preparation, reading the stack from the bottom up is the fastest way to understand paver base layers — skip or reorder any layer and the system above it pays for the mistake. The table below is the complete cross-section.
| Layer | Material | Typical Depth | Job It Does |
|---|---|---|---|
| Subgrade | Native soil, stripped of organics and compacted | — | Bears everything above it; must be firm, clean of roots and topsoil, and sloped to drain. |
| Separator (optional) | Non-woven geotextile fabric | — | Keeps clay from pumping up into the stone and keeps the stone from sinking into soft soil. |
| Aggregate base | Compacted dense-graded crushed stone (crusher run, road base, 3/4-inch minus) | 4–6 in patio · 6–12 in driveway | Structural layer: spreads load, drains water, resists settlement and frost movement. |
| Bedding course | Coarse concrete sand (ASTM C33) or fine chip stone | 1 in, screeded, uncompacted | Levels the surface so each paver can be seated; never used to correct a bad base. |
| Pavers | Concrete units, brick, or natural stone | Per product (often 2⅜ in residential) | The walking surface; transfers load down through the bed into the base. |
| Joint fill | Polymeric sand or washed joint sand | Filled to just below the chamfer | Locks the field together, limits washout, resists weeds and ants. |
| Edge restraint | Plastic or aluminum edging, 10-inch spikes | Anchored into the compacted base | Stops the whole paver field from creeping outward under foot traffic and freeze-thaw. |
Three misunderstandings account for most failed patios, and all three are layer confusions. The first is treating bedding sand as a base: a thick sand layer under the pavers has no structural matrix, so it ruts and pumps, and the surface ripples within a year — the 1-inch bedding layer stays 1 inch whether the base dipped or not, because the base is what gets re-leveled, not the sand. The second is treating polymeric sand as bedding: polymeric sand hardens when wetted and belongs in the joints on top, not under the pavers, where it would set into a rigid, non-draining slab that traps water. The third is skipping the compacted stone entirely and laying pavers on sand or soil — the definition of a patio that moves with the first wet winter. What goes under pavers is a layered system; each paver base layer exists because the others cannot do its job.

One more structural note sits inside the stack: the compacted base should extend about 6 inches past the paver edge on every side. The outermost pavers have support on only one side, so the extra width carries the edge-restraint spikes into compacted aggregate instead of native soil and stops the perimeter — where failure always starts — from working outward. On a small patio that 6-inch perimeter is a real percentage of the material bill, which is why the worked example below adds it before computing tonnage.
Paver Base Depth by Application
Paver base depth is set by what the surface will carry, not by habit. ICPI Tech Spec 2 publishes minimum compacted aggregate base depths for sand-set segmental pavement, and the same numbers recur across manufacturer and installer guidance: 4 inches for pedestrian patios and walkways, 6 inches for residential driveways, 10 inches for light-vehicular parking and alleys — all assuming reasonably firm, well-draining native soil. The bedding sand on top is a fixed 1 inch in every case; only the stone depth changes with the load.
| Application | Compacted Base Depth | Bedding Sand | Typical Total Excavation |
|---|---|---|---|
| Garden path / stepping area | 3–4 in | 1 in | Base + 1 in + paver thickness |
| Patio / walkway (pedestrian) | 4–6 in | 1 in | About 7–9 in below finished grade for a 2⅜-inch paver |
| Residential driveway | 6–8 in (10 in per ICPI for light vehicular) | 1 in | About 9–13 in below finished grade |
| Clay, wet, or freeze-thaw subgrade | Add 2 in or double the pedestrian minimum | 1 in | Deeper dig plus geotextile fabric |
| Hot tub or heavy structure pad | 6–8 in, often over a lean-concrete or thickened section | 1 in | Engineered per load |
The depth number is measured after compaction — that distinction is the whole reason paver base preparation differs from a pile of gravel. Loose crushed stone loses roughly 15 to 25 percent of its volume when a plate compactor drives the air out and locks the fines between the angular pieces. To finish at 4 inches compacted, you spread closer to 5 inches loose; to finish at 6 inches, you order as if you were building 7 to 7½. Suppliers quote loose cubic yards, so the conversion runs one way: compacted volume × about 1.25 = order volume. Skipping that factor is how a patio runs out of stone two lifts from the top.
Depth also has a climate and soil modifier layered on top of the application minimum. Cold regions with deep frost push pedestrian patios toward the 6-inch end (or deeper, following local frost depth) because a thicker drained base gives freeze-thaw water somewhere to go instead of heaving the pavers. Clay and other fine-grained, slow-draining subgrades call for the same increase plus geotextile: more base cannot fix a swampy site, but a firmer, deeper granular section over separated clay outlasts a thin one. Sandy, free-draining subgrade can stay at the 4-inch pedestrian minimum. The application number is the floor, not the ceiling — read the soil, then decide how far above the floor to build.
Subgrade Preparation
Before a single stone arrives, the ground itself has to be ready — the patio subbase is only as good as the soil underneath it, and no amount of compacted aggregate will permanently fix soft, organic, or saturated subgrade. Paver base preparation starts here, in four steps done in order, and the order matters.
Strip the organics. Excavate to the full planned depth (base + 1 inch sand + paver thickness, plus room for the base to overhang the edge) and remove every root, stump, strip of sod, and pocket of topsoil. Organic material decomposes, leaving voids that settle long after the patio is finished — this is the single most common cause of a dip that appears two winters later. If the dig turns up buried debris or fill of unknown quality, take it out; compacted native mineral soil is the only reliable starting point.
Find and fix the soft spots. Walk the excavation pressing your heel in a grid: any spot that gives more than about half an inch is too soft to build on. Dig those spots out another 2 to 4 inches and backfill with compactable crushed stone, not the spoil you just removed. On large or marginal sites, contractors proof-roll the subgrade with loaded equipment or check density against a Proctor target (95 percent of maximum dry density is the usual residential benchmark) — for a DIY patio, the heel test plus a firm, spring-free surface underfoot is the practical equivalent.
Compact the native soil. Run a plate compactor (or a jumping jack on heavy clay) over the entire exposed subgrade before any base stone goes down. Slightly damp soil compacts best — squeezed in the hand it should hold together without feeling muddy. This step is frequently skipped, and it is the step that shows up later as settlement: the compacted crushed stone above can only be as stable as the layer it sits on.
Grade and slope for drainage. Shape the bottom of the excavation to the drainage slope — about 1/8 to 1/4 inch per foot (1 to 2 percent) running away from the house and any structures. Build the fall into the subgrade and carry it up through the base; do not try to create it by varying the sand thickness across the patio, because an uneven sand bed behaves differently under compaction than a uniform one. A base that mirrors the finished slope sheds water instead of pooling it, and a saturated base is the ingredient that heaves in the first freeze.
Compacting the Crushed Stone Base
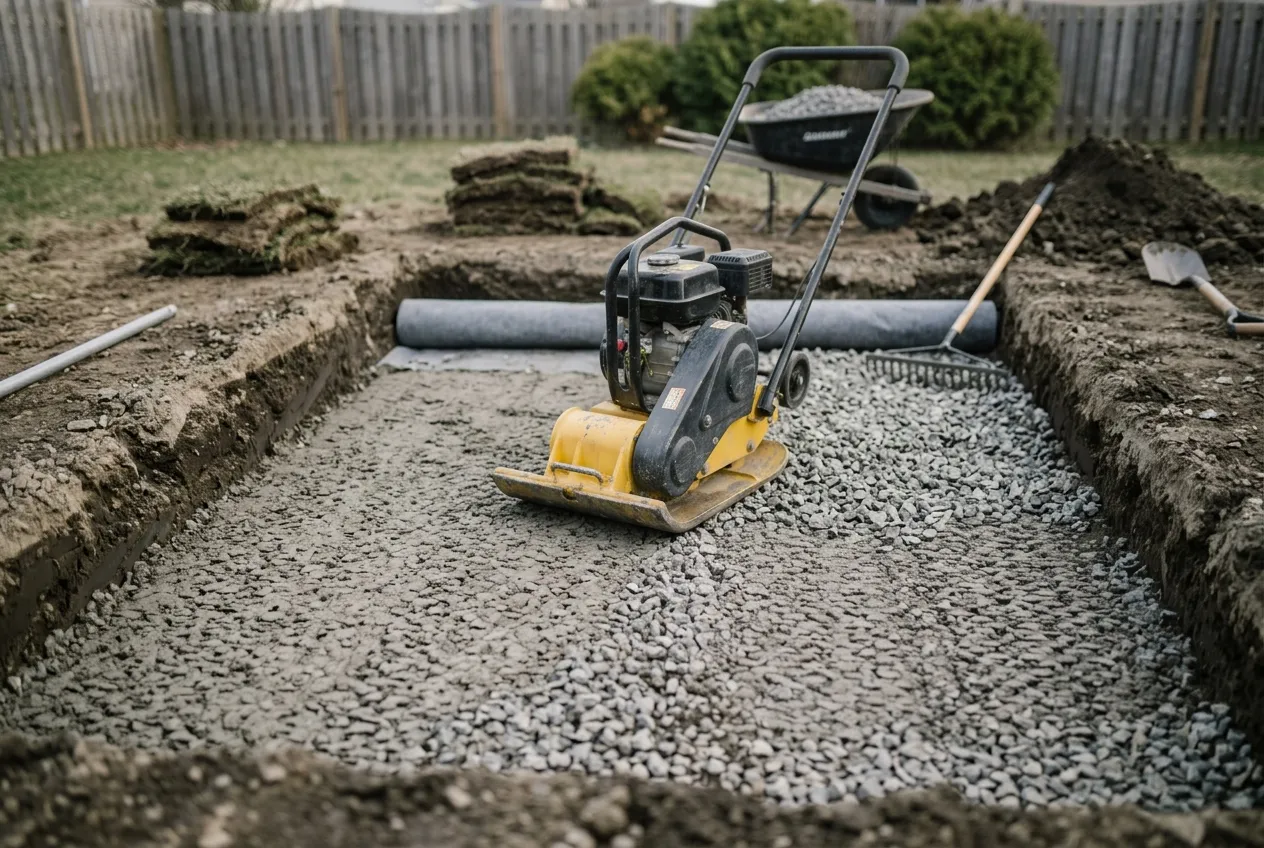
Compaction is where paver base preparation separates a patio that lasts decades from one that settles unevenly, and the governing rule is simple: never place the full base depth and compact it once. A residential plate compactor densifies granular material only about 3 to 4 inches deep; below that, the machine packs a firm crust over a loose bottom that consolidates later — under the load, after the pavers are in — producing the classic sunken, bouncy patio. The fix is lifts: place and compact the crushed stone base in 2- to 4-inch layers until the compacted depth is reached, a 6-inch base taking two or three lifts.
The lift sequence, repeated for each layer: spread loose stone to roughly 1.3 times the target lift thickness, rake to roughly grade, mist with water if the stone is bone dry (a little moisture helps the fines bind instead of bouncing), then run the plate compactor in overlapping passes — each pass overlapping the last by about half a plate width — first one direction, then a perpendicular set. Four to six passes per lift is the working standard; after about six or seven passes, extra rolling adds little and can start breaking down the stone. The end-of-lift cues are physical: the compactor stops sinking in and rides smoothly across the surface, footprints sink less than about 1/8 inch, and the sound shifts from a dull thud toward a higher pitch. Check slope and flatness with a straightedge after each lift while corrections are still cheap.
Density language gives the same instruction in engineering terms: the target for a structural paver base is 95 to 98 percent of maximum dry density, verified on critical work with a nuclear gauge, sand cone, or plate-bearing test. In the field you do not need the gauge to know the difference — a base compacted in proper lifts feels like a thin slab underfoot, with no spring and no visible movement when you walk it; a single-lift base feels spongy in the middle of the field even when the surface looks finished. After the final lift, screed a thin blinding of finer material if needed to close the surface, confirm the slope one last time, and only then move to the bedding course. The sand goes on a base that is already flat, sloped, and firm — not one that will settle into shape underneath it.
Bedding Sand for Pavers
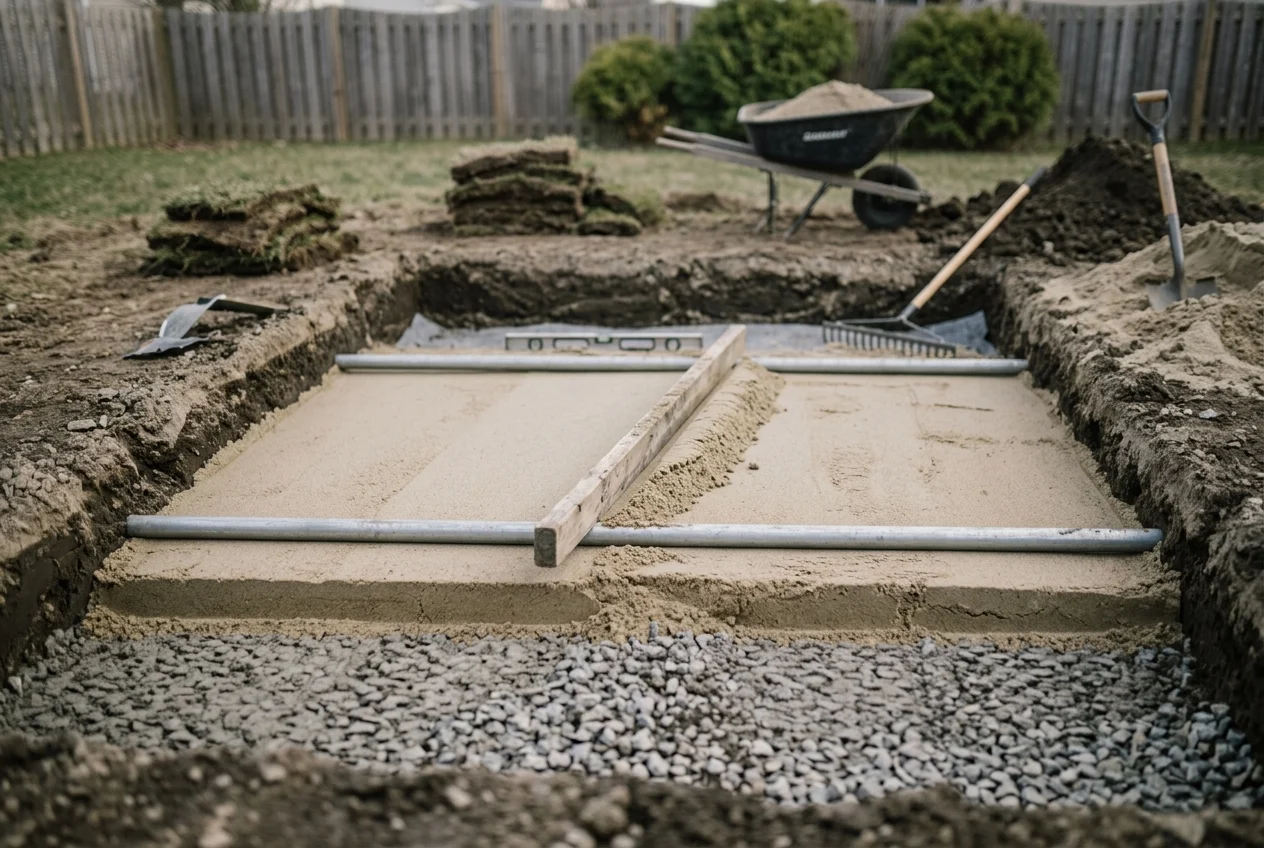
Bedding sand for pavers is a precision layer with a strict depth: 1 inch, coarse, angular, and screeded flat — no more, no less. In the paver base preparation sequence it arrives last, right before the pavers: its only job is to give each paver a uniform seat so minor irregularities in the base surface do not telegraph through to the walking surface. It is not a base, not a drainage layer, and not a cure for a wavy compacted stone course. Industry guidance (ICPI Tech Spec 2) specifies ASTM C33 concrete sand — coarse, washed, and angular — because the grains lock under load; mason sand, play sand, and stone dust are rounded or too fine, hold water, and let pavers settle unevenly over time.
The installation sequence protects the screed. Set screed rails (1-inch steel pipes or straight boards) on the compacted base at the finished sand elevation, shovel sand between them, and pull a straight board along the rails in a sawing motion to strike the bed level. Lift the rails out and fill the grooves they leave. Then stop walking on it: lay pavers directly onto the undisturbed screeded sand, working from a fixed edge and tapping each unit level with a rubber mallet or a paver settler. Two related rules close the loop — do not pre-compact the bedding sand before the pavers go down (compaction happens after laying, over the finished surface, with a pad-protected plate compactor that seats the pavers into the sand and vibrates joint sand into the gaps), and never thicken the sand to fix a low spot in the base; correct and re-compact the base instead. A sand bed pushed to 2 or 3 inches becomes the failure point it was meant to prevent.
A related material sometimes takes the same 1-inch role: fine open-graded chip stone (ASTM No. 8, sometimes called HPB or setting-bed stone) is an accepted alternative to concrete sand in many regions, especially where clean chip is easier to source than clean sand, and it is the specified bedding for permeable paver systems — where no sand appears anywhere in the section because sand would clog the infiltration path. The patio subbase itself stays granular and free-draining in that design. For a standard residential patio, concrete sand is the default; whatever bedding material is chosen stays at 1 inch, stays uncompacted until the pavers are down, and stays out of the structural-base role below it.
Paver Base Materials Compared
Paver base materials sort into two families — dense-graded aggregates that compact into a rigid mat, and open-graded or rounded stones that do not — and only the first family belongs under a sand-set patio. The confusion starts at the yard, where the same dense-graded product carries a different name in almost every region. The table below matches the material to the job and lists what to ask for.
| Material | What It Is | Compaction | Patio Base Verdict |
|---|---|---|---|
| Crusher run / DGA / road base / 3/4-inch minus | Angular crushed stone ¾ inch down to dust, with 5–15 percent fines; regional names include ABC stone, quarry process, Class 2 base, 2A modified, 21A, CR-6. | Excellent — fines fill voids and lock into a near-rigid slab. | Yes — the default choice for pedestrian and vehicular paver bases alike. |
| Recycled concrete aggregate (RCA) | Crushed concrete graded like crusher run; slightly lower density per yard. | Very good, comparable to virgin DGA when graded properly. | Yes — budget-friendly equivalent for residential base. |
| Clean #57 stone (¾-inch washed) | Single-size angular stone, no fines; excellent drainage, no interlock. | Poor — stays loose without fines. | No for standard base — it belongs in drainage layers and permeable systems as the choker course. |
| Pea gravel / river rock | Rounded, naturally eroded stones; rolls like ball bearings under load. | None — cannot lock together. | Never as a structural base; decorative use only. |
| Crusher dust / stone dust / screenings | Fine crushed material, all passing about ¼ inch. | Compacts smooth but drains poorly. | Leveling top-coat over a structural base, or bedding under natural flagstone — not the structural layer itself. |
| Bedding sand (ASTM C33 concrete sand) | Coarse, angular, washed sand. | Not compacted before laying. | Yes — the 1-inch setting bed only, never the base. |
Density and ordering follow from the material choice. Dense-graded crushed stone weighs roughly 1.3 to 1.5 tons per loose cubic yard depending on rock type and moisture — crushed limestone near 1.35, crushed granite near 1.40, bank-run around 1.25 — and the published compaction allowance for loose-to-compacted conversion sits between 15 and 25 percent, with 1.25× the standard planning factor. That range matters: the same patio can swing a quarter of a tonnage figure depending on which density and allowance the takeoff used, so confirm both with the supplier before ordering. The Gravel Calculator converts area and depth to cubic yards and tons against these densities, and the worked example below runs the full arithmetic for a 12 × 16-foot patio.
For permeable interlocking concrete pavement (PICP), the entire material list changes: no sand appears anywhere in the system. Three progressively finer open-graded stone layers — a No. 2 or No. 3 subbase (8 inches pedestrian, 12 inches or more vehicular), a 4-inch No. 57 choker base, and a 2-inch No. 8 bedding course — let stormwater pass through the surface to the subgrade. Dense-graded crusher run and open-graded PICP stone are not interchangeable in either direction; mixing a dense layer into a permeable section traps water and defeats the design. Standard sand-set paver base preparation and PICP are two complete systems, not variations on a theme.
Common Patio Base Preparation Mistakes
Most patio base failures are repeats of a short list of paver base preparation errors, and every one of them is avoidable at the base-prep stage for the cost of a few extra hours. Leaving organics in the dig tops the list: roots and topsoil decompose, the voids settle, and the surface dips two winters later where the stump used to be — strip everything down to firm mineral soil. Skipping the plate compactor on the subgrade leaves the native ground as the settling layer, no matter how well the stone above it was placed. Placing the full base depth in one lift produces a compacted crust over a loose bottom that consolidates under load; place and compact in 2- to 4-inch lifts, each one overlapped by half a plate width. Forgetting the compaction allowance when ordering — loose stone loses 15 to 25 percent of volume to the compactor, so a 4-inch compacted base needs closer to 5 inches of loose material spread. Using the wrong stone is the material version of the same mistake: pea gravel, river rock, and clean #57 stone do not lock together and have no place under a sand-set patio. Thickening the bedding sand to correct a wavy base turns the one layer that must stay thin into the failure point; fix and re-compact the base instead. Compacting the bedding sand before laying freezes screeding irregularities in place instead of letting the pavers tap level into a loose bed. Ignoring slope and edge restraint finishes the list: flat surfaces pond water, and unrestrained perimeters walk outward, opening joints across the entire field. Read through the section order above — strip, test, compact, fabric, stone in lifts, screed sand at 1 inch, lay, joint, restrain, and verify the fall away from the house at every step — and none of these failures get the chance to start.
Slope, Edge Restraint, and Geotextile
Three details sit around the main layer stack, and each one decides a different failure mode. Slope handles water: the finished patio (and every layer beneath it) falls away from the house at about 1/8 to 1/4 inch per foot — 1 to 2 percent — which on a 12-foot run is a 1.5- to 3-inch drop from the house edge to the outer edge. Water that cannot leave the surface finds the joints, washes out joint sand, and sits in the base where freeze-thaw turns it into heave. Set the fall in the subgrade and mirror it through every lift.
Edge restraints handle spread: without them, foot traffic and freeze-thaw walk the perimeter pavers outward and open the joints across the whole field. Plastic or aluminum edging, staked with 10-inch spikes roughly every 12 inches, anchors the perimeter — and the spikes have to bite into compacted aggregate, which is why the base extends about 6 inches past the paver edge on every side. On driveways and heavy edges, poured concrete curbs take the same role with more mass. Check the restraints after the first winter and top off joint sand as it settles; polymeric joint sand resists washout and weeds far better than plain sand on a residential patio, at a modest cost premium.
Geotextile fabric handles migration: on clay, silt, soft, or wet subgrades, a layer of non-woven separation fabric between the compacted subgrade and the first stone lift keeps the two from mixing — clay pumping up into the stone destroys the base's load-bearing structure within a few freeze-thaw cycles, and stone punching down into soft soil loses thickness from below. The fabric is not needed on firm, granular, free-draining subgrade, but it is cheap insurance anywhere the subgrade stays damp. Lay it clean, without wrinkles, extending across the full excavation before the first lift goes down.
Concrete Slab Base Preparation
A poured concrete patio rides on the same subgrade discipline as a paver patio — strip organics, fix soft spots, compact native soil, hold the slope — but the structural section above the subgrade is different, and the total excavation changes with it. Concrete slab base preparation replaces the 1-inch sand bed with a thicker compacted aggregate base and the pavers themselves with forms and a reinforced slab.
| Component | Paver Patio | Concrete Patio Slab |
|---|---|---|
| Compacted aggregate base | 4–6 in | 4–6 in (same crusher run / road base) |
| Bedding or leveling course | 1 in concrete sand, screeded | Optional 1–2 in sand leveling over base, or base struck off directly |
| Surface | 2⅜-in pavers + joint sand | 4-in slab typical (5–6 in for driveways) |
| Total excavation | Base + 1 in + paver ≈ 7–9 in | Base + slab ≈ 8–10 in typical |
| Vapor barrier | Not used | Optional 6- or 10-mil poly for enclosed floors; usually omitted on open exterior patios with good drainage |
| Edge treatment | Spike-in restraint into base | Forms (2× boards + stakes), removed after cure |
The slab-side sequence adds three things the paver side does not. First, forms set the final shape and elevation: batter boards and mason's line establish the perimeter, corners get squared with the 3-4-5 method, and the line level sets the slope before digging. Second, reinforcement controls cracking — light wire mesh or fiber-reinforced mix is common on residential patios, with rebar grids reserved for heavier or expansive-soil conditions. Third, the base surface becomes the slab's underside: a deep low spot under the forms eats extra concrete and creates a thin, weak slab, while a high spot thins the section below grade — so the final lift is checked flat with a straightedge at multiple points and spot-checked for depth before the pour. Keep the same lift discipline on the slab base as on a paver base; the weight above it is greater, not less.
Local codes layer onto both branches: some jurisdictions require a minimum compacted base thickness regardless of patio size, mandate documented compaction or vapor barriers for enclosed slabs, and set setback and drainage rules that affect where the patio can sit at all. Call 811 for utility locates before any excavation on either type of patio, and check permit thresholds — many towns require a permit above a modest square footage even for a simple paver or concrete patio.
Worked Example: How Much Gravel for a Patio, 12 × 16 Feet
Put every number above into one job: a rectangular paver patio, 12 × 16 feet (192 square feet), pedestrian use, firm subgrade, 6 inches of compacted crusher-run base with a 1-inch concrete sand bed, 2⅜-inch pavers, and the standard 6-inch base overhang on every side. Here is the complete base takeoff in the order a materials list gets built.
Step 1 — Excavation Depth
Excavation = compacted base + 1 inch bedding sand + paver thickness
= 6 + 1 + 2.375 = 9.375 inches below finished paver surface.
Subtract anything the pavers should stand proud of grade (say ½ inch above the lawn) → dig about 8⅞ inches below existing grade, then strip organics and compact the subgrade within that depth.
Step 2 — Base Footprint With Edge Overhang
Paver field: 12 × 16 ft. Add 6 inches of base beyond the pavers on every side:
Length: 16 + 0.5 + 0.5 = 17 ft · Width: 12 + 0.5 + 0.5 = 13 ft
Base area = 17 × 13 = 221 sq ft.
Step 3 — Compacted Base Volume
Volume = area × depth = 221 × (6 ÷ 12) = 110.5 cu ft ÷ 27 = 4.09 cu yd compacted.
Step 4 — Order Volume and Tons (Compaction Allowance)
Loose order volume = compacted × 1.25 = 4.09 × 1.25 = 5.12 cu yd to order.
Tons (crusher run ≈ 1.40 tons/cu yd loose):
Compacted tons = 4.09 × 1.40 ≈ 5.7 tons · Order tons = 5.12 × 1.40 ≈ 7.2 tons.
Round up to the next half-ton at the yard: budget about 7½ tons of crushed stone base for patio work of this size.
Step 5 — Bedding Sand
Sand area = paver field only (sand does not extend under the overhang): 12 × 16 = 192 sq ft.
Volume = 192 × (1 ÷ 12) = 16 cu ft ÷ 27 = 0.59 cu yd — order about 0.6 to 0.7 cu yd of concrete sand (roughly 1 ton at 1.35 tons/cu yd).
Step 6 — The Base Materials List
Excavation: 13 × 17 ft footprint × ~9 in deep, organics stripped, subgrade compacted and sloped ⅛–¼ in/ft away from the house · Geotextile: optional on firm subgrade, non-woven fabric across the full excavation on clay · Crusher run: 5.12 cu yd (~7½ tons) placed in two 3-inch loose lifts, each compacted with overlapping plate passes, slope checked per lift · Concrete sand: 0.6 cu yd (ASTM C33), screeded 1 inch on rails, never compacted before laying · Pavers: 192 sq ft plus 10 percent cuts and breakage · Joint sand: polymeric, one bag per 25–30 sq ft → about 7–8 bags · Edge restraint: perimeter = 2 × (12 + 16) = 56 ft of edging + spikes every 12 in → about 56 spikes. That is the paver base preparation takeoff; run your own dimensions through the Gravel Calculator and Paver Calculator for the same arithmetic on any patio size.
Frequently Asked Questions
A residential patio needs 4 to 6 inches of compacted aggregate base plus exactly 1 inch of bedding sand. Industry guidance from ICPI Tech Spec 2 sets the minimum compacted base for a pedestrian patio at 4 inches, a residential driveway at 6 inches, and light-vehicular surfaces at 10 inches, all over reasonably firm subgrade. Build deeper — toward 6 inches or beyond — when the subgrade is clay, the site holds water, or the climate runs through hard freeze-thaw cycles. The paver base depth is measured after compaction, so the loose stone you spread has to run deeper than the finished number by the material's compaction loss, roughly 15 to 25 percent.
What goes under pavers, from the bottom up, is compacted native subgrade, optional geotextile fabric on soft or clay ground, 4 to 6 inches of compacted dense-graded crushed stone (crusher run, road base, 3/4-inch minus), exactly 1 inch of screeded coarse concrete sand (ASTM C33), and then the pavers themselves. Polymeric or joint sand sweeps into the gaps on top after the pavers are laid, and edge restraints spike into the compacted base around the perimeter. Each layer does a different job: the stone carries load and drains, the thin sand bed seats the pavers, and the joint sand locks the field together.
The best material for a patio base is dense-graded crushed stone with fines — sold as crusher run, road base, dense-graded aggregate (DGA), ABC stone, 3/4-inch minus, quarry process, Class 2 base, or 2A modified depending on the region. Angular crushed rock with fines locks together under a plate compactor into a near-rigid mat that spreads load and resists settlement. Do not use pea gravel, river rock, or clean washed #57 stone as the structural base: rounded or single-size clean stone has no fines to bind it, rolls under load, and leaves the pavers sitting on a shifting layer. Clean stone belongs in drainage and permeable systems, not under a sand-set patio.
No. Pavers set directly on a thick sand bed with no compacted aggregate base will rut, sink, and shift within a season or two, because sand is not structural — it has no load-bearing matrix and no drainage path. A paver system needs both layers: the compacted crushed stone base carries the load and drains water, and the 1-inch screeded bedding sand only fine-levels the surface so each paver can be seated. Sand alone might survive briefly under a lightweight stepping stone, but any patio, walkway, or driveway needs the gravel base underneath.
How much gravel for a patio comes from area × depth: a 12 × 16-foot patio (192 square feet) at 6 inches of compacted base is 192 × 0.5 ÷ 27 = 3.56 cubic yards of compacted volume; at a typical crusher-run density near 1.4 tons per cubic yard that is about 5 tons compacted, and ordering roughly 15 to 25 percent more — about 6 to 7 tons — covers the compaction loss. Extend the base 6 inches past the paver edge on every side, which lifts a 12 × 16 field to a 13 × 17 footprint. Bedding sand is separate and thin: 1 inch over the same area is only about 0.6 cubic yards.
No — never compact the bedding sand before the pavers go down. The 1-inch sand layer is screeded flat with pipes or rails and a straight board, then left loose so the pavers can be tapped into it to level each unit. Compaction happens after the pavers are placed, when a plate compactor run over the finished surface (with a protective pad) seats the pavers into the sand and the joint sand vibrates down into the gaps. Pre-compacting the bedding sand freezes an uneven surface in place and is one of the classic paver base preparation mistakes.
Base gravel is the structural layer — several inches of compacted crushed stone that spreads load, drains water, and resists settlement and frost movement. Bedding sand is a thin, 1-inch leveling course of coarse ASTM C33 concrete sand screeded on top of the compacted base; it creates an even seat for the pavers and is never compacted before laying. They are not interchangeable: swap them and the system fails — sand cannot replace the structural base, and thick gravel cannot fine-level pavers. Joint sand (often polymeric) is a third product that goes into the gaps between pavers after installation, not under them.
Concrete slab base preparation follows the same subgrade rules as a paver patio but swaps the sand bed for a thicker structural section. Excavate to remove sod and organic material, compact the native subgrade, then place 4 to 6 inches of compacted crushed stone (road base or 3/4-inch minus) in 2- to 3-inch lifts. A standard residential concrete patio slab is 4 inches thick, so a 4-inch compacted base plus a 4-inch slab means roughly 8 to 10 inches of total excavation. Slope the subgrade and base about 1/8 inch per foot away from the house; a 6- or 10-mil vapor barrier is optional for uncovered exterior slabs and required for most enclosed floors. Forms set the final slab thickness and surface elevation after the base is compacted and checked.
References
- Interlocking Concrete Pavement Institute (ICPI), Tech Spec 2 — Materials Specifications for Installation of Unit Paver Base Depths and Bedding Course — icpi.org — minimum compacted aggregate base depth by application (pedestrian, residential driveway, light vehicular) and 1-inch bedding sand specification.
- Interlocking Concrete Pavement Institute (ICPI), Tech Spec 18 — Permeable Interlocking Concrete Pavement — icpi.org — open-graded PICP layer structure (No. 2/No. 57/No. 8 stone) and infiltration requirements.
- Concrete Materials and Applications, ASTM C33 — Standard Specification for Concrete Aggregates — coarse concrete sand gradation used for paver bedding courses.
- American Society for Testing and Materials, ASTM D698 / D1557 — Proctor compaction test methods — maximum dry density basis for the 95–98 percent compaction target on structural aggregate base.
- Brick Industry Association (BIA) and International Residential Code (IRC) drainage provisions — minimum 1 percent (1/8-inch-per-foot) positive drainage slope away from structures on hardscape surfaces.
- Interlocking Concrete Pavement Institute (ICPI), Tech Spec 1 — Edge Restraints for Interlocking Concrete Pavements — icpi.org — restraint types, embedment, and the function of the edge that keeps a compacted base and bedding course from spreading.
Disclaimer: This guide summarizes residential patio paver base preparation conventions — layer stack, compacted base depth ranges, bedding sand practice, aggregate material selection, compaction lifts, slope, and gravel quantity arithmetic — for general educational purposes. It is not an engineering design, a geotechnical evaluation, or a permit determination for any specific patio or slab. Soil conditions, frost depth, local amendments, and manufacturer installation requirements vary; verify base depth, subgrade capacity, drainage, and materials with your local building department and the paver manufacturer's installation guide before building.